 World of Warcraft Guides, Lore, Addons & News – Noob to Boss From Azeroth's Newbie to Champion – World of Warcraft Guides
Holy Paladins serve as the backbone of raid healing in WoW Classic Era, combining unparalleled single-target healing throughput with exceptional mana efficiency. Their signature talent Illumination refunds the full mana cost of critical heals, allowing Holy Paladins to sustain healing output throughout even the longest encounters. Add plate armor for survivability, powerful emergency cooldowns, and essential raid utility through Blessings and Auras, and you have one of the most valuable raid members in Classic WoW.
This comprehensive WoW Classic Holy Paladin PvE Guide covers everything you need to excel as a Holy Paladin healer in dungeons and raids throughout all phases of WoW Classic.
Holy Paladin Strengths in PvE
✅ Exceptional Tank Healing – Holy Light delivers massive single-target healing perfect for keeping tanks alive
✅ Best Mana Efficiency – Illumination combined with high critical strike creates sustainable healing throughout long encounters
✅ Plate Armor Durability – Superior survivability allows aggressive positioning without death risk
✅ Emergency Cooldowns – Lay on Hands and Divine Intervention prevent wipes
✅ Essential Raid Buffs – Greater Blessings and Auras provide massive value to entire raid composition
✅ Instant Cast Heals – Flash of Light handles emergency tank damage spikes
✅ Cleanse Utility – Cleanse removes dangerous poisons and diseases throughout encounters
Holy Paladin Weaknesses in PvE
❌ No Area Healing – Cannot efficiently heal raid-wide damage affecting multiple targets
❌ Stationary Caster – Long cast times limit mobility during encounter mechanics
❌ Silence Vulnerability – Spell interrupts completely prevent healing until effect expires
❌ Gear Dependent – Requires substantial critical strike chance for Illumination to maximize efficiency
❌ No Combat Resurrection – Redemption only functions outside combat
Talent Builds and Spec Choices
Standard Raid Healing Build
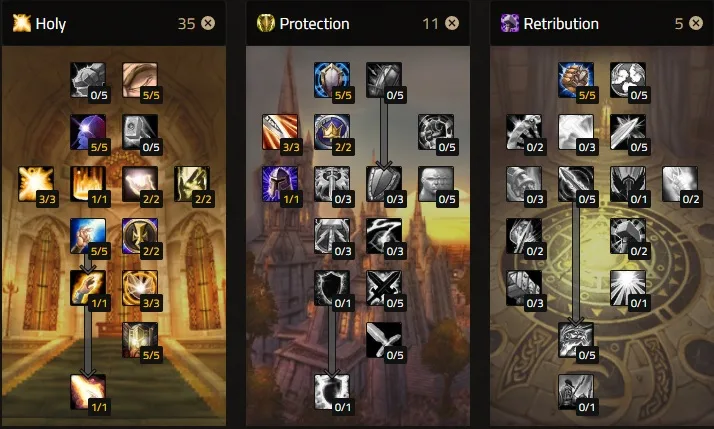
This build prioritizes healing output, mana efficiency, and raid utility. The Protection tree investment provides Blessing of Kings (absolutely essential for raids) plus defensive utilities that improve survivability.
Dungeon Healing Considerations
The same 31/20/0 raid build works excellently for dungeon healing. You don’t need separate dungeon-specific talents since the core healing mechanics remain identical. The increased survivability from Protection talents actually proves more valuable in dungeons where mistakes occur more frequently than coordinated raids.
Stat Priority and Gearing Strategy
Understanding stat priorities guides all gearing decisions from Pre-Raid BiS through Naxxramas:
Stat Priority Rankings
1. +Healing Power – Your absolute highest priority stat. Every point of +healing increases Holy Light and Flash of Light effectiveness. Pursue +healing aggressively on every gear piece, enchant, and consumable. At Phase 1 Pre-Raid BiS, aim for 400-500 +healing. By Phase 6 with Naxxramas gear, Holy Paladins can reach 1000+ healing power.
2. Intellect – Directly increases your maximum mana pool at a 1:15 ratio (1 Intellect = 15 mana). Larger mana pools enable more total healing before requiring mana potions. Intellect also provides small amount of spell critical strike (approximately 60 Intellect = 1% critical strike). Stack Intellect after +healing on most gear pieces.
3. Spell Critical Strike – Critical heals trigger Illumination to refund mana, dramatically improving efficiency. Target approximately 30% critical strike chance with raid buffs. Higher critical strike means more Illumination procs, which enables more sustained healing throughout encounters. Diminishing returns begin around 35-40% critical strike.
4. Mana per 5 Seconds (MP5) – Provides steady mana regeneration regardless of casting status. While valuable, MP5 becomes less important as your critical strike increases and Illumination handles most mana regeneration needs. Still useful for progression encounters requiring extended healing.
5. Stamina – Increases maximum health for survivability. Holy Paladins already benefit from plate armor, making Stamina lower priority than stats directly improving healing output. Still important for progression content where survival matters.
6. Spell Hit – Only relevant if regularly using offensive spells like Exorcism or Holy Wrath against Undead. Pure healers can completely ignore spell hit rating.
Gear Upgrade Philosophy
When evaluating gear upgrades, ask yourself: “Does this item significantly increase my +healing?” If yes, equip it immediately regardless of other stats. A piece with 50 more +healing but slightly worse secondary stats almost always outperforms the alternative.
For pieces with similar +healing values, prefer Intellect > Critical Strike > MP5 for secondary stats. The increased mana pool and Illumination synergy from critical strike provides more value than raw MP5 in most encounters.
Pre-Raid Best in Slot Gear
Holy Paladins should target these items from dungeons, reputation vendors, and crafted sources before entering raids. Complete lists for all phases available in our dedicated Paladin Pre-Raid BiS Guide.
Key Pre-Raid Items by Slot
Head: Crown of the Penitent (Stratholme Baron Rivendare) or Devout Crown (Dungeon Set 1)
Neck: Animated Chain Necklace (UBRS General Drakkisath) provides excellent +healing
Shoulders: Mantle of the Scarlet Crusade (Scarlet Monastery Armory) or Devout Mantle (Dungeon Set 1)
Back: Drape of the Forlorn (Stratholme Maleki the Pallid) offers strong +healing
Chest: Devout Robe (Dungeon Set 1) from various dungeons
Bracers: Bracers of the Eclipse (Maraudon Princess Theradras)
Hands: Devout Gloves (Dungeon Set 1)
Waist: Whipvine Cord (Maraudon Noxxion) provides excellent +healing and stats
Legs: Devout Skirt (Dungeon Set 1)
Feet: Devout Sandals (Dungeon Set 1)
Rings: Songstone of Ironforge (Blackrock Depths quest reward) and Fordring’s Seal (Western Plaguelands quest chain)
Trinkets: Briarwood Reed (UBRS Jed Runewatcher) and Second Wind (Maraudon Landslide)
Weapon: Hammer of Grace (Stratholme Baron Rivendare) or Benediction (Onyxia Sinew quest chain)
Shield: Aegis of the Scarlet Commander (Stratholme Balnazzar) or Draconian Deflector (UBRS crafted)
Focus dungeon farming on Stratholme, Scholomance, UBRS, and Maraudon for optimal Pre-Raid BiS acquisition. Many pieces come from Dungeon Set 1, which drops from various level 60 dungeons.
Enchants and Gear Enhancements
Proper enchants significantly increase healing performance:
Best Enchants by Slot
Head: Prophetic Aura (+24 healing from Argent Dawn Revered reputation) – Later available from Zul’Gurub as +healing/+10 Spirit
Shoulders: ZG Enchant (+18 healing from Zandalar Tribe Exalted) or Chromatic Mantle of the Dawn (+5 all resistances)
Cloak: Enchant Cloak – Subtlety (-2% threat) for threat-sensitive encounters, or +5 All Resistances for progression
Chest: Enchant Chest – Greater Stats (+4 all stats) or +100 Health for survivability
Bracers: Enchant Bracer – Healing Power (+24 healing) is mandatory for maximum output
Gloves: Enchant Gloves – Healing Power (+30 healing) provides significant throughput
Legs: Prophetic Aura (+24 healing from Argent Dawn Revered) – Later available from Zul’Gurub with additional Spirit
Boots: Enchant Boots – Minor Speed (movement speed increase) or +7 Stamina for survivability
Weapon: Enchant Weapon – Healing Power (+55 healing) is absolutely essential for maximum healing output
Shield: Enchant Shield – Greater Stamina (+7 Stamina) for survivability
Many enchants require specific reputation levels. Prioritize Argent Dawn (Western Plaguelands/Eastern Plaguelands) reputation for helmet and leg enchants. Farm Zandalar Tribe reputation through Zul’Gurub for superior shoulder enchants once available.
Essential Consumables and Buffs
WoW Classic emphasizes consumable usage for raid progression. Holy Paladins should bring comprehensive consumables to every raid:
Flasks
Flask of Distilled Wisdom – Increases maximum mana by 2000 for 2 hours and persists through death. Extremely expensive due to Black Lotus requirement. Use for progression content and challenging encounters where every advantage matters. You can only have one flask active at a time.
Elixirs and Potions
Elixir of Greater Intellect – Increases Intellect by 25 for 1 hour. Relatively inexpensive and provides substantial mana increase.
Mageblood Potion – Regenerates 12 mana per 5 seconds for 1 hour. Stacks with Elixir of Greater Intellect (Battle Elixir + Guardian Elixir).
Greater Mana Potion – Restores 1800-3000 mana instantly. Shares 2-minute cooldown with other mana potions.
Major Mana Potion – Restores 1350-2250 mana instantly. Use as backup when Greater Mana Potions on cooldown.
Food Buffs
Nightfin Soup – Provides 8 MP5 for 30 minutes. Crafted through Cooking profession.
Blessed Sunfruit – Provides 10 Spirit for 30 minutes. Purchased from vendors.
Cerebral Cortex Compound – Increases Intellect by 25 for 1 hour. Obtained from repeatable quest in Blasted Lands.
Weapon Oils
Brilliant Mana Oil – Increases healing by 25 and restores 12 mana per 5 seconds for 30 minutes. Crafted through Alchemy. Very strong consumable that should be maintained throughout raids.
Lesser Mana Oil – Increases MP5 by 8 for 30 minutes. Budget alternative to Brilliant Mana Oil.
Mana Regeneration Items
Demonic Rune – Restores 900-1500 mana at cost of 600-1000 health. Shares cooldown with Dark Rune. Farm from Felguard Elites in Blasted Lands.
Dark Rune – Similar to Demonic Rune but Bind on Equip (can purchase from Auction House). Use during encounters when health sacrifice acceptable.
World Buffs
While not consumables you carry, coordinate to receive these powerful world buffs before raids:
- Rallying Cry of the Dragonslayer (from turning in Onyxia Head)
- Spirit of Zandalar (from turning in Zandalar reputation items)
- Songflower Serenade (from Felwood Songflower nodes)
- Dire Maul buffs from tribute runs
World buffs dramatically increase performance but require coordination and timing. Many guilds schedule raid times around world buff availability.
Healing Rotation and Spell Usage
Holy Paladin healing emphasizes spell rank selection and mana efficiency rather than fixed rotation:
Downranking Fundamentals
Downranking represents the most important technique for Holy Paladin healing efficiency. Lower ranks of healing spells receive identical percentage of +healing power while costing significantly less base mana. When combined with Illumination refunding mana on critical strikes, downranking creates exceptional efficiency.
Holy Light Rank Selection:
- Rank 11 (maximum) – Use for heavy predictable tank damage or emergency situations
- Rank 9 – Balance between throughput and efficiency for moderate tank damage
- Rank 4 – Most mana efficient rank, ideal for consistent tank healing when damage moderate
Flash of Light Rank Selection:
- Rank 7 (maximum) – Emergency healing when tank health dangerously low
- Rank 6 – Balance option for moderate emergency healing
- Rank 4 – Most efficient Flash of Light for minor damage or quick heals
The optimal rank depends on multiple factors: tank health percentage, current damage intake rate, your remaining mana, fight duration, and whether you’re receiving Innervate or other mana support. Experienced Holy Paladins constantly adjust rank selection based on encounter flow.
Standard Tank Healing Priority
Your typical healing sequence while assigned to tank healing:
- Pre-pull Setup – Apply appropriate Greater Blessing to all classes, activate assigned Aura, ensure full mana through drinking
- Monitor Tank Health – Watch assigned tank health bar constantly. Start casting heal when tank drops to approximately 80% health so heal lands before dangerous threshold
- Cast Appropriate Rank – Use Rank 4 Holy Light for consistent moderate damage. Upgrade to Rank 9 or maximum rank during heavy damage phases
- Emergency Response – If tank suddenly drops below 40% health, immediately cast Flash of Light (max rank or Rank 7) for fast emergency heal
- Use Divine Favor – Pop Divine Favor before casting high-rank Holy Light during predictable heavy damage phases (guarantees critical strike and Illumination refund)
- Cleanse Debuffs – Remove dangerous poisons and diseases promptly using Cleanse. Coordinate with other healers to avoid multiple people cleansing same debuff
- Mana Monitoring – Keep your mana percentage roughly matching boss health percentage. If ahead on mana, use higher ranks. If behind, downrank more aggressively
Seal Usage for Healing
While primarily focused on healing, Holy Paladins can activate Seals when safely in melee range:
Seal of Wisdom – Regenerates mana on melee attacks. Auto-attack boss between heal casts when positioned safely in melee range. Using Judgement applies Judgment of Wisdom debuff that grants mana to entire raid on attacks (coordinate with raid leader on debuff slot availability).
Seal of Light – Provides health regeneration on melee attacks. Use when personal health management important or mana regeneration unnecessary.
Seal usage remains situational. Many encounters prevent safe melee positioning for healers. Don’t risk death attempting to auto-attack for minor mana gains. Only use Seals when safely positioned and comfortable with encounter mechanics.
Blessing Management in Raids
Greater Blessing coordination represents essential Holy Paladin responsibility:
Pre-Raid Assignment – Coordinate with other Paladins to divide Greater Blessing responsibilities. Each Greater Blessing lasts 15 minutes and affects all raid members of same class. Typical assignments:
- Paladin 1: Greater Blessing of Kings on all classes (most common)
- Paladin 2: Greater Blessing of Wisdom on Mages, Warlocks, Priests, Druids, Paladins
- Paladin 3: Greater Blessing of Might on Warriors, Rogues, Hunters
- Paladin 4: Greater Blessing of Salvation on all DPS to reduce threat
- Paladin 5: Greater Blessing of Sanctuary on main tank
Between Pulls – Check Greater Blessing timers and refresh any expiring soon. Greater Blessings require Symbol of Kings reagent (purchase from reagent vendors). Stock 20-30 symbols for full raid night.
Aura Selection Strategy
Choose auras based on encounter mechanics and raid composition:
Devotion Aura – Default choice providing armor increase. Use for physical damage heavy encounters.
Concentration Aura – Reduces spell pushback for casters. Valuable on encounters where raid takes consistent damage while casters must maintain DPS uptime.
Fire Resistance Aura – Essential for Molten Core (especially Ragnaros) and Blackwing Lair fire encounters (Firemaw, Vaelastrasz).
Frost Resistance Aura – Critical for Naxxramas Sapphiron encounter.
Shadow Resistance Aura – Helpful on shadow damage heavy encounters throughout all raid tiers.
Coordinate aura assignments with other Paladins. Position yourselves to provide optimal aura coverage across different groups. Auras only affect party and raid members within 30-yard range.
Emergency Abilities and Cooldown Usage
Holy Paladins possess game-changing emergency cooldowns that prevent wipes:
Lay on Hands
Lay on Hands instantly heals target for amount equal to your maximum health. This ability consumes your entire mana pool but has 40-60 minute cooldown (reduced with talents).
When to Use:
- Tank suddenly drops dangerously low and will die before normal heals land
- Off-tank gets unexpected aggro and needs immediate heal
- Any raid member in imminent death situation where their survival critical
Important Note: Use Lay on Hands proactively rather than holding it. Preventing single death often more valuable than saving cooldown for hypothetical better moment. Dead tank at 70% boss health causes more problems than using Lay on Hands early.
Talent Synergy: Improved Lay on Hands talent reduces cooldown and grants physical damage reduction buff after use, making ability even more valuable.
Divine Favor
Divine Favor guarantees your next heal critically strikes. 2-minute cooldown makes it available multiple times per encounter.
Optimal Usage:
- Activate before casting max rank Holy Light during heavy damage phase
- Guaranteed critical strike triggers Illumination for full mana refund
- Effectively provides massive free heal on 2-minute cooldown
- Coordinate timing with predictable boss damage patterns
Divine Shield
Divine Shield grants complete immunity to all damage and harmful effects for 8-12 seconds. 5-minute cooldown can be used once per most boss encounters.
Strategic Applications:
- Continue healing through mechanics that would otherwise kill you
- Ignore dangerous boss abilities while maintaining heal output on tanks
- Survive situations where other healers must stop casting or die
- Buy time for other healers to recover if multiple people low
PvP Note: Divine Shield can be dispelled by enemy players, but in PvE raids it provides guaranteed immunity duration.
Divine Intervention
Divine Intervention sacrifices yourself to grant target 3 minutes of complete invulnerability. Target cannot move or act but survives raid wipes.
Wipe Prevention:
- When raid wipe becomes inevitable, immediately cast Divine Intervention on another healer with resurrection ability
- Druids with Rebirth or Priests work best as Divine Intervention targets
- This saves entire raid from corpse run and expensive repair bills
- Divine Intervention target can resurrect raid after enemies reset
Requirements: Divine Intervention requires Symbol of Divinity reagent. Always carry 2-3 in bags for emergency wipe prevention.
Blessing of Protection
Blessing of Protection grants 6-10 seconds of complete physical damage immunity. Target cannot use physical attacks while buff active.
Applications:
- Save casters from melee enemy attacks
- Protect yourself when enemies target you
- Remove bleed effects from targets
- Enable cloth wearers to safely run through enemy groups
Critical Warning: Never cast Blessing of Protection on tank actively tanking. Physical immunity prevents tank threat generation and causes boss to attack raid. Only use on tanks during specific mechanics or when off-tanking.
Blessing of Freedom
Blessing of Freedom removes and grants immunity to movement impairing effects for 10 seconds.
Tactical Uses:
- Help melee DPS escape from boss AoE abilities
- Enable tanks to position bosses quickly
- Remove snare effects preventing proper positioning
- Allow players to kite dangerous enemies
Mana Management and Sustainability
Proper mana management separates average Holy Paladins from exceptional ones:
Mana Conservation Principles
⚡ Start Conservative – Begin encounters with efficient downranked heals to gauge damage patterns. Don’t blow mana on maximum rank heals unless necessary.
⚡ Match Boss Health – Keep your mana percentage roughly equivalent to boss health percentage. If boss at 60% health and you at 80% mana, you’re ahead and can afford higher ranks. If boss at 60% and you at 40% mana, downrank aggressively.
⚡ Maximize Illumination – Higher critical strike chance means more mana refunds. This creates positive feedback loop where better gear enables more aggressive healing.
⚡ Use Consumables Proactively – Don’t wait until completely out of mana. Use mana potion when reaching 40-50% mana during heavy healing phases. Use Demonic/Dark Runes when health sacrifice acceptable.
⚡ Coordinate with Healers – Communicate mana status with other healers. If you’re low mana, inform team so they can cover while you regenerate. Request Innervate from Druids during mana-intensive phases.
⚡ Avoid Overhealing – Healing targets already at full health wastes mana and doesn’t contribute to encounter success. Focus heals on targets actually taking damage.
Phase-Specific Mana Strategies
Different encounter lengths require adjusted mana approaches:
Short Fights (2-3 minutes) – Use higher rank heals more liberally. Fight ends before mana becomes critical factor. Prioritize throughput over efficiency.
Medium Fights (4-6 minutes) – Balance efficiency and throughput. Start conservative, ramp up healing ranks as fight progresses. Use 1-2 mana potions during encounter.
Long Fights (7+ minutes) – Maximum efficiency essential. Rely heavily on downranked heals. Coordinate consumable usage with predictable damage phases. May require 2-3 mana potions plus runes.
Dungeon vs Raid Healing Differences
While core mechanics identical, dungeons and raids emphasize different aspects:
Five-Man Dungeon Healing
Faster Pacing – Dungeons feature quick pulls with limited downtime. Focus on keeping tank alive through rapid enemy damage.
Drink Frequently – Regenerate to full mana between pulls. Mana efficiency less critical than in raids since frequent drink breaks available.
Liberal Cleanse – Use Cleanse generously on poison and disease debuffs. Mana cost negligible with regular drinking.
Emergency Cooldowns – Don’t hesitate using Blessing of Protection, Divine Shield, or even Lay on Hands. They’ll be available again soon with dungeon pacing.
Aggressive Positioning – Plate armor allows closer positioning without death risk. Stand near tank for faster heal delivery and potential Seal auto-attacks.
Raid Healing
Assigned Targets – Typically assigned specific tank healing duty. Maintain focus on assigned target throughout encounter.
Mana Marathon – Encounters last 3-8+ minutes requiring careful mana management throughout. Every wasted heal threatens sustainability.
Coordinated Cleansing – Avoid multiple healers cleansing same debuff. Communicate or assign specific cleanse responsibilities.
Cooldown Coordination – Announce major cooldown usage (Lay on Hands, Divine Favor) to prevent overlap. Let raid leader know before using Divine Intervention.
Blessing Maintenance – Monitor Greater Blessing timers and refresh proactively. Coordinate coverage with other Paladins.
Encounter-Specific Strategies
Molten Core
Lucifron – Dispel curse debuffs quickly (requires Mage/Druid). Focus tank healing through Mind Control phases.
Magmadar – High tank damage requires aggressive healing. Save Lay on Hands for Fear into dangerous positioning.
Gehennas – Dispel curses promptly. Tank damage moderate but consistent.
Garr – Position to avoid add damage. Tank takes heavy burst damage when adds die.
Geddon – Move out of raid when affected by Living Bomb. Heal through Ignite Mana burn.
Shazzrah – Tank damage spiky due to teleport mechanics. Keep tank topped between teleports.
Sulfuron Harbinger – Heal through knockback damage. Tank damage consistent but manageable.
Golemagg – Position away from adds. Tank requires heavy healing due to boss and add damage combined.
Majordomo Executus – Dispel Magic Shield from adds. Moderate tank damage throughout.
Ragnaros – Use Fire Resistance Aura. Massive tank damage requires maximum rank Holy Light. Manage mana carefully for full 3-4 minute encounter. Submerge phases allow mana regeneration and drinking.
Blackwing Lair
Razorgore – Focus tank healing on player controlling orb. Minimal damage during control phases.
Vaelastrasz – Burning Adrenaline provides infinite resources but kills after 20 seconds. Use this buff aggressively with maximum rank spam healing. When affected, inform raid and heal frantically until death. Extremely chaotic fight with very high tank damage.
Broodlord Lashlayer – Heavy tank damage requires aggressive healing. Mortal Strike reduces healing effectiveness on tanks.
Firemaw – Fire Resistance Aura essential. Stack fire resistance gear if necessary. Moderate tank damage but Wing Buffet can be dangerous.
Chromaggus – Dispel magic debuffs based on breath combinations. Tank damage varies by active breaths. Some combinations very dangerous.
Nefarian – Class calls create unique challenges. During Paladin call, all Paladins affected by Divine Shield preventing actions. Continue healing once call ends. Phase 2 has heavy tank damage.
Additional Raid Tiers
Temple of Ahn’Qiraj and Naxxramas introduce even more complex mechanics. Use Frost Resistance Aura on Sapphiron. Stack nature resistance gear for Princess Huhuran. Each encounter requires studying specific mechanics and adapting healing strategy accordingly.
Common Mistakes to Avoid
❌ Using Maximum Rank Always – Wastes enormous mana. Downranking dramatically improves efficiency.
❌ Overhealing Full Health Targets – Contributes nothing to encounter success while draining mana pool.
❌ Holding Lay on Hands – Using emergency cooldowns proactively prevents deaths better than saving for perfect moment.
❌ Ignoring Cleanse Assignments – Multiple healers cleansing same debuff wastes mana and global cooldowns.
❌ Poor Positioning – Standing too far from assigned targets or in dangerous locations reduces effectiveness.
❌ Forgetting Blessing Maintenance – Allowing Greater Blessings to expire removes significant raid-wide benefits.
❌ Not Using Consumables – Refusing to use consumables in progression content handicaps entire raid team.
❌ Panic Healing – Spamming maximum rank heals when encountering mana issues makes problem worse.
Tips for Improvement
🎯 Master Downranking – Practice using multiple spell ranks fluidly based on situation. This skill defines Holy Paladin excellence.
🎯 Install Healing AddOns – Use Healbot, VuhDo, or similar addon for efficient raid frame healing.
🎯 Create Mouseover Macros – Enable healing targets without changing current target selection.
🎯 Study Combat Logs – Review Warcraft Logs after raids to identify overhealing patterns and inefficient mana usage.
🎯 Learn Fight Mechanics – Understanding predictable damage patterns allows proactive healing preparation.
🎯 Optimize Keybindings – Bind frequently used healing spells to easily accessible keys for faster response.
🎯 Communicate Constantly – Call out mana status, cooldown usage, and problems immediately to enable team coordination.
🎯 Watch Experienced Healers – Study how top Holy Paladins position, manage mana, and respond to encounters.
Frequently Asked Questions
What’s the best healing spell to spam?
Should I heal DPS who stand in fire?
How much +healing should I have for Molten Core?
Do I need different gear sets for each raid?
Is Holy Paladin good for dungeon healing while leveling?
How do I know which spell rank to use?
Should I DPS during raid encounters?
What consumables are mandatory vs optional?
Conclusion
Holy Paladin healing in WoW Classic Era demands mastery of mana efficiency, intelligent downranking, proper cooldown usage, and raid awareness. Your plate armor survivability, powerful single-target healing, and extensive utility through Blessings and emergency abilities make you invaluable to raid composition.
Success requires practice, game knowledge, and coordination with your healing team. Study encounter mechanics to anticipate damage patterns. Optimize gear and consumable usage. Communicate effectively with your raid. Most importantly, understand that Holy Paladin excellence comes from sustainable efficiency rather than raw throughput.
For specialized content:
- PvP Healing: Check our Holy Paladin PvP Guide
- Leveling: Visit our Holy Paladin Leveling Guide
- General Overview: Return to our Holy Paladin Guide hub
- All Paladin Content: Browse our WoW Classic Paladin Guide
May your heals always crit, your mana never empty, and your tanks remain immortal!