 World of Warcraft Guides, Lore, Addons & News – Noob to Boss From Azeroth's Newbie to Champion – World of Warcraft Guides
Look, I’m not going to sugarcoat it—Retribution Paladin isn’t going to compete with Warriors or Rogues on the damage charts. But here’s the thing: if you’re playing Ret because you love the class fantasy and want to support your raid while still dealing damage, you’re in the right place.
Ret Paladins shine through their powerful blessings, emergency heals, and raid utility. You’ll be the Swiss Army knife of your raid group—buffing allies with Greater Blessing of Kings and Greater Blessing of Salvation, throwing off-heals when things get dicey, and yes, dealing some decent Holy damage when everything procs just right.
Why Play Retribution in PvE?
⚔️ Unique Strengths:
- Powerful raid-wide blessings that benefit everyone
- Can off-heal in emergencies with Flash of Light and Lay on Hands
- Multiple utility abilities like Divine Shield and Blessing of Protection
- Less competition for two-handed weapon drops
- Plate armor makes you surprisingly durable
⚠️ Limitations to Know:
- Lower personal DPS compared to pure DPS classes
- Mana management can be challenging on longer fights
- Limited raid spots (usually 1-2 per raid maximum)
- Rotation is somewhat simple but proc-dependent
Best Races for Retribution Paladin
Paladins can only be played by two Alliance races, and your choice does matter for PvE performance.
Human (Recommended) ⭐
Humans are the superior choice for Retribution Paladins due to weapon skill racials. In Classic WoW, weapon skill is incredibly important—it increases your chance to hit, reduces glancing blows, and decreases the chance enemies dodge your attacks.
Racial Bonuses:
- Sword Specialization: +5 weapon skill with swords
- Mace Specialization: +5 weapon skill with maces
- The Human Spirit: +5% Spirit (minor benefit)
- Diplomacy: 10% faster reputation gains (quality of life)
Since many of the best two-handed weapons in Classic are swords or maces (think Ashkandi or Sulfuras), this racial gives you a significant DPS boost.
Dwarf (Alternative)
Dwarves are the tankier option with decent defensive utility, but they lack the offensive power of Humans.
Racial Bonuses:
- Stoneform: Removes poisons, diseases, and bleeds while reducing damage taken by 10%
- Frost Resistance: +10 Frost Resistance (situational)
- Gun Specialization: +5 gun skill (irrelevant for Ret)
Verdict: Go Human if you want to maximize damage. Pick Dwarf if you prefer survivability and the class fantasy, but accept you’ll do slightly less DPS.
Retribution Paladin PvE Talent Builds for Raids and Dungeons
This is the bread-and-butter Retribution build that works well throughout all phases of Classic. It focuses on maximizing your damage while maintaining the Hit Chance needed before you’re fully geared.
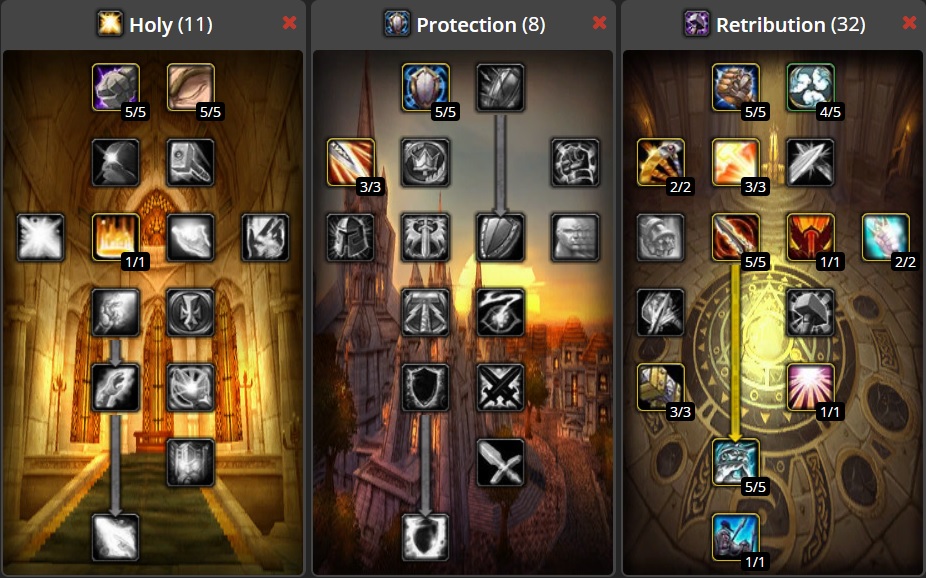
This build gives you the essential 3% Hit Chance from Precision, which is crucial before you have enough Hit Rating from gear. The Protection tree talents also provide solid utility with Blessing of Kings and improved blessings.
Geared Retribution Build (Hit-Capped Players)
Once you’ve reached the 9% Hit Cap through gear (which happens in later phases), you can drop Precision and invest those points elsewhere for more utility.
Talent Distribution: 32/8/11
Changes from Standard Build:
- Remove Precision (3 points) and Improved Devotion Aura (5 points) from Protection
- Add Spiritual Focus 5/5 in Holy (better off-healing)
- Add Improved Lay on Hands 2/2 in Holy
- Add Unyielding Faith 2/2 in Holy (Fear resistance)
- Add Healing Light 2/2 in Holy
This variant makes you a better support player with enhanced off-healing capabilities and a stronger Lay on Hands for clutch saves.
Key Talents Explained
Let me break down why certain talents are absolutely essential:
Vengeance (5/5): This is your most important talent. After landing a critical strike, your physical and Holy damage increases by 15% for 8 seconds. Since Seal of Command can crit, this talent has excellent uptime and dramatically boosts your DPS.
Seal of Command (1/1): Your primary damage seal. This gives each melee attack a chance to deal additional Holy damage based on your weapon damage. It synergizes beautifully with slow, hard-hitting two-handed weapons.
Conviction (5/5): Flat 5% increased critical strike chance. More crits mean more Vengeance uptime, which means more damage.
Sanctity Aura (1/1): Increases Holy damage dealt by you and nearby party members by 10%. This benefits your Seal of Command, Judgement, and Consecration significantly.
Benediction (5/5): Reduces the mana cost of instant-cast spells (including seals and judgements) by 15%. Essential for mana management.
Retribution Paladin Rotation and Abilities
The Retribution rotation in Classic is relatively straightforward, but there are some nuances that separate good Ret Paladins from great ones.
Standard PvE Rotation
Your basic rotation revolves around maintaining Seal of Command and using Judgement on cooldown while managing your mana.
Priority System:
- Apply Judgement of the Crusader: At the start of combat, activate Seal of the Crusader and immediately use Judgement to apply the debuff. This increases Holy damage taken by the target.
- Maintain Seal of Command: After applying Judgement of the Crusader, switch to Seal of Command and keep it active throughout the fight. This is your primary damage source.
- Use Judgement on Cooldown: Judge Seal of Command whenever Judgement comes off cooldown (every 10 seconds). This deals instant Holy damage.
- Consecration with Vengeance: When Vengeance is active (after you crit), use Consecration to maximize the damage buff. If mana is tight, skip Consecration.
- Auto-attack: Let your white damage roll while maintaining seals. Your auto-attacks with Seal of Command active are your primary damage source.
- Exorcism (Situational): Against Undead or Demon targets, use Exorcism on cooldown for extra damage.
- Holy Wrath (Situational): On AoE pulls with Undead or Demon enemies, Holy Wrath can add significant damage.
Advanced Technique: Seal Twisting
Seal Twisting is an advanced technique that allows skilled players to benefit from two seals on a single auto-attack. It’s difficult to execute consistently but can increase your DPS by 10-15% when done correctly.
How It Works:
Seal of Command has a 0.4-second delay between your weapon swing and when the seal damage actually applies. During this window, you can activate Seal of Righteousness and get both seal effects on one hit.
Execution Steps:
- Have Seal of Command active
- Use a swing timer addon (like WeaponSwingTimer)
- Approximately 0.4 seconds before your swing lands, cast Seal of Righteousness
- If timed correctly, you’ll see both seal procs on that swing
- Immediately reapply Seal of Command for the next swing
Important Notes:
⚠️ Seal twisting is extremely mana-intensive. You’ll drain your mana pool quickly, so it’s only viable on shorter boss fights or when you have strong mana support (Judgement of Wisdom, mana potions, etc.).
⚠️ You need a reliable swing timer addon. I recommend WeaponSwingTimer or Quartz.
⚠️ This technique requires low latency. If your ping is above 100ms, seal twisting becomes unreliable.
⚠️ For most players, especially those learning Ret, stick to the standard rotation. Seal twisting is an optimization for players who have mastered the basics.
Mana Management Tips
Running out of mana mid-fight is embarrassing and tanks your DPS. Here’s how to manage it:
🎯 Downrank Abilities: Use lower ranks of Consecration and Judgement when mana is low. The DPS loss is minimal compared to running OOM.
🎯 Skip Consecration: On long fights, consider skipping Consecration entirely unless Vengeance is active. Your mana is better spent on seals and judgements.
🎯 Use Judgement of Wisdom: Coordinate with your raid to ensure Judgement of Wisdom is active on bosses. This returns mana on melee hits.
🎯 Bring Consumables: Always carry Major Mana Potions, Dark Runes, and Demonic Runes.
Stat Priority for Retribution Paladin
Understanding your stat priority is crucial for gearing decisions and enchant choices.
Primary Stat Priority
| Priority | Stat | Explanation |
|---|---|---|
| 1 | Hit Rating (until 9% cap) | Most important stat. Missing attacks means zero damage and wasted mana. You need 9% Hit Chance to never miss a level 63 raid boss. The Precision talent gives you 3%, so you need 6% from gear until you’re fully geared. |
| 2 | Strength | Your primary damage stat. Each point of Strength gives 2 Attack Power, which increases all your physical and seal damage. Stack this heavily after reaching Hit Cap. |
| 3 | Critical Strike Chance | Essential for proccing Vengeance. Since Vengeance gives 15% increased damage for 8 seconds after a crit, maintaining high uptime is crucial. Aim for at least 25-30% crit chance. |
| 4 | Agility | Provides Critical Strike Chance (20 Agility = 1% crit) and a small amount of Armor. Less efficient than Strength but still valuable. |
| 5 | Attack Power | Direct damage increase, but less efficient than Strength. Only prioritize when comparing items with significantly more AP than Strength. |
| 6 | Spell Power | Increases Holy damage from your seals, Judgement, and Consecration. Some Paladin tier sets include Spell Power, which is nice but shouldn’t be actively stacked. |
Secondary Stats
Stamina: You’ll naturally get this on most gear. More health means less risk of dying, which is always good.
MP5 (Mana per 5 seconds): Some Paladin gear includes this. It helps with sustained fights but shouldn’t be prioritized over damage stats.
Armor: You wear plate, so you’re already tanky. Don’t sacrifice damage stats for more armor.
Hit Rating Breakpoints
Understanding Hit Rating is crucial:
- 0%: 8.6% chance to miss bosses (unacceptable)
- 6% (with Precision): 2.6% miss chance (pre-raid BiS target)
- 9%: Hit Cap – 0% miss chance (goal for raid gearing)
Once you hit 9%, any additional Hit Rating is wasted. Respec to drop Precision and invest those points elsewhere.
Best Consumables for Retribution Paladin
Consumables are expensive but necessary for serious raiding. Here’s what you need to perform at your best.
Essential Raid Consumables
Flasks:
⚡ Flask of Supreme Power – Increases spell damage by 150 for 2 hours. Persists through death. This is your best flask despite being crazy expensive. It boosts your Holy damage from seals and Judgement significantly.
Elixirs (if not using flasks):
You can use one Battle Elixir and one Guardian Elixir together:
⚡ Elixir of the Mongoose – +25 Agility and 2% Critical Strike Chance (Battle Elixir) ⚡ Elixir of Giants – +25 Strength (Battle Elixir, better on farm content) ⚡ Elixir of Superior Defense – +450 Armor (Guardian Elixir)
Food Buffs:
⚡ Blessed Sunfruit Juice – +10 Strength (cheap option) ⚡ Grilled Squid – +10 Agility (alternative) ⚡ Dirge’s Kickin’ Chimaerok Chops – +25 Stamina (if available, very rare)
Potions:
⚡ Major Mana Potion – Restores 1350-2250 mana. Use one pre-pull and one during the fight. ⚡ Demonic Rune – Restores 900-1500 mana at the cost of health. Farm these from Felguards in Blasted Lands. ⚡ Dark Rune – Restores 900-1500 mana. Shares cooldown with Demonic Rune but can be bought on AH.
Blasted Lands Buffs:
These are from repeatable quests in Blasted Lands. Stack them by logging out to pause cooldowns:
⚡ R.O.I.D.S. – +25 Strength for 1 hour ⚡ Ground Scorpok Assay – +25 Agility for 1 hour ⚡ Cerebral Cortex Compound – +25 Intellect (helps with mana pool)
World Buffs:
⚡ Rallying Cry of the Dragonslayer – +10% crit and 140 Attack Power ⚡ Warchief’s Blessing / Spirit of Zandalar – +15% max health and +10% all stats (Horde only / Neutral) ⚡ Songflower Serenade – +15 to all stats and +5% crit ⚡ Dire Maul Tribute – +200 Attack Power and +10% all stats
Enchants Priority
Head: Lesser Arcanum of Voracity (+8 Strength, +1% Hit) from Librams of Voracity
Shoulders: Chromatic Mantle of the Dawn or Zandalar Signet of Might (+30 Attack Power in later phases)
Back: Enchant Cloak – Lesser Agility (+3 Agility)
Chest: Enchant Chest – Greater Stats (+4 to all stats)
Bracers: Enchant Bracer – Superior Strength (+9 Strength)
Gloves: Enchant Gloves – Greater Strength (+7 Strength) or Enchant Gloves – Superior Agility (+15 Agility)
Legs: Dragonscale Leg Armor (+40 Attack Power, +12 Critical Strike)
Boots: Enchant Boots – Minor Speed (+movement speed, useful for positioning)
Weapon: Crusader (+100 Strength proc) or Enchant 2H Weapon – Superior Impact (+9 weapon damage)
Both Crusader and Superior Impact are excellent. Crusader has higher theoretical DPS but relies on procs, while Superior Impact is consistent damage.
Professions for Retribution Paladin
Your profession choices can significantly impact your raiding performance.
Best Professions
Engineering (Highly Recommended) ⭐
Engineering is hands-down the best profession for any serious PvE player. The utility and damage from engineering items is unmatched.
Benefits:
- Goblin Sapper Charge (AoE damage on trash packs)
- Dense Dynamite (ranged damage option)
- Thorium Grenades (extra damage on cooldown)
- Dragonling pets (Battle Chicken gives 5% melee attack speed to group)
- Death Ray (decent ranged attack)
Blacksmithing (Solid Choice)
Blacksmithing allows you to craft Lionheart Helm, which is BiS (Best in Slot) for multiple phases.
Benefits:
- Lionheart Helm (BiS helmet until AQ40)
- Annihilator (good weapon with armor reduction debuff)
- Can craft your own plate gear while leveling
Mining (Pairs with Engineering or Blacksmithing)
If you take Engineering or Blacksmithing, Mining is a natural pairing to farm your own materials and save gold.
Secondary Professions
Cooking: Essential for food buffs. Level this up for self-sufficiency.
First Aid: Heavy Runecloth Bandages can save you in emergencies when you’re OOM.
Fishing: Provides some cooking materials and is relaxing. Optional but nice to have.
Retribution Paladin BiS Gear
Your Best in Slot gear changes throughout Classic WoW’s phases. Here’s what to aim for in each major phase.
Pre-Raid BiS (Level 60 Dungeons)
These are the best items you can get before stepping into raids:
| Slot | Item | Source |
|---|---|---|
| Head | Lionheart Helm | Blacksmithing (highly recommended) |
| Neck | Mark of Fordring | Quest: In Dreams (Eastern Plaguelands) |
| Shoulders | Truestrike Shoulders | Stratholme Undead (General Drakkisath) |
| Back | Cape of the Black Baron | Stratholme Undead (Baron Rivendare) |
| Chest | Savage Gladiator Chain | Blackrock Depths (General Angerforge) |
| Wrist | Bracers of Valor | Upper Blackrock Spire (The Beast) |
| Hands | Gauntlets of Valor | General Drakkisath (Upper Blackrock Spire) |
| Waist | Omokk’s Girth Restrainer | Upper Blackrock Spire (Overlord Wyrmthalak) |
| Legs | Legplates of Valor | General Drakkisath (Upper Blackrock Spire) |
| Boots | Boots of Valor | General Drakkisath (Upper Blackrock Spire) |
| Ring 1 | Blackstone Ring | Quest: Seal of Ascension |
| Ring 2 | Painweaver Band | Upper Blackrock Spire (Rend Blackhand) |
| Trinket 1 | Hand of Justice | Blackrock Depths (Emperor Dagran Thaurissan) |
| Trinket 2 | Blackhand’s Breadth | Upper Blackrock Spire (Rend Blackhand) |
| Weapon | Treant’s Bane | Dire Maul West (Tendris Warpwood) |
Note: Lionheart Helm is expensive to craft (requires Blacksmithing and hundreds of gold in materials) but absolutely worth it. It remains BiS until Phase 5.
Phase 1-2 Raid BiS (Molten Core / Onyxia)
| Slot | Item | Source |
|---|---|---|
| Head | Lionheart Helm | Blacksmithing |
| Neck | Onyxia Tooth Pendant | Onyxia’s Lair |
| Shoulders | Spaulders of Valor | Molten Core (Lucifron) |
| Back | Cloak of Draconic Might | Blackwing Lair (Nefarian) – Phase 3 |
| Chest | Breastplate of Valor | Molten Core (Golemagg) |
| Wrist | Wristguards of True Flight | Molten Core (Trash) |
| Hands | Gauntlets of Might | Molten Core (Sulfuron Harbinger) |
| Waist | Onslaught Girdle | Molten Core (Ragnaros) |
| Legs | Legplates of Might | Molten Core (Ragnaros) |
| Boots | Chromatic Boots | Molten Core (Trash) |
| Ring 1 | Quick Strike Ring | Molten Core (Trash) |
| Ring 2 | Circle of Applied Force | Molten Core (Trash) |
| Trinket 1 | Hand of Justice | Pre-Raid BiS (keep this) |
| Trinket 2 | Drake Fang Talisman | Upper Blackrock Spire (Overlord Wyrmthalak) |
| Weapon | Obsidian Edged Blade | Molten Core (Ragnaros) |
Phase 3 BiS (Blackwing Lair)
BWL introduces some powerful upgrades:
Weapon: Ashkandi, Greatsword of the Brotherhood (Nefarian) – Massive DPS upgrade
Helm: Helm of Endless Rage (Nefarian) – Slightly better than Lionheart
Shoulders: Drake Talon Pauldrons (Broodlord Lashlayer)
Chest: Savage Gladiator Chain remains strong until you get tier pieces
Phase 5 BiS (Temple of Ahn’Qiraj)
AQ40 has some of the best weapons for Ret Paladins:
Weapon: Might of Menethil (C’Thun) – One of the best 2H weapons in Classic
Helm: Avenger’s Crown (AQ40 token set)
Shoulders: Avenger’s Pauldrons (AQ40 token set)
Phase 6 BiS (Naxxramas)
Naxxramas is the final raid tier and has several BiS items:
Weapon: Corrupted Ashbringer or Might of Menethil
Multiple slots: Check out our full WoW Classic Paladin Pre-Raid BiS Guide for a comprehensive gear breakdown including all raid phases.
Auras, Seals, and Blessings
Understanding when to use each ability is key to being an effective Ret Paladin.
Auras
You can only have one aura active at a time. Choose based on the encounter:
⚔️ Sanctity Aura – Default for all DPS situations. 10% increased Holy damage for your group.
⚔️ Retribution Aura – Automatically damages attackers. Useful when tanking or on high-damage trash pulls.
⚔️ Devotion Aura – Bonus armor for the group. Use when extra survivability is needed.
⚔️ Fire/Frost/Shadow Resistance Aura – Essential on specific boss fights (Ragnaros, Sapphiron, etc.)
⚔️ Concentration Aura – Reduces spell pushback. Give this to your healers if they’re struggling with interrupts.
Seals
Your seal choice defines your damage output:
⚔️ Seal of Command – Your primary DPS seal for almost all situations. Gives your melee attacks a chance to deal additional Holy damage. Use with slow, high-damage weapons.
⚔️ Seal of Righteousness – Used for seal twisting or when you have a very fast weapon. Otherwise, stick with Command.
⚔️ Seal of the Crusader – Only used to apply Judgement of the Crusader at the start of a fight, then switch to Seal of Command.
⚔️ Seal of Wisdom – Returns mana when judged. Use this if your raid needs mana support more than your personal DPS.
⚔️ Seal of Light – Returns health when judged. Rarely used in raids but helpful in 5-mans.
Blessings Priority
Coordinate with other Paladins in your raid to ensure all blessings are covered:
Greater Blessings (40-player raids):
- Greater Blessing of Salvation – Critical for DPS to avoid pulling threat. Usually the Holy Paladin’s job, but you can cover it.
- Greater Blessing of Might – Increases Attack Power for physical DPS classes. Improved by your Improved Blessing of Might talent.
- Greater Blessing of Kings – 10% increase to all stats. Extremely powerful raid-wide buff from your talent tree.
- Greater Blessing of Wisdom – Increased mana regeneration for healers and casters.
- Greater Blessing of Sanctuary – Reduces damage taken and restores mana when blocking. For tanks.
Buff the appropriate classes based on your raid’s needs and coordinate with other Paladins to avoid overlap.
Utility Abilities and When to Use Them
Being a good Ret Paladin means knowing when to use your utility toolkit:
Defensive Cooldowns
🛡️ Divine Shield – 12-second immunity to all damage and effects. Use this to:
- Ignore deadly raid mechanics
- Drop threat if you’re about to pull aggro
- Survive otherwise lethal damage
- Continue DPSing during raid-wide damage phases
Warning: Using Divine Shield drops all your threat, so be careful not to mess up tank positioning by causing mobs to switch targets.
🛡️ Divine Protection – 50% damage reduction for 12 seconds, but also reduces your damage by 50% and attack speed by 100%. Only use this when you need survivability and can afford the DPS loss.
Support Abilities
⚡ Lay on Hands – Complete heal on any target. This is one of the most powerful emergency abilities in the game. Use it to:
- Save a tank who’s about to die
- Save a healer who’s in trouble
- Save yourself if healers are overwhelmed
Don’t sit on this ability! Better to use it early and have the tank survive than to watch them die because you were waiting for the “perfect” moment.
⚡ Blessing of Protection – Makes the target immune to physical damage for 10 seconds but prevents them from using physical attacks. Use this to:
- Save cloth DPS who pulled aggro
- Protect healers from adds
- Allow someone to safely run through physical damage
⚡ Blessing of Freedom – Removes and prevents movement impairing effects. Great for helping melee DPS stay on targets that slow or snare.
⚡ Cleanse – Removes one poison and one disease from a target. Help your healers by dispelling when needed, especially if they’re overwhelmed.
Resurrection
⚡ Redemption – Out-of-combat resurrection. You can help get the raid back up after a wipe.
⚡ Divine Intervention – Sacrifices yourself to make an ally immune to all attacks for 3 minutes. Mainly used to save a healer after a wipe so they can