The Enhancement Shaman in WoW Classic is primarily valued in raids for its exceptional group support rather than raw personal DPS. While your own damage output won’t match that of Warriors or Rogues, your Windfury Totem can boost your entire melee group’s DPS by thousands, making you an essential part of any raid composition.
This WoW Classic Enhancement Shaman PvE DPS Guide covers everything you need to maximize your raid performance — including optimal PvE talent builds, rotation priorities, totem management strategies, best-in-slot gear progression, and advanced tips to increase your overall contribution to the raid. By mastering these techniques, you’ll become an indispensable force in any endgame PvE encounter.
Enhancement PvE Overview
Your Role in Raids
Primary Role: Totem support for melee DPS groups
Secondary Role: Melee DPS with burst potential
Utility: Emergency healing, cleansing, resistance totems
Why Raids Bring Enhancement:
- ✅ Windfury Totem – 20% increased melee attack speed (party-only)
- ✅ Strength of Earth Totem – +77 Strength for entire party
- ✅ Grace of Air Totem – +77 Agility for entire party
- ✅ Utility Totems – Tremor, Poison/Disease Cleansing, Resistance totems
- ✅ Flexible – Can emergency heal, off-tank adds, or resurrect (Reincarnation)
Reality Check:
- ❌ Your personal DPS will be low compared to pure DPS classes
- ❌ You are mana-hungry and may go OOM on long fights
- ❌ Your damage is RNG-dependent on Windfury procs
- ❌ You will compete with Warriors/Rogues for melee gear
- ✅ But you make 4 other melee DPS significantly stronger
Typical Raid Composition
Most Horde raids want 8+ Shamans total, with typical distribution:
- 6-7 Restoration Shamans (healing)
- 1-2 Enhancement Shamans (melee group totems)
- 0-1 Elemental Shamans (if allowed)
Ideal Melee Group Composition:
- Enhancement Shaman (you – Windfury Totem)
- 2-3 Warriors (Fury DPS)
- 1-2 Rogues (Combat/Assassination)
- 1 Feral Druid (optional – off-tank/DPS hybrid)
Your Windfury Totem affects all 5 party members, so maximizing melee DPS in your group is critical.
Enhancement Shaman PvE Talent Tree Builds Calculator
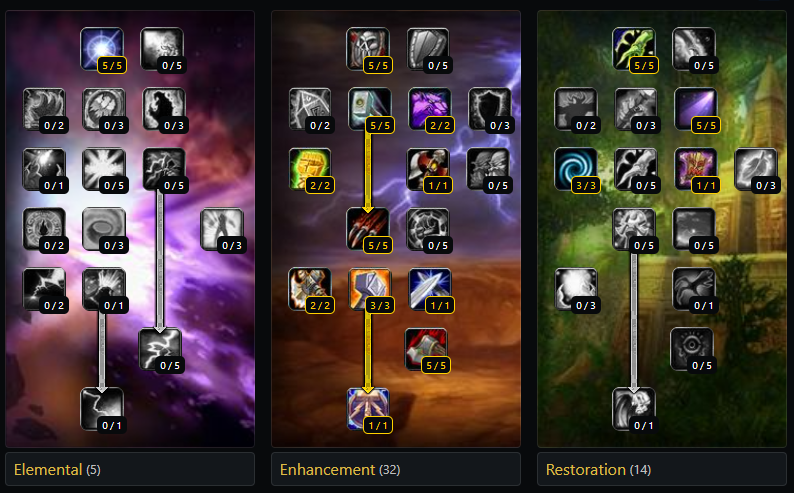
Complete Shaman Talent Calculator for PVP and PVE Link: Click here
Why This Build?
- ✅ Totemic Mastery allows 30-yard totem range (essential for raid mobility)
- ✅ Enhancing Totems boosts your entire group’s Strength/Agility by 15%
- ✅ Improved Weapon Totems increases Windfury Totem damage
- ✅ Enables Totem Twisting (maintaining Windfury + Grace of Air simultaneously)
- ✅ Nature’s Guidance provides 3% spell/melee hit
PvE Rotation & Priority
Single-Target Boss Rotation
Pre-Pull (10 seconds before):
- Drop Windfury Totem
- Drop Strength of Earth Totem (or Grace of Air if twisting)
- Apply Windfury Weapon (if not already active)
- Activate Lightning Shield (Rank 8)
Priority System:
- Stormstrike (on cooldown) – 20% Nature damage debuff for 12 seconds
- Earth Shock (during Stormstrike window) – Benefits from Nature damage debuff
- Flame Shock (if target lives >12 seconds) – DoT damage
- Auto-attack – Wait for Windfury procs
- Frost Shock (if nothing else available and mana >50%)
Detailed Rotation Explanation:
Stormstrike Usage:
- Use immediately on cooldown (12-second cooldown)
- Applies 20% Nature damage taken debuff for 12 seconds
- Your next Earth Shock will deal 20% more damage
- Provides instant white damage attack
Shock Spell Usage:
- Earth Shock: Only use during Stormstrike debuff window for maximum damage
- Flame Shock: Apply once at pull if boss lives >12 seconds, refresh at 3 seconds remaining
- Frost Shock: Filler damage when everything else is on cooldown (rarely used in raids)
Windfury Weapon Procs:
- Windfury gives 20% chance on melee hit to proc 2 extra attacks
- These extra attacks can also proc Windfury (chain procs possible!)
- Each extra attack deals +383 Attack Power bonus damage
- This is your primary damage source – you’re waiting for lucky proc chains
Cooldown Management:
- Stormstrike: Use on cooldown (12 sec)
- Earth Shock: 6-second cooldown (save for Stormstrike windows)
- Flame Shock: 6-second cooldown (refresh DoT only)
Totem Management
Raid Standard Totems:
- Air: Windfury Totem (or totem twist with Grace of Air)
- Earth: Strength of Earth Totem
- Fire: Depends on fight (Searing vs Magma vs Totem of Wrath if Elemental present)
- Water: Mana Spring Totem (or Fire Resistance for specific bosses)
Totem Refresh Timers:
- Windfury Totem: Refresh every 2 minutes
- Strength of Earth: Refresh every 2 minutes
- Grace of Air: Refresh every 2 minutes (or twist continuously)
- Searing Totem: Refresh every 55 seconds for consistent damage
Boss-Specific Totem Changes:
- Ragnaros: Fire Resistance Totem (water slot)
- Chromaggus: Poison Cleansing Totem or Disease Cleansing Totem
- Nefarian: Tremor Totem (during class call)
- Razorgore: Tremor Totem (fear mechanics)
- Sapphiron: Frost Resistance Totem (water slot)
AoE / Trash Pack Rotation
For 3+ targets:
- Drop Magma Totem (instead of Searing)
- Drop Fire Nova Totem if mobs are stacked
- Use Goblin Sapper Charge (Engineering item – 5min CD)
- Apply Flame Shock to primary target
- Cleave primary target with melee attacks
- Refresh Magma Totem every 20 seconds
Engineering Explosives (Essential for AoE):
- Goblin Sapper Charge: 450-600 AoE fire damage (5-yard radius)
- Dense Dynamite: 340-460 AoE fire damage
- Thorium Grenade: 300-500 AoE fire damage + 5-second stun
AoE trash is where Enhancement can shine – explosive damage stacks with Elemental Shamans and isn’t split between targets.
Totem Twisting Guide
What is Totem Twisting? Totem Twisting is an advanced technique that allows you to maintain two Air totems simultaneously – giving your group both Windfury Totem and Grace of Air Totem buffs at the same time.
How Totem Twisting Works
Totem Buff Mechanics:
- When you drop a totem, it pulses a buff every 2 seconds
- This buff lasts 10 seconds on the player
- If you drop a different totem before the buff expires, players keep the first buff while gaining the second
Example:
- Drop Windfury Totem at 0 seconds
- Windfury pulses buff at 2 seconds (buff lasts until 12 seconds)
- Drop Grace of Air Totem at 3 seconds
- Grace of Air pulses buff at 5 seconds
- Players now have both Windfury and Grace of Air active!
- Repeat cycle: Drop Windfury at 11 seconds, Grace of Air at 14 seconds, etc.
Totem Twisting Step-by-Step
Required:
- TotemTimers addon (shows totem pulse timers – mandatory!)
- Totemic Mastery talent (1/1 – increases totem range to 30 yards)
- Practice and muscle memory
Basic Twist Rotation:
- Drop Windfury Totem
- Wait ~1 second after first pulse
- Drop Grace of Air Totem
- Wait ~8 seconds
- Drop Windfury Totem again
- Repeat steps 2-5
Timing Precision:
- Drop second totem 1-1.5 seconds after first totem pulses
- Too early = first totem doesn’t pulse before being replaced
- Too late = first buff expires before second totem drops
Visual Aid (Timeline):
0s: Drop Windfury Totem
2s: Windfury pulses (buff duration: 2s-12s)
3s: Drop Grace of Air Totem (Windfury buff still active)
5s: Grace of Air pulses (buff duration: 5s-15s)
11s: Drop Windfury Totem (Grace of Air buff still active)
13s: Windfury pulses (buff duration: 13s-23s)
14s: Drop Grace of Air Totem
... continue pattern
Simplified Twist Pattern (Beginner)
4-Second Cycle (Easier):
- Drop Windfury
- Count 4 seconds
- Drop Grace of Air
- Count 4 seconds
- Repeat
This creates a 8-second cycle where both buffs are active for most melee players. Less optimal than perfect timing but much easier to execute.
Mana Cost Warning
Totem twisting is extremely mana-intensive:
- Normal totem usage: ~100 mana per minute
- Totem twisting: ~500-800 mana per minute
Mana Management:
- Requires Totemic Focus (5/5) – reduces totem cost by 25%
- Use Mana Spring Totem when not twisting
- Carry Major Mana Potions (60-second cooldown)
- Request Innervate from Druids on long fights
- Stop twisting if mana drops below 30% (unless fight is ending soon)
Is Totem Twisting Worth It?
DPS Gain Calculation:
- Windfury Totem alone: ~100 DPS per melee player
- Windfury + Grace of Air: ~130 DPS per melee player
- Gain per player: +30 DPS
- 4 melee players: +120 total raid DPS
Verdict: Yes, if you can sustain the mana cost. Adds ~120-150 raid DPS if executed properly.
When NOT to Twist:
- Learning a new boss (focus on mechanics first)
- Fights with heavy movement (you’ll go OOM)
- Fights requiring emergency healing
- When undergeared/low mana pool (<6000 mana)
Stats Priority
PvE Hit Cap (MOST IMPORTANT)
Hit Cap for Bosses:
- 9% hit = 142.5 hit rating (for level 63 bosses)
- Orc with Axes: Only need 6% hit = 95 hit rating (Axe Specialization gives +5 weapon skill = +3% effective hit)
Why Hit Cap Matters:
- Missing an attack wastes potential Windfury procs
- Missing Stormstrike wastes the Nature damage window
- Hit cap is your absolute #1 priority before any other stat
How to Reach Hit Cap:
- Nature’s Guidance talent: +3% hit (included in raid build)
- Need ~90-110 additional hit rating from gear (for Orc with axes)
- Need ~140-160 additional hit rating from gear (for Troll/Tauren)
Stat Priority Ranking
Priority Order:
- Hit Chance → 9% (or 6% for Orc with axes) – Non-negotiable cap
- Weapon DPS → Slow 2-handed weapon with highest max damage
- Attack Power → Direct damage increase
- Strength → 1 Str = 2 AP (twice as valuable as raw AP)
- Critical Strike → 25-30% target – Increases Windfury proc value
- Agility → Provides crit + dodge + armor (1 Agi = ~0.05% crit)
- Intellect → 200-250 for totem/shock mana pool
- Stamina → 4000-5000 HP for survivability
Detailed Stat Explanations
Hit Rating:
- 1% hit = ~15.8 hit rating
- 9% cap = 142.5 hit rating
- Over-hit cap does nothing (no glancing blows)
Attack Power:
- Increases weapon damage linearly
- ~14 AP = +1 DPS
- Scales better at higher weapon speeds
Strength:
- 1 Strength = 2 Attack Power
- Also increases block value (minor benefit)
- Buffed by Blessing of Kings (+10% Strength)
Critical Strike:
- 1% crit = ~20 Agility (varies by level)
- Triggers Flurry (30% attack speed for 3 swings)
- Critical Windfury procs deal massive damage
- Soft cap at ~35-40% (diminishing returns)
Agility:
- Provides crit, dodge, and armor
- 1 Agi ≈ 0.04-0.05% crit at level 60
- Less valuable than Strength point-for-point
Intellect:
- 1 Int = 15 mana
- Need ~200-250 Int for comfortable mana pool
- More valuable if totem twisting
Stamina:
- 1 Stam = 10 HP
- Target 4000-5000 HP for raid survivability
- Less important than DPS stats in PvE
Gemming (if applicable – TBC reference)
Not applicable in Classic WoW (no sockets).
Best-in-Slot Gear
Weapon Priority
Why Weapon Matters Most: Enhancement scales heavily with weapon damage, not weapon DPS. Slow, hard-hitting 2-handed weapons maximize Windfury Weapon damage.
Weapon Speed Explanation:
- Windfury Weapon adds +383 Attack Power to extra attacks
- This damage scales with weapon speed (not DPS)
- A 3.8-speed weapon gets more value from the AP bonus than a 2.5-speed weapon
- Always prioritize slowest weapon with highest max damage
Best-in-Slot Weapons (Ranked):
- Might of Menethil (Naxx – Kel’Thuzad)
- 2H Mace, 3.80 speed, 228-343 damage
- +40 Strength, +28 Stamina, +16 Hit
- Best weapon in Classic – highest max damage
- Sulfuras, Hand of Ragnaros (MC – Legendary)
- 2H Mace, 3.70 speed, 223-372 damage
- +12 Strength, +30 Fire Resist
- Proc: 273-333 AoE fire damage
- Best pre-Naxx weapon (but very rare)
- Dark Edge of Insanity (AQ40 – C’Thun)
- 2H Axe, 3.50 speed, 216-324 damage
- +39 Agility, +21 Stamina, +10 Hit, +1% Crit
- Best non-legendary weapon
- Spinal Reaper (BWL – Razorgore)
- 2H Axe, 3.80 speed, 181-271 damage
- +27 Strength, +18 Agility, +1% Crit
- Easier to obtain than above options
- The Unstoppable Force (PvP – Rank 14)
- 2H Mace, 3.80 speed, 199-301 damage
- +22 Strength, +15 Stamina, +1% Crit
- Requires Rank 14 (extremely difficult)
- Obsidian Edged Blade (MC – Ragnaros)
- 2H Sword, 3.60 speed, 188-283 damage
- +9 Strength, +1% Crit
- Best early raid weapon (Molten Core)
- Bonereaver’s Edge (MC – Ragnaros)
- 2H Axe, 3.40 speed, 170-256 damage
- +24 Strength, +16 Stamina, +1% Crit
- Alternative to OEB
Budget/Pre-Raid Options:
- Ice Barbed Spear (Dungeon – Av’Aran Scholomance)
- Dreadforge Retaliator (Crafted – Blacksmithing)
- Gatorbite Axe (Quest – Sunken Temple)
Phase 6 Best-in-Slot (Naxxramas)
Armor Slots:
| Slot | Item | Source | Key Stats |
|---|---|---|---|
| Head | Dreadnaught Helmet | Naxx T3 | +26 Str, +17 Agi, +34 Stam, +1% Hit |
| Neck | The Phylactery of Kel’Thuzad | Naxx (KT) | +26 Str, +12 Agi, +24 Stam, +1% Hit, +1% Crit |
| Shoulder | Dreadnaught Pauldrons | Naxx T3 | +20 Str, +20 Agi, +26 Stam |
| Back | Shroud of Dominion | Naxx (KT) | +21 Str, +16 Agi, +15 Stam |
| Chest | Dreadnaught Breastplate | Naxx T3 | +30 Str, +20 Agi, +40 Stam |
| Wrist | Bracers of Heroism | BWL (Trash) | +16 Str, +16 Agi, +13 Stam |
| Hands | Gauntlets of Annihilation | Naxx (Gluth) | +35 AP, +26 Stam, +1% Hit, +1% Crit |
| Waist | Onslaught Girdle | Naxx (Trash) | +35 Str, +15 Agi, +16 Stam, +1% Hit |
| Legs | Titanic Leggings | MC (Ragnaros) | +30 Str, +15 Sta, +1% Hit, +2% Crit |
| Feet | Chromatic Boots | BWL (Chromaggus) | +20 Str, +15 Agi, +20 Stam, +1% Hit |
| Ring 1 | Quick Strike Ring | MC (Trash) | +29 AP, +1% Hit, +1% Crit |
| Ring 2 | Master Dragonslayer’s Ring | BWL (Quest) | +24 AP, +8 Stam, +1% Hit, +1% Crit |
| Trinket 1 | Drake Fang Talisman | BWL (Ebonroc) | +38 AP, proc: +200 AP |
| Trinket 2 | Kiss of the Spider | Naxx (Maexxna) | +45 AP, +1% Hit, proc: +320 AP/20% haste |
| Weapon | Might of Menethil | Naxx (KT) | 228-343 dmg, 3.80 spd, +40 Str, +16 Hit |
Set Bonuses:
- Dreadnaught 4-piece: Not useful (reduces threat)
- Dreadnaught 6-piece: Not worth completing (weak bonus)
- Mix T3 with non-set pieces for optimal stats
Phase 5 Best-in-Slot (AQ40)
Key Upgrades in AQ40:
- Dark Edge of Insanity (C’Thun) – 2H Axe weapon
- Gauntlets of Annihilation (Gluth) – Wait, this is Naxx, use Ring of Emperor Vek’lor instead
- Belt of Never-ending Agony (C’Thun) – Waist
- Boots of the Fallen Hero (Twin Emps) – Feet with +2% hit
Phase 4 Best-in-Slot (BWL/ZG)
Key Items:
- Spinal Reaper (Razorgore) – 2H Axe
- Drake Fang Talisman (Ebonroc) – Trinket
- Chromatic Boots (Chromaggus) – Feet
- Maladath, Runed Blade of the Black Flight (Broodlord) – If using 1H (not recommended)
Phase 3 Best-in-Slot (BWL)
See Phase 4 – BWL items remain BiS for many slots.
Phase 2 Best-in-Slot (DM/World Bosses)
Key Additions:
- Conqueror’s Spaulders (Azuregos) – Shoulders
- Eskhandar’s Right Claw (Azuregos) – Off-hand weapon (if dual-wielding)
- Edgemaster’s Handguards (World Drop) – Hands (+7 weapon skill for non-racial weapons – insane if Troll/Tauren using swords/maces)
Phase 1 Best-in-Slot (MC/Ony)
Core Items:
- Obsidian Edged Blade or Bonereaver’s Edge (Ragnaros) – Weapon
- Onslaught Girdle (Trash) – Waist
- Titanic Leggings (Ragnaros) – Legs
- Quick Strike Ring (Trash) – Ring
- Lionheart Helm (Crafted) – Head (remains BiS until Naxx)
Pre-Raid Best-in-Slot
Focus: Hitting 6-9% hit cap before entering raids
| Slot | Item | Source | Hit Rating |
|---|---|---|---|
| Head | Mask of the Unforgiven | Stratholme (Baron) | 0 |
| Neck | Mark of Fordring | EPL Quest Chain | +1% Hit |
| Shoulder | Truestrike Shoulders | UBRS (Rend) | +2% Hit |
| Chest | Savage Gladiator Chain | Crafted (LW) | 0 |
| Hands | Flameguard Gauntlets | LBRS (Quest) | 0 |
| Waist | Omokk’s Girth Restrainer | LBRS (Omokk) | 0 |
| Legs | Eldritch Reinforced Legplates | Crafted (BS) | 0 |
| Feet | Boots of the Full Moon | Dire Maul (Tribute) | 0 |
| Ring | Tarnished Elven Ring | DM West (Trash) | +1% Hit |
| Ring | Painweaver Band | UD Stratholme (Ramstein) | 0 |
| Trinket | Hand of Justice | BRD (Emperor) | Proc: Extra attack |
| Trinket | Blackhand’s Breadth | UBRS (Rend) | +2% Crit |
| Weapon | Ice Barbed Spear | Scholomance (Av’aran) | 0 |
Total Hit: 4% from gear + 3% from Nature’s Guidance = 7% Hit (need 2% more!)
Additional Hit Sources:
- Eldritch Reinforced Legplates (Crafted BS) – Alternative legs with +1% Hit
- Devilsaur Set (2pc – Crafted LW) – +2% Hit (Gloves + Legs)
Enchants & Consumables
Enchants (Phase 6 Optimal)
| Slot | Enchant | Stats | Source |
|---|---|---|---|
| Head | Arcanum of Rapidity | +1% Haste | Libram (Naxx/DM) |
| Shoulder | Zandalar Signet of Might | +30 AP | ZG Revered |
| Back | Enchant Cloak – Lesser Agility | +3 Agility | Enchanting |
| Chest | Enchant Chest – Greater Stats | +4 All Stats | Enchanting |
| Wrist | Enchant Bracer – Superior Strength | +9 Strength | Enchanting |
| Hands | Enchant Gloves – Superior Agility | +15 Agility | Enchanting |
| Legs | Arcanum of Rapidity | +1% Haste | Libram (Naxx/DM) |
| Feet | Enchant Boots – Minor Speed | +Run Speed | Enchanting |
| Weapon | Enchant Weapon – Crusader | Proc: +100 Str | Enchanting |
Weapon Enchant Priority:
- Crusader – Proc: +100 Strength for 15 seconds (Best overall)
- +15 Agility – Consistent crit/dodge increase
- DO NOT use weapon enchants – Your Windfury Weapon overwrites them!
CRITICAL: Always use Windfury Weapon imbue, not enchants. Enchants like Crusader are applied to the weapon permanently but Windfury Weapon takes priority and provides more DPS.
Consumables (Full Raid Prep)
Mandatory Consumables:
| Type | Item | Effect | Duration | Cost |
|---|---|---|---|---|
| Flask | Flask of the Titans | +400 HP | 2 hours (death persists) | ~100g |
| Elixir | Elixir of the Mongoose | +25 Agi, +2% Crit | 1 hour | ~5g |
| Elixir | Elixir of Giants | +25 Strength | 1 hour | ~3g |
| Food | Grilled Squid | +10 Agility | 30 min | ~2g |
| Food | Smoked Desert Dumplings | +20 Strength | 15 min | ~1g |
| Buff | ROIDS (Juju Power) | +30 Strength | 30 min | ~5g |
| Buff | Juju Might | +40 AP | 10 min | ~3g |
| Potion | Mighty Rage Potion | +45-75 Rage | Instant | ~1g |
Optional But Recommended:
- Winterfall Firewater: +35 AP (10min) – ~2g
- Elixir of Brute Force: +18 Strength, +18 Stamina (1hr) – ~5g
- Scroll of Strength IV: +17 Strength (30min) – ~1g
Major Mana Potion: 1000-1800 mana restore (60-second CD) – Essential if totem twisting!
Boss-Specific Consumables
Ragnaros (Molten Core):
- Greater Fire Protection Potion: +1950 fire resist (2min)
- Fire Resistance Totem (water slot)
Vaelastrasz (Blackwing Lair):
- Greater Fire Protection Potion: +1950 fire resist (2min)
- Flask of the Titans for extra HP buffer
Chromaggus (Blackwing Lair):
- Poison Cleansing Totem or Disease Cleansing Totem (depends on breath combo)
Sapphiron (Naxxramas):
- Greater Frost Protection Potion: +1950 frost resist (2min)
- Frost Resistance Totem (water slot)
- Flask of the Titans (life blocks)
Princess Huhuran (AQ40):
- Greater Nature Protection Potion: +1950 nature resist (2min)
- Nature Resistance Totem
Engineering Consumables (Essential)
AoE Trash Damage:
- Goblin Sapper Charge: 450-600 fire damage (5-yard radius, 5min CD) – ~5g each
- Dense Dynamite: 340-460 fire damage (5-yard radius)
- Thorium Grenade: 300-500 fire damage + 5-second stun
Emergency Items:
- Goblin Rocket Helmet: 280-350 fire damage (30min CD)
- Arcanite Dragonling: Summon pet for extra DPS (1hr CD)
Weekly Consumable Budget
Full Progression Raid (4 hours):
- 1x Flask of the Titans: ~100g
- 4x Elixir of the Mongoose: ~20g
- 4x Elixir of Giants: ~12g
- 8x Smoked Desert Dumplings: ~8g
- 12x Juju Power: ~60g
- 5x Major Mana Potion: ~15g
- 10x Goblin Sapper Charge: ~50g
- Protection Potions (varies): ~20g
Total: ~285g per raid
Budget Alternative (Farm Raids):
- Skip Flask (~100g saved)
- Skip Juju buffs (~60g saved)
- Use Grilled Squid instead of Mongoose (~15g saved)
- Total: ~110g per raid
Boss Strategies
Molten Core
Lucifron:
- Drop Tremor Totem for Mind Control
- Drop Poison Cleansing Totem after Impending Doom
- Standard DPS rotation
Magmadar:
- Drop Tremor Totem for Fear
- Refresh Tremor every 2 minutes (critical!)
- Use Greater Fire Protection Potion if assigned to melee range
Gehennas:
- Drop Curse of Elements Cleansing – Wait, use Poison/Disease Cleansing Totem
- Standard DPS rotation
Garr:
- Drop Tranquil Air Totem to reduce threat
- Focus DPS on assigned add (DO NOT use AoE)
- Conserve mana for long fight
Baron Geddon:
- Drop Fire Resistance Totem (water slot)
- Run out immediately if targeted by Living Bomb
- Do NOT stay in melee range when bombed – you’ll wipe the raid
Shazzrah:
- Drop Grounding Totem to absorb Arcane Explosion (if possible)
- Blink mechanic – chase boss
- Low DPS uptime fight
Sulfuron Harbinger:
- Kill adds first (priests will heal boss otherwise)
- Drop Fire Resistance Totem
- Use Greater Fire Protection Potion
Golemagg the Incinerator:
- Tank dogs away from boss
- Melee DPS on Golemagg
- Drop Fire Resistance Totem
- High DPS check
Majordomo Executus:
- Kill adds in assigned order
- Drop Tremor Totem for Shield Wall heal interrupts
- Drop Poison Cleansing Totem for Damage Shield
Ragnaros:
- MANDATORY: Greater Fire Protection Potion + Fire Resistance Totem
- DPS during 90-second active phases
- Sons of Flame: Use Goblin Sapper Charge on add packs
- Submerge at 3:00, 6:00 (2 submerge phases)
- Execute phase starts at ~35-40% HP
Blackwing Lair
Razorgore the Untamed:
- Drop Tremor Totem (fear from trash)
- DPS adds while orb controller destroys eggs
- Phase 2: Full DPS on Razorgore
Vaelastrasz the Corrupt:
- MANDATORY: Greater Fire Protection Potion
- Drop Windfury Totem + Strength of Earth
- Use ALL offensive cooldowns immediately (Stormstrike on CD)
- Very high DPS check (3-minute enrage)
- Tank swap every 15 seconds (Burning Adrenaline)
Broodlord Lashlayer:
- Drop Tremor Totem for Mortal Strike fear
- Single-target DPS
- Simple tank-and-spank
Firemaw / Ebonroc / Flamegor (Drakes):
- Firemaw: Greater Fire Protection Potion, Fire Resistance Totem
- Ebonroc: Shadow damage – no special consumables
- Flamegor: Frenzy enrage – Tranquil Air Totem to reduce threat
- All drakes: Wing Buffet knockback (stand with back to wall)
Chromaggus:
- Drop Poison Cleansing Totem OR Disease Cleansing Totem (depends on breath combo)
- Time Lapse debuff – reduces haste (unavoidable)
- Tank facing away from raid (breath attacks)
Nefarian:
- Phase 1: Kill adds on platforms
- Phase 2: Drop Tremor Totem immediately at pull
- Class Call (Shamans): Your totems become hostile and attack raid
- Drop totems before class call
- Wait out class call (~15 seconds)
- Re-drop totems after call ends
- Phase 3: Full DPS burn
Ahn’Qiraj 40 (AQ40)
The Prophet Skeram:
- Three copies of boss (split damage)
- True Copy mechanic – identify real boss
- Drop Earthbind Totem if adds spawn
Battleguard Sartura:
- Whirlwind + Enrage combo (extremely dangerous)
- Drop Tranquil Air Totem to reduce tank threat
- Kill adds quickly
Fankriss the Unyielding:
- Worm adds spawn from eggs
- Drop Earthbind Totem to slow adds
- Focus DPS on boss
Princess Huhuran:
- MANDATORY: Greater Nature Protection Potion
- Enrage at 30% HP (massive damage)
- Drop Nature Resistance Totem
- Execute burn phase (30% to 0%)
Twin Emperors:
- Vek’lor (caster) + Vek’nilash (melee)
- Melee group: DPS Vek’nilash (physical boss)
- Teleport mechanic every 30-45 seconds
- Drop Windfury Totem in melee group
- DO NOT attack Vek’lor (immune to physical)
C’Thun:
- Phase 1: DPS eye tentacles and Giant Eye Tentacles
- Phase 2: Enter stomach, kill stomach tentacles, exit
- Drop totems outside stomach (they die inside)
- Complex mechanic fight – focus on survival over DPS
Naxxramas
Anub’Rekhan:
- Locust Swarm forces tank kiting
- Drop Poison Cleansing Totem for Impale DoT
- Kill adds (Crypt Guards) quickly
Grand Widow Faerlina:
- Mind Control on raid members
- Drop Tremor Totem (doesn’t help – different CC)
- Kill Mind Controlled targets or use Worshippers to remove Enrage
Maexxna:
- Web Spray roots entire raid (every 40 seconds)
- Drop totems before Web Spray
- Kill Web Wrap targets fast (suffocation)
Noth the Plaguebringer:
- Teleport phases (plague wave spawns)
- Drop Poison Cleansing Totem for Curse of the Plaguebringer
- Kill adds during teleport phase
Heigan the Unclean:
- Dance Phase – avoid eruptions (most important mechanic!)
- Drop totems in safe zone
- Low DPS uptime during dance
Loatheb:
- Healing massively reduced (1 heal every 60 seconds)
- Drop Windfury Totem + Strength of Earth
- Use ALL offensive consumables (Flask, Elixir, Juju, etc.)
- Massive DPS check
Instructor Razuvious:
- Mind Control off-tanks (Priests control Understudies)
- Drop Tremor Totem for Disrupting Shout fear
- Simple DPS after Mind Control setup
Gothik the Harvester:
- Two sides (Living vs Undead)
- Drop totems on assigned side
- Teleport to other side at 5 minutes
Four Horsemen:
- Hardest boss in Naxxramas
- Tank rotation (Mark debuff forces swaps)
- Melee DPS: Assigned to Zeliek or Blaumeux corners
- Drop Windfury Totem in assigned corner
- Move with tank rotations
Patchwerk:
- Pure tank-and-spank DPS check
- Drop Windfury Totem + Strength of Earth
- Use ALL offensive cooldowns and consumables
- 6-minute enrage timer (soft enrage at 5% HP)
Grobbulus:
- Poison Cloud DoT (deadly)
- Drop totems away from poison clouds
- Kite Mutating Injection away from raid
Gluth:
- Zombie Chow adds heal boss (must kill quickly)
- Drop Earthbind Totem to slow adds
- Use Goblin Sapper Charge on add packs
Thaddius:
- Polarity mechanic (positive/negative charges)
- CRITICAL: Stand with correct polarity group (+/+) or (-/-)
- Wrong polarity = chain lightning wipes raid
- Drop Windfury Totem in assigned group
- Very high DPS check
Sapphiron:
- MANDATORY: Greater Frost Protection Potion + Frost Resistance Totem
- Ice Block mechanic – hide behind ice blocks during Frost Breath
- Life Drain hits entire raid (healers OOM quickly)
- Air phase every ~45 seconds
Kel’Thuzad:
- Phase 1: Kill Abominations and Soldiers (5 minutes)
- Phase 2: Full DPS on Kel’Thuzad
- Frost Blast – ice blocks random players (break them out)
- Drop Windfury Totem + Strength of Earth
- Shadow Fissure (void zones) – avoid at all costs
Advanced Tips & Tricks
Weapon Swap Techniques
Why Weapon Swap? Enhancement can carry a 1-handed weapon + shield in bags and swap during:
- High raid damage (equip shield for survival)
- Running between pulls (save durability)
- Emergency off-tanking adds
How to Weapon Swap:
- Create macro (see Macros section)
- Bind macro to easy keybind (Mouse Button 4/5 recommended)
- Practice swapping during low-pressure moments
When to Swap to Shield:
- Vaelastrasz (Burning Adrenaline damage)
- Sapphiron (Life Drain + Frost Breath)
- Any “raid-wide damage” mechanic
Debuff Weapon Usage
What are Debuff Weapons? Some weapons apply powerful debuffs that benefit the entire raid, sacrificing personal DPS for raid utility.
Nightfall (2H Axe):
- Proc: 15% increased spell damage taken by target (15% uptime)
- Benefits all casters in raid (+hundreds of raid DPS)
- You become a debuff applier, not a DPS
- Used in caster-heavy raids
Annihilator (1H Axe):
- Proc: Stacking armor reduction on target (3 stacks = -600 armor)
- Benefits all physical DPS in raid
- Less impactful than Nightfall overall
Should You Use Debuff Weapons?
- Nightfall: Only if assigned by raid leader (typically 1 per raid)
- Your personal DPS drops by ~50%, but raid DPS increases by 300-500
- You become a support role, not DPS role
Emergency Healing
When to Heal:
- Tank about to die (healer is dead)
- Multiple raid members in danger
- Your own survival at risk
Emergency Healing Rotation:
- Nature’s Swiftness (if specced) + Healing Wave (instant 2000+ heal)
- Healing Wave Rank 10 (max rank) on tanks
- Chain Heal if multiple targets are low
- Re-apply Windfury Weapon after healing (weapon imbue may drop)
Mana Management:
- Don’t heal unless absolutely necessary
- You’re DPS first, healer last resort
Totem Placement Tips
Totems Have 20-Yard Base Range (30-Yard with Totemic Mastery):
- Drop totems centrally in melee group
- If raid spreads out, re-position totems
- Totems can be killed by AoE damage (move them!)
Totem Macro Positioning: Create macros for quick totem placement:
#showtooltip Windfury Totem
/cast [@player] Windfury Totem
Boss-Specific Totem Positions:
- Ragnaros Sons Phase: Drop totems on ranged platform (melee moves out)
- Nefarian Class Call: Drop totems early (before call starts)
- Thaddius: Drop totems in center (both polarity groups can reach)
Threat Management
Enhancement Threat Issues:
- High burst threat from Windfury procs
- Stormstrike + Earth Shock spike threat
Threat Reduction:
- Wait 5-10 seconds after tank pulls before DPSing
- Use Tranquil Air Totem if assigned (reduces threat by -20%)
- Stop DPS if threat is 90%+ (check threat meter)
- Use Salvation (if available from Paladin – Alliance only… wait, you’re Horde)
Threat Meters (Mandatory Addons):
- KLHThreatMeter or Omen Threat Meter
- Shows threat % relative to tank
- Stop DPS at 90% threat
Mana Management
Mana Issues:
- Enhancement is mana-starved in long fights
- Totem twisting makes it worse
Mana Conservation:
- Don’t spam shocks – only use during Stormstrike windows
- Drop Mana Spring Totem when not twisting
- Request Innervate from Druids (if available)
- Carry Major Mana Potions (60-second cooldown – use liberally)
- Use Demonic/Dark Runes (instant 900-1500 mana, costs HP)
Mana Pot Rotation:
- Use first Major Mana Potion at ~40% mana
- Cooldown resets after 60 seconds
- Can use 3-4 potions per boss fight
Off-Tanking Adds
When Assigned to Off-Tank:
- Equip 1H weapon + Shield
- Apply Rockbiter Weapon (high threat imbue)
- Drop Stoneclaw Totem (absorbs damage)
- Tank adds away from raid
You are NOT a main tank:
- Only emergency off-tank for small adds
- Swap back to DPS when adds are dead
Windfury Proc Fishing
What is Proc Fishing? Intentionally delaying attacks to maximize Windfury proc value.
How it Works:
- Wait for slow 2H weapon swing timer (3.5-3.8 seconds)
- Cast instant shock spell right before swing lands
- If Windfury procs, the 2 extra attacks can also proc Windfury
- Chain procs possible (2 procs → 4 procs → 8 procs theoretically)
Practical Use:
- Only relevant for advanced players
- Requires WeaponSwingTimer addon
- Minimal DPS gain (~1-2%) for significant effort
Frequently Asked Questions
Can Enhancement Shaman tank?
While you can equip a shield and use Rockbiter Weapon for threat, you lack:
– Defense skill
– Crushing blow immunity
– Taunt ability
– Sufficient armor and stamina
You can off-tank small adds in 5-man dungeons or emergencies, but never main-tank raid bosses.
Should I use 1H + Shield or 2H weapon?
– 2H: Higher Windfury Weapon damage, better burst
– 1H + Shield: Only for emergency survivability
Dual-wielding 1H weapons is viable but inferior in Classic (better in TBC).
What’s the best race for Enhancement?
– +5 weapon skill with Axes (best weapon type)
– Blood Fury: +25% base melee AP cooldown
Troll is second-best, Tauren mainly PvP-focused.
Is Totem Twisting mandatory?
– Normal totems: 100% effective
– Totem twisting: 120–130% effective
Requires practice and mana management. Not needed for casual raiding.
Do I need Engineering?
– Goblin Sapper Charge: huge AoE DPS
– Bombs: extra burst damage
– Only profession that increases DPS
Alternatives: Alchemy (own consumables), Mining (gold farming).
Can I raid as Enhancement without being Orc?
– Troll: Need more hit gear (no weapon skill racial)
– Tauren: Same as Troll
Orc advantage: +3% effective hit from Axe Specialization — huge DPS boost.
Should I use Stormstrike on AoE/trash?
For trash packs:
– Drop Magma Totem
– Use Goblin Sapper Charge
– Spam Fire Nova Totem
– Auto-attack (Windfury can cleave with enough targets)
What consumables should I prioritize on a budget?
1. Major Mana Potions (mandatory for totem twisting)
2. Elixir of the Mongoose (+25 Agi, +2% Crit)
3. Smoked Desert Dumplings (+20 Str)
4. Juju Power (+30 Str)
Skip Flask of the Titans for farm content to save 100g.
Can I get a raid spot as Enhancement?
– Most guilds bring Enhancement for Windfury Totem
– Competition is high — prove your value: master totem twisting, bring consumables, and avoid dying to mechanics.
What’s my DPS target?
– Single-target boss: 300–400 DPS
– AoE trash (with Engineering): 500–700 DPS
Warriors/Rogues may hit 600–900+ DPS — your value is totem utility, not personal DPS.
Related Guides
- WoW Classic Enhancement Shaman Guide – Main hub (overview)
- WoW Classic Enhancement Shaman PvP Guide – PvP talents, tactics, and gear
- WoW Classic Enhancement Shaman Leveling Guide – Level 1-60 guide
- WoW Classic Elemental Shaman Guide – Caster DPS alternative
- WoW Classic Restoration Shaman Guide – Healing specialization
Conclusion
Enhancement Shaman in PvE is a support-focused melee DPS that excels at making your group stronger rather than topping damage meters. Master totem management, embrace the RNG of Windfury procs, and take pride in knowing your Windfury Totem adds hundreds of DPS to every melee player in your group.
Key Takeaways: ✅ Prioritize hit cap (9% or 6% for Orc) above all other stats
✅ Master totem twisting to maximize group DPS
✅ Use slow 2-handed weapons with highest max damage
✅ Bring full consumables to every raid (Flask, Elixirs, Juju, Mana Pots)
✅ Drop resistance totems on appropriate bosses
✅ Your value is group support, not personal DPS
May your Windfury procs be plentiful, and your totems always in range! ⚡🔨