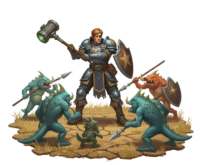
Paladins have a unique ability to pull and kill massive groups of mobs simultaneously, making them one of the most efficient leveling classes once you understand the mechanics. This comprehensive WoW Classic Paladin AOE Grinding Guide covers the best talent builds, grinding locations from level 20-60, gear recommendations, and advanced techniques to maximize your experience per hour.
Unlike traditional questing where you kill mobs one at a time, AOE grinding lets you pull 5-15 enemies at once and destroy them with reflect damage, Consecration, and blocking mechanics. Once mastered, this playstyle transforms Paladins from one of the slowest leveling classes into a remarkably efficient grinding machine.
⚔️ Why AOE Grinding Works for Paladins
Paladins are uniquely designed for multi-mob combat thanks to several key mechanics that other classes simply don’t have access to.
The Core Mechanics
Reflect Damage Your damage doesn’t come from hitting enemies – it comes from them hitting YOU. Retribution Aura, Blessing of Sanctuary, and shield spikes all deal damage when enemies attack you. The more mobs hitting you, the faster they die.
Insane Survivability Between plate armor, shields, Holy Shield, Redoubt, and self-healing with Holy Light, Paladins can tank 10+ mobs without breaking a sweat. Your armor and block chance mean physical damage barely scratches you.
Reckoning Burst Damage The Reckoning talent gives you extra attacks when you get critically hit. Pull enough mobs and you’ll stack up Reckoning charges, then unleash devastating burst damage that can one-shot enemies. This synergizes perfectly with multi-mob pulls.
Zero Downtime Other AOE classes like Mages need to drink after every pull. Paladins using Seal of Wisdom and Blessing of Sanctuary can maintain near-infinite mana through blocked attacks and judgments. You literally never stop grinding.
When AOE Grinding Becomes Viable
You can start basic AOE grinding at level 20 once you have Consecration, but the real power spike comes at level 32-34 when you can spec deeper into Protection and get Blessing of Sanctuary and Reckoning.
At level 40 with Holy Shield, you become nearly unstoppable. This is when you can comfortably pull 10-15 mobs and grind through levels faster than most quest-levelers.
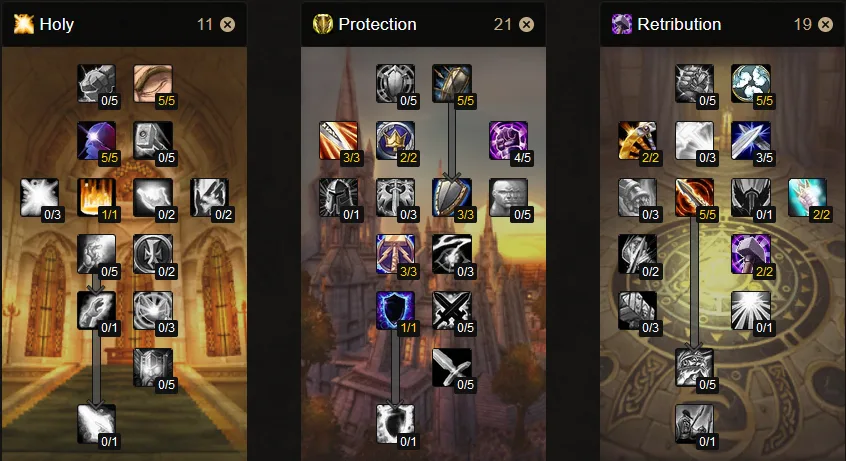
🎯 The Perfect AOE Grinding Talent Build
For optimal AOE grinding, you need a hybrid Protection/Retribution build that maximizes reflect damage, block chance, and survivability.
🛡️ Essential Gear for AOE Grinding
Your gear priorities are completely different from normal Paladin builds. You want spell damage, stamina, and defense – not strength or pure tanking stats.
Stat Priority
| Priority | Stat | Why It Matters |
|---|---|---|
| 1st | Spell Damage | Increases Consecration, Holy Shield, and Retribution Aura damage |
| 2nd | Stamina | Bigger health pool = larger pulls without dying |
| 3rd | Intellect | More mana for longer grinding sessions |
| 4th | Defense/Armor | Reduces incoming damage from pulls |
| 5th | Block Value | Extra damage from Holy Shield and Blessing of Sanctuary |
The Golden Rule: Every point of spell damage increases your Consecration ticks, Holy Shield block damage, and reflect aura damage. This is your most important stat by far.
Key Gear Pieces
Weapon: Fast One-Handed with Spell Damage
You want a fast-attacking weapon (2.0 speed or faster) with spell damage for optimal Seal of Wisdom and Reckoning procs. Some excellent options:
- Hammer of the Grand Crusader (Scarlet Monastery) – Early game spell damage weapon
- Aegis of Stormwind (Quest reward) – Solid stats with spell damage
- Bonecrusher (Stratholme) – Excellent spell damage for level 58+
Shield: Maximum Block Value + Spell Damage
Your shield is critical for damage mitigation and Holy Shield damage:
- Green Tower (Maraudon) – Excellent mid-level option with good block
- Draconian Deflector (UBRS) – Solid pre-raid shield
- Drillborer Disk (Gnomeregan) – Unique effect that deals AOE damage on block
Shield Spike: Absolutely Mandatory
Shield spikes add significant reflect damage when you block. Always have one equipped:
- Iron Shield Spike (Level 20-29) – 11-16 damage per block
- Mithril Shield Spike (Level 30-39) – 16-20 damage per block
- Thorium Shield Spike (Level 40+) – 20-30 damage per block
With high block chance and 10+ mobs hitting you, shield spikes add hundreds of damage per pull.
Armor Pieces with Spell Damage
Since spell damage gear is rare on plate, you’ll mix in some cloth and leather pieces:
Head:
- Crown of the Ogre King (Dire Maul) – Great spell damage helmet
- Green Lens (Engineering) – Solid alternative
Chest:
- Demon Forged Breastplate (Stratholme) – BiS for AOE grinding with lifesteal proc
- Lightforge Breastplate (Dungeon Set) – Good all-around stats
Shoulders:
- Runed Stygian Leggings (Scholomance/Stratholme) – Cloth with massive spell damage
- Lightforge Spaulders (Dungeon Set) – Plate alternative
Gloves:
- Gloves of the Dawn (quest reward) – Spell damage + good stats
- Hands of Power (Stratholme) – Solid alternative
Belt/Boots/Legs:
- Focus on stamina and intellect
- Spell damage if you can find it
- Don’t sacrifice too much armor for stats
Trinkets and Accessories
Best Trinkets:
- Royal Seal of Eldre’Thalas (Dire Maul Tribute) – +2% dodge and healing
- Mark of the Chosen (Maraudon quest) – Huge stamina boost
- Second Wind (LBRS) – Health regeneration for sustained grinding
Enchants:
- Weapon: Lifesteal or Fiery Weapon (spell damage scales with Fiery)
- Shield: +9 Stamina
- Chest: +4 All Stats
- Gloves: Riding Skill or +7 Strength
- Boots: Minor Speed (you’ll be moving between pulls constantly)
📍 Best AOE Grinding Locations (Level by Level)
Finding the right grinding spot is crucial. You want dense mob packs, minimal casters, and fast respawns.
Level 20-25: Getting Started
Duskwood – Raven Hill Cemetery
- Dense undead spawns
- Mix of skeletons and ghouls (all melee)
- Watch out for the worms that spawn – they can overwhelm you
- Competition from other players can be high
Wetlands – Murloc Camps
- Multiple murloc camps near Menethil Harbor
- Pure melee mobs
- Be careful not to pull too many at once (they hit surprisingly hard)
- Good cloth drops for money
Westfall – Defias Camps
- Humanoid mobs with solid vendor trash
- Some ranged attackers (avoid the riflemen)
- Harvest Golems also work but watch for casters
Level 25-30: Expanding Your Options
Hillsbrad Foothills – Yeti Cave
- Excellent concentration of yetis in the cave
- All melee except watch for the rare caster
- Yetis enrage at low health (more damage = more Reckoning procs)
- Can’t mount in cave so positioning matters
Wetlands – Dragonmaw Orcs
- Good experience and vendor trash
- Some casters mixed in (pull carefully)
- Less competition than other zones
Arathi Highlands – Dabyrie Militia
- Humanoid mobs that drop silver and cloth
- They run when low (can pull more mobs, good or bad!)
- Watch for casters in the camps
Level 30-35: Mid-Level Grinding
Arathi Highlands – Syndicate Camps
- Multiple syndicate camps with melee humanoids
- Pathstalkers have ranged attacks (focus them first)
- Excellent gold per hour from vendor trash
Duskwallow Marsh – Murloc Village
- One of the BEST spots for level 35-38
- 30+ murlocs in the village, all melee
- No special abilities except minor snare (ignore it)
- Fast respawns
- You can pull 10-15 at once here
Swamp of Sorrows – Lost Ones
- Level 34-36 humanoids
- One mob type spawns additional level 25 adds (great for Reckoning procs)
- Let the weak adds kill themselves on your shield spike
Level 35-42: Prime Grinding Time
Badlands – Earth Elementals
- Excellent vendor trash (elements sell well)
- Pure melee
- Some spots have good density
Badlands – Ogres
- Dual-wielding ogres (more hits = more Reckoning)
- Watch for casters in some camps
- Good experience rates
Badlands – Troggs
- Dense pulls available
- Mixed in with elementals and ogres
- Variety helps with grinding monotony
Tanaris – Wastewander Nomads
- Humanoid bandits in the desert
- Some casters to avoid
- Decent cloth and vendor trash drops
Level 42-50: Advanced Grinding
Feralas – Woodpaw Gnolls
- Recommended by many guides but has casters
- If you can avoid the casters, pulls are solid
- Competition can be high
Tanaris – Dunemaul Ogres
- Large ogre camp in northwest Tanaris
- Mix of melee and casters
- Better to skip casters and focus on warriors
Hinterlands – Gammerita Cave Turtles
- Often overlooked spot
- Pure melee
- Lower experience but extremely safe
The Hinterlands – Vilebranch Trolls
- Large troll camps
- Watch for casters and witchdoctors
- Good vendor trash
Level 48-55: Late Game Grinding
Searing Gorge – Dwarves
- Multiple dark iron dwarf camps
- Mix of melee and ranged
- Excellent vendor trash
- Can be challenging due to mob variety
Burning Steppes – Whelps
- Dragon whelps in various locations
- Pure melee for most types
- Fast respawns
- Good money from scales
Western Plaguelands – Undead
- PERFECT for Paladins (Exorcism and Holy Wrath bonus damage)
- Dense undead camps everywhere
- Sorrow Hill in particular is excellent
- Can also farm Righteous Orbs
Level 50-60: End Game Grinding
Western Plaguelands – Sorrow Hill
- Undead-heavy area
- Dense spawns
- Bonus Paladin damage against undead
- Occasional Righteous Orb drops
Eastern Plaguelands – Undead Camps
- Similar to WPL but higher level
- Multiple good grinding spots
- Bonus damage from anti-undead abilities
- Good gold per hour
Winterspring – Various Locations
- Yetis, owlbeasts, and other creatures
- Some spots better than others
- Less crowded than Plaguelands
Silithus – Twilight Camps
- Cultist camps with dense pulls
- Excellent vendor trash
- Twilight texts sell for good gold
- Can be farmed at 60 for gold
Instance AOE Grinding (Advanced)
Once you’re well-geared, you can solo parts of dungeons:
Scarlet Monastery – Cathedral
- Pull entire rooms of scarlet crusaders
- Excellent gold and experience
- Requires good gear and practice
Maraudon – Princess Runs
- Solo or duo certain sections
- Good gold from vendor trash
- Nature resist helps but isn’t required
🔄 The AOE Grinding Rotation
Understanding the proper sequence of abilities is what separates mediocre AOE grinders from experts.
Pre-Pull Setup
Before engaging mobs, make sure you have:
- Blessing of Sanctuary – Active on yourself
- Retribution Aura – For reflect damage
- Seal of Wisdom – For mana return
- Full Health and Mana – Never start a pull injured
- Shield Spike – Check it’s still active on your shield
The Pull Phase
Step 1: Gather Mobs
Run through the area collecting 5-15 mobs depending on your gear and confidence. Use your speed and survivability to group them up. Don’t worry about taking hits during this phase – you’re tanky enough.
Step 2: Position and Stack
Once you’ve gathered your mobs, position yourself so they’re all in front of you in a tight cluster. This maximizes Consecration damage and ensures they’re all hitting you.
Positioning Tips:
- Stand against a wall if possible to prevent mobs from surrounding you
- Keep them tightly grouped
- If ranged mobs pull, move toward them to bring them into melee range
The Burn Phase
Step 3: Activate Defensive Cooldowns
- Cast Holy Shield immediately
- Drop Consecration
- Start auto-attacking to proc Seal of Wisdom
Step 4: Maintain Damage
- Refresh Consecration every 8 seconds
- Recast Holy Shield when it expires (8-12 seconds)
- Use Exorcism and Holy Wrath if fighting undead
- Judge your seal occasionally for extra mana
Step 5: Monitor Reckoning Stacks
Watch for the Reckoning buff to stack up (shows as a buff icon). Once you have 3-5 stacks, switch to a high-damage seal and unleash your stored attacks:
- Switch to Seal of Righteousness or Seal of Command
- Attack once – all your Reckoning stacks fire off simultaneously
- Watch mobs evaporate from burst damage
- Switch back to Seal of Wisdom
The Survival Phase
If your health drops below 50% during a pull:
Emergency Heals:
- Cast Divine Protection for 50% damage reduction
- Cast Holy Light (use lower ranks to save mana)
- Keep refreshing Consecration between heals
- If desperate, use Divine Shield and heal to full
Concentration Aura Technique:
If you need to heal during combat without interruption:
- Switch to Concentration Aura
- Cast Holy Light
- Switch back to Retribution Aura
The Concentration Aura plus talents give you near-immunity to spell pushback.
Post-Pull Phase
After mobs are dead:
- Loot everything (vendor trash adds up fast)
- Check mana – if above 40%, pull again
- If below 40%, drink for 10-15 seconds
- Rebuff if Blessing of Sanctuary fell off
The Goal: Zero downtime grinding. Pull, kill, loot, pull again. With Seal of Wisdom and Blessing of Sanctuary mana returns, you should rarely need to drink.
💡 Advanced AOE Grinding Techniques
Once you’ve mastered the basics, these advanced tactics will boost your efficiency even further.
Optimal Mob Selection
What Makes a Perfect Grinding Mob:
✅ Melee only – Casters interrupt Consecration and are annoying ✅ Dual-wielders – Attack twice as fast = double the Reckoning procs ✅ Runners – Mobs that flee at low health pull more adds (free extra mobs!) ✅ High density – Tight spawn patterns mean less running between pulls ✅ Fast respawns – You want continuous grinding without waiting ✅ Humanoids – Best vendor trash and cloth drops
❌ Avoid These:
- Heavy casters
- Mobs with stuns or fears
- Mobs with disease (costs mana to Cleanse)
- Spread out spawns (too much running)
Managing Reckoning Stacks
Reckoning is your secret weapon for burst damage. Here’s how to use it optimally:
Building Stacks:
- Each time you get critically hit, you gain a Reckoning charge (10% chance per talent point)
- You can store up to 5 charges
- The buff lasts 8 seconds from the last proc
Spending Stacks:
- When you have 3+ charges and mobs are low, switch to Seal of Righteousness
- Your next attack hits 4-6 times instantly
- This can one-shot enemies that are already injured
Pro Tip: Don’t always spend all your Reckoning stacks. Sometimes it’s better to let them expire and keep consistent damage rather than switching seals constantly.
Mana Management Mastery
The key to zero-downtime grinding is maintaining your mana pool:
Mana Sources:
- Seal of Wisdom – Returns mana on every hit
- Blessing of Sanctuary – Returns mana on every block/dodge/parry
- Judgment of Wisdom – Extra mana return (use if mana is critical)
Mana Savers:
- Use lower rank Consecration (Rank 4-5 instead of max rank)
- Use lower rank Holy Light for emergency heals (Rank 4-6 is plenty)
- Don’t spam abilities unnecessarily
When to Drink:
- Only if mana drops below 30%
- Even then, drink for just 10-15 seconds (partial mana bar)
- Get back to grinding ASAP
With proper technique, you can grind for 30+ minutes without drinking once.
Dealing with Casters
Casters are the enemy of AOE grinding, but sometimes you can’t avoid them:
Strategy 1: Focus Fire
- Use Exorcism (if undead) or Hammer of Justice to interrupt
- Kill casters first before they can cast multiple spells
- Accept that some Consecration interruptions will happen
Strategy 2: Skip Them
- If a camp has too many casters, find a different spot
- It’s better to have lower XP with all-melee than higher XP with constant interruptions
Strategy 3: Pull Around Them
- Sometimes you can pull melee mobs away from casters
- Position yourself out of caster range
Efficient Looting
Don’t waste time looting poorly:
Loot Rules:
- Loot everything immediately after combat
- Vendor all grey and white items
- Keep cloth (Runecloth especially sells well)
- Keep valuable crafting materials
- Ignore items worth less than 1 silver unless you’re desperate
Bag Management:
- Bring large bags (14-16 slots minimum)
- Keep 4-8 free slots at all times
- Vendor/mail items every 60-90 minutes
Competition Management
Other players can ruin your grinding spot:
Dealing with Competition:
- Politely ask if they want to group up and share kills
- If they decline, find a different camp in the same zone
- Farm during off-peak hours (weekday mornings)
- Have 2-3 backup grinding locations in mind
Don’t:
- Ninja mobs from other players
- Grief or harass people
- Waste time arguing in chat
Just find another spot and keep grinding efficiently.
🎮 Useful Macros for AOE Grinding
These macros will streamline your grinding and make ability management much easier.
All-in-One AOE Macro
/cast Holy Shield
/cast Consecration
/cast [target=player] Blessing of Sanctuary
This macro combines your three main abilities. Spam it during combat to maintain uptime on everything.
Seal Switcher Macro
/cast [mod:shift] Seal of Righteousness; Seal of Wisdom
Hold Shift to switch to Seal of Righteousness for Reckoning dumps. Release to go back to Seal of Wisdom.
Emergency Panic Macro
/cast Divine Shield
/cast [target=player] Lay on Hands
/cast [target=player] Holy Light(Rank 7)
Smash this when a pull goes horribly wrong. Uses all emergency cooldowns.
Aura Swap Macro
/cast [mod:alt] Concentration Aura; Retribution Aura
Hold Alt to switch to Concentration Aura for uninterrupted healing. Release to return to Retribution Aura.
Auto-Attack + Seal Macro
/startattack
/cast Seal of Wisdom
Ensures you’re always auto-attacking and maintains your seal. Spam this during combat.
🚫 Common Mistakes to Avoid
Here are the mistakes that tank your experience per hour:
Pulling Too Few Mobs
Mistake: Only pulling 2-3 mobs because you’re scared to die.
Fix: You’re designed for large pulls! Start with 5-6 mobs and gradually increase as you get comfortable. Your reflect damage scales with mob count – more mobs = faster kills.
Using Max Rank Spells
Mistake: Always using max rank Consecration and running OOM constantly.
Fix: Use Rank 4-5 Consecration. The damage difference is minimal but the mana savings are massive. Same for Holy Light heals.
Ignoring Spell Damage Gear
Mistake: Focusing on tank stats while leveling instead of spell damage.
Fix: Spell damage is KING for AOE grinding. Every point increases your damage output significantly. Mix in cloth/leather pieces if they have spell damage.
Not Using Shield Spike
Mistake: Forgetting to apply or maintain shield spike.
Fix: Shield spike is one of your highest damage sources when grinding. Always keep it active and reapply when it breaks.
Improper Reckoning Usage
Mistake: Never switching seals to spend Reckoning stacks, or switching too often and wasting GCDs.
Fix: Let stacks build to 3-4, then swap to Seal of Righteousness for one attack burst. Don’t micromanage it.
Poor Grinding Location Choice
Mistake: Staying in a spot with too many casters or spread-out spawns.
Fix: If you’re constantly interrupted or running too much between pulls, find a new spot. Dense melee camps are worth traveling for.
📊 AOE Grinding vs. Quest Leveling
Should you AOE grind or quest? Here’s an honest comparison:
| Aspect | AOE Grinding | Quest Leveling |
|---|---|---|
| XP per Hour | High (once mastered) | Moderate to High |
| Gold per Hour | Excellent | Poor until 50+ |
| Gear Dependency | Moderate to High | Low |
| Monotony | Very repetitive | Varied content |
| Skill Requirement | High | Low |
| Gear Upgrades | Vendor trash only | Quest rewards |
| Rested XP Usage | Burns through quickly | Uses efficiently |
My Recommendation:
- Levels 1-40: Quest normally, practice basic AOE grinding occasionally
- Levels 40-55: Mix of AOE grinding and questing based on rested XP
- Levels 55-60: Heavy AOE grinding for fast leveling and gold
AOE grinding is most efficient when you:
- Have rested XP to burn through quickly
- Need gold (grinding makes way more than questing)
- Are in a zone with excellent grinding spots
- Have appropriate gear with spell damage
Quest when you:
- Need gear upgrades from quest rewards
- Want to break up the monotony
- Are working toward specific quest chains (like mount quests)
- Don’t have good grinding gear yet
💰 Gold Making Through AOE Grinding
One of the biggest advantages of AOE grinding is the gold income. Here’s what to expect:
Expected Gold per Hour
| Level Range | Gold per Hour | Notes |
|---|---|---|
| 20-30 | 5-10g | Mostly vendor trash |
| 30-40 | 8-15g | Better drops, more mobs per pull |
| 40-50 | 12-20g | Excellent vendor trash |
| 50-60 | 20-35g | Best gold rates, valuable drops |
These numbers assume efficient grinding with minimal downtime.
Most Valuable Drops
Vendor Trash Humanoid mobs drop the best vendor trash. Greys and whites that sell for 5-20 silver each add up quickly when you’re killing 50+ mobs per hour.
Cloth
- Wool Cloth: 5-10s per stack
- Mageweave Cloth: 20-40s per stack
- Runecloth: 1-2g per stack
At level 50+, you’ll collect 20-40 Runecloth per hour of grinding.
Crafting Materials Leather, ore nodes near grinding spots, and other materials can boost gold income.
Funding Your Character
Use AOE grinding gold to:
- Buy your level 40 and 60 epic mounts
- Purchase spell damage gear from the auction house
- Stock up on consumables for raids
- Fund profession leveling
- Help guildmates or alts
Many Paladins use AOE grinding as their primary gold source throughout Classic.
🔍 Frequently Asked Questions
Do I need to respec Protection to AOE grind effectively?
What level can I start AOE grinding?
Is AOE grinding faster than quest leveling?
How much gold can I make while AOE grinding?
What gear do I need for AOE grinding?
Can I AOE grind in dungeons?
What’s the biggest mistake new AOE grinders make?
Final Thoughts
AOE grinding as a Paladin is one of the most satisfying and efficient ways to level in WoW Classic. It transforms the Paladin from a slow, auto-attack-focused class into an unstoppable grinding machine that mows through packs of enemies while generating excellent gold income.
The key is patience and practice. Your first few AOE grinding sessions will feel clunky as you learn pull sizes, ability timing, and mana management. But once it clicks, you’ll wonder how you ever leveled any other way.
Start small at level 20-32 with basic pulls while questing. Respec to Protection at 32 and begin serious AOE grinding. By level 40 with Holy Shield, you’ll be pulling 10-15 mobs at a time and laughing as they melt on your shields.
Remember that gear matters significantly. Invest in spell damage pieces even if they’re cloth or leather. That 200+ spell damage is what separates decent AOE grinding from exceptional gold and experience rates.
For more Paladin optimization, check out our guides on Protection talents, gold farming at 60, and leveling strategies.
Now get out there and show those mobs what a real Paladin can do! ⚔️🛡️