Discipline Priests excel at preventing damage and keeping groups alive through proactive healing. While Holy dominates raid healing, Discipline offers a unique playstyle that shines in 5-man dungeons and can effectively fill tank healing roles in raids.
This comprehensive WoW Classic Discipline Priest PvE Guide covers everything from dungeon healing strategies to raid performance, helping you master Discipline Priest in all Classic Era PvE content.
Why Discipline for PvE?
Discipline brings specific advantages to PvE content that make it a viable alternative to Holy in many situations.
Damage Prevention – Power Word: Shield prevents damage before it happens, reducing the burden on your healing and protecting against one-shot mechanics.
Superior Mana Efficiency – Meditation talent provides excellent mana regeneration while casting, allowing you to heal longer without drinking.
Strong Tank Healing – The combination of shields, Renew, and efficient direct heals makes you an excellent tank healer.
Flexibility – Better damage output than Holy through Wand Specialization and other talents means you can contribute DPS when healing isn’t needed.
Personal Survivability – Enhanced shields and defensive talents keep you alive in dangerous situations.
Best Discipline PvE Talent Build (21/30/0)
This hybrid build combines Discipline’s preventive tools with Holy’s healing power for optimal PvE performance.
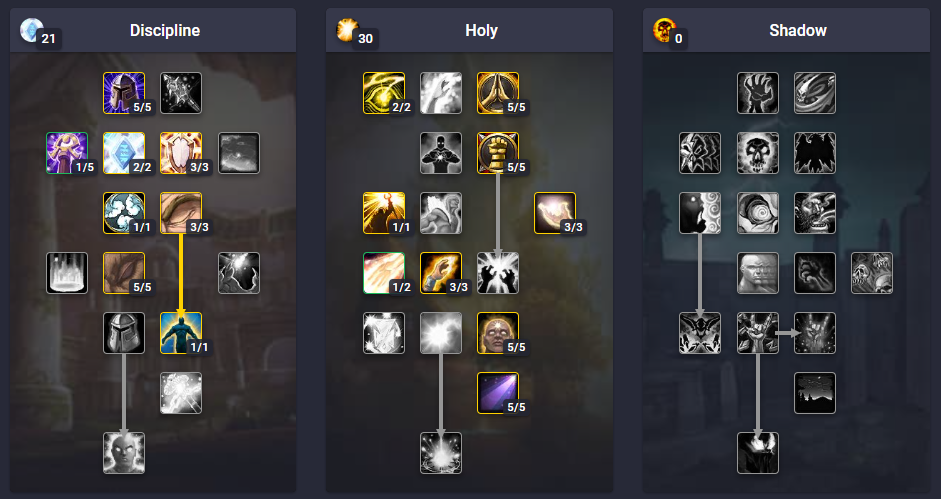
Talent Adjustments
More Mana Regeneration – Increase Meditation to 3/3 if you find yourself going out of mana frequently. Remove points from Spiritual Guidance.
Raid Healing Focus – Take Improved Prayer of Healing (2/2) instead of Searing Light if assigned to raid healing duties.
Threat Issues – If you pull aggro frequently, max out Silent Resolve and be more careful with threat management.
For more builds and experimentation, use our WoW Classic Priest Talent Calculator.
Healing Rotation and Priorities
Discipline healing requires a proactive mindset. You prevent damage with shields and maintain health pools with efficient heals.
Core Healing Rotation
Pre-Combat – Apply Power Word: Shield to the tank 15+ seconds before pull so Weakened Soul expires early.
Pull Sequence – Reapply shield immediately after pull → Cast Renew on tank → Begin Greater Heal rotation.
Sustained Healing – Keep Renew active on the tank → Use Greater Heal for efficient healing → Shield before big hits.
Emergency Healing – Flash Heal when someone drops below 40% health → Power Word: Shield to prevent death → Continue with efficient heals.
Group Damage – Prayer of Healing when 3+ party members take damage → Shield the most vulnerable → Spot heal with Flash Heal.
Spell Priority by Situation
| Situation | Priority Rotation | Mana Efficiency |
|---|---|---|
| Tank steady damage | Renew → Greater Heal Rank 4-5 | Excellent |
| Tank spike damage | Power Word: Shield → Flash Heal → Renew | Moderate |
| DPS taking damage | Power Word: Shield → Renew or Flash Heal | Good |
| Group AoE damage | Prayer of Healing → Shield lowest → Spot heal | Poor |
| Low mana | Renew spam → Greater Heal Rank 1-3 | Excellent |
| No healing needed | Wand damage → Smite if mana allows | N/A |
Advanced Healing Techniques
Downranking Mastery – Keep multiple ranks of Greater Heal (Ranks 1-4) and Flash Heal (Ranks 5-7) on your bars. Use lower ranks when targets don’t need full healing.
Predictive Shielding – Learn boss and trash mechanics. Shield the tank 2-3 seconds before big abilities hit. This prevents damage and interrupts.
Renew Blanket – In low-damage phases, keep Renew rolling on multiple party members. It’s extremely mana efficient.
Five Second Rule – Stop casting for 5 seconds between pulls to trigger full spirit-based mana regeneration. This is crucial for dungeon sustainability.
Inner Focus Timing – Save Inner Focus for critical moments: low mana situations, expensive Prayer of Healing casts, or emergency Greater Heal on dying tanks.
Flash Heal Ranks – Max rank Flash Heal is extremely expensive. Use Rank 7 for emergencies, Rank 5-6 for moderate damage.
Stat Priority
Your stat priorities determine which gear to prioritize and how to gem/enchant your equipment.
Primary Stats
+Healing Power – Your most important stat. Every point increases all healing done. Target 400-500 for pre-raid, 600-800 in early raids, 1000+ in Naxxramas.
Intellect – Increases mana pool and spell critical strike chance. Critical heals are 50% more effective. Aim for 350-400 unbuffed at level 60.
Spirit – Mana regeneration, especially powerful with Meditation talent. The more spirit you have, the more you regenerate while casting. Target 300-400 for comfortable regen.
Mp5 (Mana per 5 seconds) – Mana regeneration that works while casting. Very valuable but rare on gear. Take it when available.
Secondary Stats
Stamina – Survivability. Important for progression content where you might take damage. Target 4000-5000 health unbuffed.
Spell Critical Strike – More healing crits mean better throughput. Naturally increases with intellect. Aim for 15-20% unbuffed.
Stat Weights (Approximate)
For comparing gear pieces, use these rough values:
- 1 +Healing = 1.0 point
- 1 Intellect = 0.4 points
- 1 Spirit = 0.35 points
- 1 Mp5 = 2.0 points
- 1 Spell Crit = 0.5 points
- 1 Stamina = 0.1 points
Breakpoints and Thresholds
Mana Pool – Target 6000+ mana unbuffed for comfortable raid healing. Below 5500 you’ll struggle in longer fights.
Spirit Effectiveness – Spirit becomes significantly more valuable above 300. Below 200, it provides minimal benefit.
+Healing Efficiency – Every point matters, but returns diminish slightly after 800-900 in terms of gear efficiency vs other stats.
Gear and Best in Slot
Discipline shares most gear with Holy Priests, prioritizing healing power and mana stats.
Pre-Raid Best in Slot
These items represent your best options before entering raids. Farm these from dungeons, quests, and reputation rewards.
Head: Whitemane’s Chapeau (Scarlet Monastery Cathedral – High Inquisitor Whitemane) Neck: Animated Chain Necklace (Stratholme Undead – Ramstein the Gorger) Shoulders: Mantle of the Oracle (Various world drops) Back: Amplifying Cloak (Quest: Natural Materials – Winterspring) Chest: Robes of the Exalted (Argent Dawn Revered reputation) Wrist: Dusty Bracers (Stratholme Live – Hearthsinger Forresten) Hands: Hands of the Exalted Herald (Scholomance – Darkmaster Gandling) Waist: Whipvine Cord (Maraudon – Celebras the Cursed) Legs: Skyshroud Leggings (Stratholme Undead – Baron Rivendare) Feet: Omnicast Boots (Lower Blackrock Spire – Bannok Grimaxe) Ring 1: Fordring’s Seal (Quest: In Dreams – Western Plaguelands) Ring 2: Band of the Steadfast Hero (Quest: The Princess Saved? – Blackrock Depths) Trinket 1: Second Wind (Various dungeon drops) Trinket 2: Briarwood Reed (Upper Blackrock Spire – Jed Runewatcher) Main Hand: Hammer of Grace (Stratholme Undead – Maleki the Pallid) Off-Hand: Thuzadin Sash (Stratholme Undead – Magistrate Barthilas) or Tome of the Lost (Stratholme Undead) Wand: Bonecreeper Stylus (Scholomance – Rattlegore)
For complete pre-raid lists with alternatives, check our WoW Classic Priest Pre-Raid BiS Guide.
Raid Progression Gear
Phase 1 (Molten Core / Onyxia):
- Tier 1: Prophecy set – Solid starting raid gear
- Benediction/Anathema – Best weapon until Naxxramas (complete class quest)
- Cauterizing Band – Excellent healing ring from Lucifron
- Rejuvenating Gem – Strong healing trinket from Lucifron
Phase 2 (Dire Maul):
- Royal Seal of Eldre’Thalas – Best trinket from tribute runs
- Padre’s Trousers – Excellent healing legs from tribute
Phase 3 (Blackwing Lair):
- Tier 2: Vestments of Transcendence – Major upgrade from Tier 1
- Neltharion’s Tear – Powerful on-use healing trinket
- Scepter of the False Prophet – Excellent healing weapon
- Cloak of the Brood Lord – Best-in-slot back until AQ40
Phase 4 (Zul’Gurub / AQ20):
- Hazza’rah’s Charm of Healing – Best-in-slot trinket
- Animist’s Caress – Strong healing shoulders
- Cloak of Clarity – Excellent mana regeneration cloak
Phase 5 (AQ40):
- Tier 2.5: Striker’s Garb pieces – Situational upgrades
- Burrower Bracers – Best-in-slot wrists
- Ring of the Martyr – Excellent healing ring
- Grasp of the Old God – Strong healing main hand
Phase 6 (Naxxramas):
- Tier 3: Vestments of Faith – Best-in-slot raid set
- Sapphiron’s Scale – Best trinket in game
- Gem of Trapped Innocents – Excellent healing trinket
- Hammer of the Twisting Nether – Best main hand weapon
Weapon Progression
The most important upgrades for healers are weapons. Prioritize these:
- Pre-Raid: Hammer of Grace (Stratholme)
- Molten Core: Benediction (Class Quest) ⭐ Priority #1
- Alternative MC: Lok’amir il Romathis (Molten Core)
- Blackwing Lair: Scepter of the False Prophet
- AQ40: Blessed Qiraji Acolyte Staff
- Naxxramas: Hammer of the Twisting Nether
Benediction should be your absolute priority once you can attempt the quest. It’s best-in-slot until Naxxramas.
Consumables and Buffs
Proper consumables dramatically improve your healing output and sustainability in raids.
Essential Consumables
Mana Potions ⭐ Most Important
- Major Mana Potion (1350-2250 mana) – Use on cooldown in raids
- Superior Mana Potion (900-1500 mana) – Cheaper alternative for dungeons
- Dark/Demonic Runes (900-1500 mana) – No shared cooldown with potions
Elixirs
- Elixir of Greater Intellect (+25 intellect) – Best for healing output
- Elixir of Sages (+18 intellect, +18 spirit) – Alternative with regen
- Elixir of Superior Defense (+450 armor) – For survivability
Food Buffs
- Nightfin Soup (+8 mp5) – Best for sustained healing
- Blessed Sunfruit (+10 spirit) – Good regen alternative
- Smoked Desert Dumplings (+20 spirit) – Best spirit food
Flasks (Progression Content)
- Flask of Distilled Wisdom (+2000 mana) – Expensive but powerful
- Flask of Supreme Power (+70 spell damage) – Uncommon for healers
Protection Potions (Boss-Specific)
- Greater Shadow Protection Potion – Reduces shadow damage
- Greater Nature Protection Potion – Reduces nature damage
- Greater Fire Protection Potion – Essential for many MC/BWL fights
Dungeon Consumables
For 5-man content, you don’t need expensive consumables:
- Superior Mana Potion (budget friendly)
- Mageblood Potion (+12 mp5 for 1 hour)
- Brilliant Wizard Oil (+36 healing, +14 spell damage to weapon)
World Buffs
Always obtain these before raids for maximum performance:
Rallying Cry of the Dragonslayer – +140 AP, +5% spell crit, +10% melee crit (Turn in Onyxia head)
Warchief’s Blessing (Horde) / Rallying Cry (Alliance) – +300 health, +15 mp5 (Turn in opposing faction leader’s head)
Spirit of Zandalar – +15% to all stats, +10% movement speed (Yojamba Isle, Zul’Gurub)
Songflower Serenade – +15 all stats, +5% spell crit (Felwood)
Dire Maul Tribute Buffs – +10% intellect, +10% stamina, +25 all resistances (Complete tribute run)
Resist Fire (Fire-heavy fights) – +83 fire resistance (Major cities)
Fengus’ Ferocity (DPS phases) – +200 attack power (Dire Maul North)
Enchants
Prioritize these enchants for your gear:
- Head: Arcanum of Focus (+8 healing, Lesser Cenarion Circle honored)
- Shoulders: Zandalar Signet of Serenity (+33 healing, Zul’Gurub exalted)
- Chest: Enchant Chest – Stats (+4 all stats)
- Bracers: Enchant Bracer – Healing Power (+24 healing)
- Gloves: Enchant Gloves – Healing Power (+30 healing)
- Legs: Prophetic Spellthread (+18 healing, +8 spirit, Argent Dawn revered)
- Boots: Enchant Boots – Spirit (+5 spirit)
- Weapon: Enchant Weapon – Healing Power (+55 healing)
Dungeon Healing Strategies
Discipline excels in 5-man content where your shields and mana efficiency shine.
General Dungeon Tips
Pre-Pull Shields – Shield the tank 15+ seconds before every pull. This ensures Weakened Soul expires during combat for re-shielding.
Renew Uptime – Keep Renew active on the tank at all times. It’s your most mana-efficient heal.
Drink Aggressively – Don’t enter combat below 80% mana. Use the five-second rule between pulls.
Crowd Control – Use Shackle Undead liberally in undead dungeons. Psychic Scream for emergencies.
DPS When Safe – Wand enemies when the group is stable. Your 25% wand damage bonus adds up over a dungeon.
Dungeon-Specific Strategies
Stratholme (Undead Side)
- Shackle Undead is extremely powerful here
- Shield tanks before Ramstein the Gorger pulls
- Keep Abolish Disease ready for disease-heavy trash
- Baron Rivendare: Shield tank before meteor strikes
Scholomance
- Dispel poison on Dark Plague pulls
- Shield before Blood Boil casts from Rattlegore
- Darkmaster Gandling: Shield players before they’re teleported
Blackrock Spire (Upper)
- Shield Pyroguard Emberseer tank constantly
- Warchief Rend Blackhand: Dispel Magic his buffs
- General Drakkisath: Shield tank before Cleave and Conflagration
Dire Maul (All Wings)
- North: Heavy AoE damage on some pulls, spam shields
- East: Shield puller in conservatory, dispel banish on ogre bosses
- West: Keep Renew on tank during Tendris Warpwood
Blackrock Depths
- Emperor Dagran Thaurissan: Shield mind control targets
- Ambassador Flamelash: Shield tank before Spirit of Flame spawns
- Long instance, manage mana conservatively
Common Dungeon Mistakes
Not Pre-Shielding – Always shield tanks before pulls. This is Discipline’s signature advantage.
Overhealing with Flash Heal – Flash Heal is expensive. Use Renew and downranked Greater Heal for efficiency.
Not Using Shackle – Shackle Undead makes undead dungeons trivial. Use it liberally.
Ignoring Five Second Rule – Wait 5 seconds after your last spell before drinking for maximum mana regeneration.
Standing in Bad – Even though you can shield yourself, avoid avoidable damage to conserve mana.
Raid Healing Strategies
Discipline can heal raids effectively, though most guilds prefer Holy for progression content.
Raid Role and Assignments
Tank Healing – Your primary role in raids. Shield before spike damage, maintain Renew, use efficient Greater Heal.
Off-Tank Support – Shield off-tanks before they pick up adds. Keep Renew rolling on all tanks.
Raid Healing (Secondary) – If assigned to raid healing, focus on shielding vulnerable classes and spot healing with Flash Heal.
Dispel Duty – You’ll often be assigned dispel duties. React quickly with Dispel Magic and Abolish Disease.
Molten Core Strategies
Lucifron – Dispel Magic Lucifron’s Curse from raid members immediately
Magmadar – Keep Renew on everyone, heavy raid damage from Lava Bomb
Gehennas – Dispel duty is critical, curse must be removed quickly
Garr – Shield tanks picking up adds, heavy group damage
Geddon – Shield Living Bomb targets, they need to run out
Sulfuron Harbinger – Shield tank before Demoralizing Shout
Golemagg – Tank healing focused, shield before Earthquake
Majordomo Executus – Shield healers, dispel magic shields on adds
Ragnaros – Shield tank constantly during Phase 2, use consumables heavily
Blackwing Lair Strategies
Razorgore – Shield mind controllers, heal them through damage
Vaelastrasz – Extremely healing intensive, spam Flash Heal and use consumables
Broodlord Lashlayer – Shield tank before Blast Wave
Firemaw/Ebonroc/Flamegor – Shield before Wing Buffet, heavy tank damage
Chromaggus – Dispel debuffs quickly, shield tanks before breath attacks
Nefarian – Class calls require adaptation, shield tanks heavily in Phase 3
AQ40 Key Encounters
Prophet Skeram – Shield tanks when he splits, track real boss
Bug Family – Heavy healing required, use all cooldowns
Fankriss – Shield tank before Mortal Wound stacks high
Huhuran – Extremely intense healing phase, burn all mana
Twin Emperors – Shield teleporting tanks, coordinate with healers
C’Thun – Shield players in stomach, precise healing required
Naxxramas Highlights
Patchwerk – Most healing-intensive fight in game, use every consumable
Heigan – Shield during dance, players taking avoidable damage
Loatheb – Limited healing windows, stack HoTs including Renew
Four Horsemen – Shield tanks during mark transitions
Sapphiron – Shield players behind ice blocks
Kel’Thuzad – Shield Mind Control targets, heavy raid damage
Raid Healing Tips
Heal Assignments – Always know your assignment before pulls. Stick to your role.
Buff Responsibility – Maintain Power Word: Fortitude and Divine Spirit on your groups. Use Prayer of Fortitude before pulls.
Threat Management – Silent Resolve helps, but watch your threat. Let tanks build aggro before healing aggressively.
Mana Conservation – Raids are long. Don’t spam max-rank heals when lower ranks suffice.
Communication – Call out when you need Innervate or mana. Coordinate dispels with other healers.
For additional raid strategies, visit our WoW Classic Priest Healing Guide.
Mana Management
Proper mana management separates good Discipline Priests from great ones.
Core Mana Principles
Meditation Talent – Your 1-3 points in Meditation provide mana regeneration while casting. Time your heals to maximize this benefit.
Five Second Rule – You regenerate zero spirit-based mana while casting. After 5 seconds of not casting, full spirit regen kicks in.
Downranking – Using lower ranks of spells provides better healing per mana. Learn which ranks to use in different situations.
Efficient Spell Selection – Renew and Greater Heal are your most efficient heals. Flash Heal max rank costs nearly 2x mana.
Spell Efficiency Rankings
| Spell | Healing per Mana | When to Use |
|---|---|---|
| Renew (Full Duration) | Excellent | Always on tanks |
| Greater Heal Rank 1-3 | Excellent | Low damage situations |
| Greater Heal Rank 4-5 | Very Good | Standard tank healing |
| Power Word: Shield | Good | Prevent spike damage |
| Flash Heal Rank 5-6 | Moderate | Medium emergencies |
| Prayer of Healing | Poor | Group damage only |
| Flash Heal Max Rank | Poor | Life-or-death situations |
Advanced Mana Techniques
Drinking Optimization – Start drinking immediately after the last mob dies. Every second counts.
Wanding – Your 25% wand damage bonus means wanding actually helps. Wand when no healing is needed.
Inner Focus Usage – Save for expensive spells: Prayer of Healing, max-rank Greater Heal, or when critically low on mana.
Consumable Timing – Use mana potions early and often. Don’t save them for emergencies—use them proactively.
Dark Rune Coordination – Dark/Demonic Runes don’t share cooldowns with potions. Use both for maximum mana.
Spirit Window Management – In long fights, create 5-second casting breaks during low-damage phases for spirit regen.
Addons and UI Setup
Proper addons significantly improve your healing effectiveness and awareness.
Essential Addons
Healbot or VuhDo – Mouseover healing frames that allow click-casting. Configure all your heals for quick access.
Deadly Boss Mods (DBM) or BigWigs – Essential for raid awareness. Warns you about boss abilities and timers.
Details! or Recount – Track healing output, overhealing, and mana efficiency to improve performance.
OmniCC – Shows cooldown numbers on abilities for precise timing.
WeakAuras – Create custom alerts for important buffs, debuffs, and cooldowns. Track Inner Fire, Weakened Soul, and more.
Recommended Setup
Raid Frames – Place in center-bottom of screen for easy viewing while watching boss mechanics.
Unit Frames – Keep your target and target-of-target visible. Track boss cast bars for shield timing.
Buffs/Debuffs – Track Inner Fire, Power Word: Fortitude, and important raid buffs prominently.
Cooldown Tracking – Monitor Inner Focus, Power Word: Shield (Weakened Soul), and consumable cooldowns.
Threat Meter – Omen or similar addon to avoid pulling aggro with healing.
WeakAura Priorities
Create or import WeakAuras for:
- Inner Fire uptime reminder
- Weakened Soul debuff tracker on all raid members
- Inner Focus cooldown and availability
- Low mana warning (below 20%)
- Renew duration on current target
Macros for PvE
Effective macros streamline your healing and improve reaction times.
Essential PvE Macros
Mouseover Shield
#showtooltip Power Word: Shield
/cast [@mouseover,help,nodead][help][target=player] Power Word: Shield
Mouseover Flash Heal
#showtooltip Flash Heal
/cast [@mouseover,help,nodead][help][target=player] Flash Heal
Mouseover Greater Heal
#showtooltip Greater Heal
/cast [@mouseover,help,nodead][help][target=player] Greater Heal
Mouseover Renew
#showtooltip Renew
/cast [@mouseover,help,nodead][help][target=player] Renew
Mouseover Dispel
#showtooltip Dispel Magic
/cast [@mouseover,help,nodead][help][target=player] Dispel Magic
Inner Focus + Greater Heal
#showtooltip Greater Heal
/cast Inner Focus
/cast Greater Heal
Inner Focus + Prayer of Healing
#showtooltip Prayer of Healing
/cast Inner Focus
/cast Prayer of Healing
Emergency Self-Heal
#showtooltip Flash Heal
/cast [@player] Power Word: Shield
/cast [@player] Flash Heal
Shield Main Tank (Set Focus)
#showtooltip Power Word: Shield
/cast [@focus,help,nodead][@mouseover,help,nodead][help] Power Word: Shield
Shackle Undead with Stop Casting
#showtooltip Shackle Undead
/stopcasting
/cast [@mouseover,harm,nodead][harm] Shackle Undead
For more advanced macros, check our WoW Classic Priest Macros guide.
Common Mistakes and How to Fix Them
Avoid these frequent errors to improve your Discipline healing performance:
Mistake #1: Not Pre-Shielding
Problem: Casting Power Word: Shield reactively instead of predictively wastes its damage prevention.
Solution: Learn boss and trash mechanics. Shield 2-3 seconds before big hits. Pre-shield tanks between pulls so Weakened Soul expires early.
Mistake #2: Overusing Flash Heal
Problem: Flash Heal max rank costs nearly as much as Greater Heal but heals for less. Spamming it drains mana.
Solution: Use Renew and downranked Greater Heal for efficiency. Save Flash Heal for genuine emergencies.
Mistake #3: Ignoring Renew
Problem: Many Discipline Priests forget Renew exists, missing out on extremely efficient healing.
Solution: Keep Renew active on tanks at all times. In low-damage phases, blanket Renew on multiple raid members.
Mistake #4: Poor Mana Management
Problem: Going out of mana mid-fight or not drinking between pulls.
Solution: Downrank appropriately, use Renew more, drink aggressively, and use consumables proactively.
Mistake #5: Not Tracking Weakened Soul
Problem: Wasting globals trying to shield targets with Weakened Soul debuff.
Solution: Install a Weakened Soul tracker addon. Wait for the debuff to expire before re-shielding.
Mistake #6: Standing in Fire
Problem: Taking avoidable damage that requires healing from other healers.
Solution: Position properly, watch your feet, and use DBM/BigWigs warnings. Your healing doesn’t matter if you’re dead.
Mistake #7: Pulling Threat
Problem: Healing too aggressively early in fights and pulling aggro.
Solution: Let tanks build threat for 3-5 seconds. Use Silent Resolve talent. Consider Fade if you pull.
Mistake #8: Not Maintaining Inner Fire
Problem: Forgetting to keep Inner Fire active, losing significant armor.
Solution: Create a WeakAura or use an addon to remind you. Recast Inner Fire every 10 minutes.
Mistake #9: Wrong Downrank Usage
Problem: Using max rank when lower ranks would suffice, or using too low ranks and wasting globals.
Solution: Learn appropriate ranks for each situation. Tank at 80%? Use Rank 4 Greater Heal. Tank at 30%? Use max rank.
Mistake #10: Not Using Inner Focus
Problem: Saving Inner Focus for “the perfect moment” and never using it.
Solution: Use Inner Focus on cooldown during high-damage phases. Don’t hoard it—regular usage provides more value than perfect usage.
Tips and Tricks
Master these advanced techniques to elevate your Discipline Priest gameplay:
Pro Tips
Predictive Shielding – Study boss timers. Shield your tank exactly 2 seconds before major abilities hit. This prevents damage and potential one-shots.
Renew Blanketing – During low-damage raid phases, apply Renew to 10-15 raid members. It’s incredibly mana efficient if the full duration is used.
Shield Rotation – Track which DPS are taking consistent damage (melee, warlocks with Life Tap). Rotate shields through them efficiently.
Greater Heal Canceling – Start casting Greater Heal, but cancel if someone else heals the target first. Saves mana and globals.
Fade Usage – Fade doesn’t drop combat but reduces threat temporarily. Use it if you’re close to pulling aggro.
Mana Potion + Dark Rune Combo – These have separate cooldowns. Use both for massive mana recovery in critical moments.
Consumable Stacking – You can have one Guardian elixir (intellect) and one Battle elixir (defense) active simultaneously. Stack appropriate buffs.
Prayer of Healing Timing – Don’t use Prayer of Healing unless 3+ party members need healing. It’s inefficient otherwise.
Boss Positioning – Stand at maximum healing range. This gives you more time to react to mechanics and reduces incoming damage.
Healing Assignment Focus – If assigned tank healing, tunnel vision on your tanks. Trust other healers to handle raid damage.
Efficiency Optimizations
Spell Queueing – Queue your next spell slightly before the current cast finishes to minimize downtime between casts.
Pre-Casting – Start casting Greater Heal before damage hits if you know it’s coming. Time it to land right after damage.
Movement Planning – Plan your movement during mechanics. Cast instant spells (Renew, Power Word: Shield) while moving.
Target of Target Healing – Heal the tank by targeting the boss and using target-of-target macros. Helps with threat management.
Dispel Priority – Learn which debuffs are dangerous and which are harmless. Prioritize critical dispels over minor ones.
Leveling as Discipline for PvE
While Shadow is faster for pure leveling, Discipline allows you to heal dungeons while leveling efficiently.
Hybrid Leveling Build
Levels 10-19: Wand Specialization (5/5) Levels 20-29: Improved Power Word: Shield (3/3), Silent Resolve (2/5) Levels 30-39: Finish Silent Resolve (5/5), Mental Agility (5/5) Levels 40-49: Meditation (3/3), Improved Power Word: Fortitude (2/2) Levels 50-60: Enter Holy tree for Spiritual Healing (5/5) and other healing talents
This build allows you to quest reasonably well while being excellent at dungeon healing.
Leveling Tips
Wand is King – With 25% wand damage bonus, wanding becomes very effective. Always use the best wand for your level.
Shield + DoT + Wand – Standard rotation: Power Word: Shield yourself, cast Shadow Word: Pain, wand enemy down.
Dungeon Healing – You can heal all dungeons in this hybrid spec. Keep a healing gear set in your bags.
Profession Synergy – Level Tailoring while leveling for constant gear upgrades. You can craft your own healing gear.
For complete leveling strategies, visit our WoW Classic Discipline Leveling Guide.
Frequently Asked Questions
Can Discipline Priest main heal raids?
What healing assignments work best for Discipline?
How much healing should I do in raids as Discipline?
Should I use max rank or downranked heals?
When should I use Inner Focus?
Is Discipline good for dungeon healing?
What’s the best way to manage mana in long raid fights?
Should I use Prayer of Healing in raids?
Related Discipline Priest Guides
Discipline Specialization
Core Guides
- WoW Classic Discipline Priest Guide (complete overview)
- WoW Classic Discipline PvP Guide (battlegrounds & arena)
- WoW Classic Discipline Leveling Guide (1-60 path)
Other Priest Specs
Holy Priest
- WoW Classic Holy Priest Guide (overview)
- WoW Classic Holy PvE Guide (raiding)
- WoW Classic Holy PvP Guide (PvP)
Shadow Priest
- WoW Classic Shadow Priest Guide (overview)
- WoW Classic Shadow PvE Guide (DPS)
- WoW Classic Shadow PvP Guide (PvP)
General Priest Resources
- WoW Classic Priest Guide (main hub)
- WoW Classic Priest Leveling Guide (leveling hub)
- WoW Classic Priest Macros (macro collection)
- WoW Classic Priest Talent Calculator (talent planner)
- WoW Classic Priest Pre-Raid BiS (pre-raid gear)
- WoW Classic Priest Healing Guide (healing mechanics)
- WoW Classic Priest Racial Abilities Guide (racial spells)
- WoW Classic Priest Quests Guide (class quests)
Conclusion
Discipline Priest offers a unique and engaging PvE healing experience focused on damage prevention and proactive gameplay. While Holy may dominate the healing meters in raids, Discipline brings unmatched mana efficiency and protective capabilities that shine in both 5-man dungeons and specific raid encounters.
The key to excelling as Discipline in PvE is mastering predictive shielding, efficient spell selection through downranking, and proper mana management. Your Power Word: Shield prevents deaths that would otherwise require expensive emergency healing. Your Meditation talent allows you to heal longer than other specs. Your flexibility lets you adapt to any situation.
Whether you’re keeping your tank alive through difficult dungeon pulls, preventing raid wipes with timely shields, or simply enjoying the most mana-efficient healing spec in the game, Discipline Priest rewards skillful, thoughtful play. Start by mastering 5-man content with our WoW Classic Discipline Leveling Guide, then progress into raids using the strategies outlined in this guide.
Remember: the best healer isn’t always the one with the highest healing numbers—it’s the one who prevents deaths and keeps the group progressing. That’s where Discipline truly shines. ⚔️