Affliction Warlocks dominate sustained single-target damage in WoW Classic raids through powerful damage-over-time effects. This specialization excels in long boss encounters, where your DoTs can tick for their full duration, making you one of the most consistent DPS classes in endgame PvE content. For those looking to optimize their playstyle, this WoW Classic Affliction Warlock PvE Guide covers everything from talent choices to advanced strategies, ensuring you’re maximizing your DPS in raid environments.
Affliction provides exceptional sustained damage with minimal gear dependency in early raid tiers. Your DoT-based gameplay means you’re less affected by hit chance issues and can contribute meaningful DPS even with Pre-Raid BiS gear.
Key Strengths:
- Highest sustained single-target DPS among Warlock specs
- Excellent mana efficiency through Life Tap and Dark Pact
- Strong scaling with gear as raid tiers progress
- Shadow Mastery increases all shadow damage by 10%
- Provides debuff slots for raid-wide damage increase
Weaknesses:
- Limited debuff slots in 40-man raids (only 16 available)
- Vulnerable to boss mechanics requiring frequent movement
- Lower burst damage compared to Destruction
- Relies on long fight durations for optimal performance
Best Affliction PvE Talent Build
This talent distribution maximizes your single-target raid DPS while maintaining essential utility.
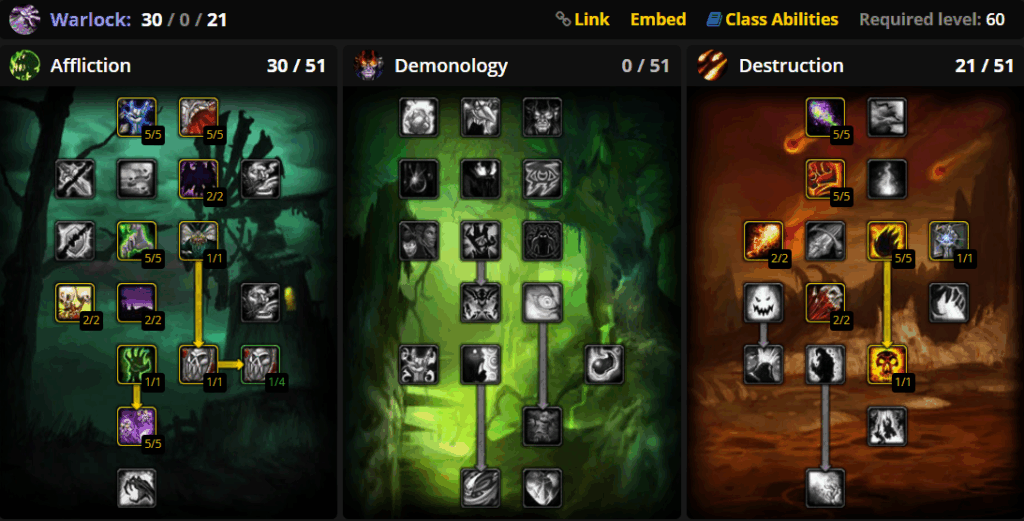
Alternative Builds: Some guilds require SM/Ruin hybrid build which sacrifices some Affliction talents for Ruin (Destruction capstone). Coordinate with your raid leader before selecting talents.
Raid Rotation and Priority System
Affliction uses a priority-based rotation that adapts to debuff slots and fight duration. Your goal is maintaining DoT uptime while filling gaps with Shadow Bolt casts.
Standard Single-Target Rotation
Pre-Pull (5 seconds before tank engages):
- Life Tap to ~50% HP (generates mana before combat)
- Apply Siphon Life if debuff slots allow
- Position at maximum range (30 yards)
Opening Sequence:
- Curse of Agony (or assigned curse)
- Corruption
- Siphon Life (if talented and slots available)
- Immolate (if slots available)
- Shadow Bolt spam until DoT refresh needed
Priority System During Fight:
- Maintain Curse of Agony – Never let this fall off
- Maintain Corruption – Refresh at 1-2 seconds remaining
- Maintain Siphon Life – Only if debuff slots permit
- Cast Shadow Bolt – Fill all downtime between DoT refreshes
- Life Tap – Convert HP to mana when below 40% mana
- Dark Pact – Use on cooldown if talented
Debuff Slot Management
Most guilds limit Warlock debuffs due to the 16-debuff cap. Coordinate with your raid leader for debuff priority.
High Priority Debuffs (Always Apply):
- Curse of Elements (Warlock assigned)
- Curse of Recklessness (Tank Warlock)
- Corruption (All Warlocks)
Medium Priority Debuffs (Situational):
- Curse of Agony (when not using CoE)
- Siphon Life (if slots available)
- Immolate (usually skipped for better debuffs)
Low Priority Debuffs (Skip in Raids):
- Curse of Weakness
- Curse of Tongues
- Curse of Exhaustion
Multi-Target Situations
Affliction excels when 2-3 targets exist simultaneously. Beyond three targets, consider respeccing to Destruction for AoE capabilities.
Two Target Strategy:
- Full DoT rotation on primary target
- Apply Corruption + Curse of Agony on secondary target
- Tab-target Shadow Bolt between both enemies
- Prioritize killing order based on raid leader calls
Three+ Target Strategy:
- Corruption on all targets
- Curse of Agony on primary target
- Shadow Bolt primary target until death
- Repeat for remaining enemies
Best in Slot Gear Progression
Your gear priority changes as raid tiers release. Focus on Hit Rating first, then Spell Power and Critical Strike.
Stat Priority
Until 16% Spell Hit:
- Hit Rating – Reach 16% hit cap (10% from talents + 6% from gear)
- Spell Power – Increases all damage
- Critical Strike – Scales with Ruin and Devastation
- Stamina – Survivability for raid mechanics
- Intellect – Larger mana pool
After Hit Cap:
- Spell Power
- Critical Strike
- Stamina
- Intellect
Pre-Raid Best in Slot
Before entering Molten Core, acquire these items from 5-man dungeons and world content.
| Slot | Item | Source |
|---|---|---|
| Head | Felcloth Hood (Crafted) | Tailoring |
| Neck | Jagged Bone Fist | LBRS Quest |
| Shoulders | Felcloth Shoulders (Crafted) | Tailoring |
| Back | Archivist Cape | Stratholme |
| Chest | Robe of Winter Night (Crafted) | Tailoring |
| Wrist | Sublime Wristguards | Uldaman Quest |
| Hands | Hands of Power | Scholomance |
| Waist | Ban’thok Sash | LBRS Quest |
| Legs | Skyshroud Leggings | Stratholme |
| Feet | Boots of the Full Moon | Dire Maul |
| Ring 1 | Fordring’s Seal | Western Plaguelands Quest |
| Ring 2 | Songstone of Ironforge | 30 Runecloth donation |
| Trinket 1 | Briarwood Reed | UBRS |
| Trinket 2 | Royal Seal of Eldre’Thalas | Dire Maul Tribute |
| Main Hand | Witchblade | Stratholme UD |
| Off-Hand | Drakestone of Shadow Wrath | Uldaman |
| Wand | Skul’s Ghastly Touch | Scholomance |
For complete gear lists across all raid tiers, visit our Pre-Raid BiS guide.
Phase 1 – Molten Core & Onyxia
| Slot | Item | Source |
|---|---|---|
| Head | Nemesis Skullcap | Molten Core (Tier 2) |
| Neck | Choker of the Fire Lord | Ragnaros |
| Shoulders | Mantle of the Blackwing Cabal | Molten Core |
| Back | Cloak of the Shrouded Mists | Onyxia |
| Chest | Robe of Volatile Power | Molten Core |
| Wrist | Bracers of Arcane Accuracy | Molten Core trash |
| Hands | Ebony Flame Gloves | Molten Core |
| Waist | Mana Igniting Cord | Molten Core trash |
| Legs | Nemesis Leggings | Molten Core (Tier 2) |
| Feet | Boots of the Shadow Flame | Molten Core |
| Ring 1 | Ring of Spell Power | Molten Core |
| Ring 2 | Talisman of Ephemeral Power | Molten Core |
| Trinket 1 | Briarwood Reed | UBRS (Pre-raid) |
| Trinket 2 | Tome of Fiery Arcana | Molten Core trash |
| Weapon | Staff of Dominance | Molten Core |
| Wand | Bloodcaller | Onyxia |
Phase 2 – Blackwing Lair
Blackwing Lair introduces significant upgrades that boost your DPS substantially.
| Slot | Item | Source |
|---|---|---|
| Head | Nemesis Skullcap | Molten Core |
| Neck | Pendant of the Fallen Dragon | Nefarian |
| Shoulders | Nemesis Spaulders | Nefarian (Tier 2) |
| Back | Cloak of the Brood Lord | Nefarian |
| Chest | Robe of Volatile Power | Molten Core |
| Wrist | Bracers of Arcane Accuracy | Molten Core |
| Hands | Ebony Flame Gloves | Molten Core |
| Waist | Mana Igniting Cord | Molten Core |
| Legs | Bloodtinged Kilt | Razorgore |
| Feet | Boots of Pure Thought | Chromaggus |
| Ring 1 | Pure Elementium Band | Razorgore |
| Ring 2 | Ring of Spell Power | Molten Core |
| Trinket 1 | Briarwood Reed | UBRS |
| Trinket 2 | Neltharion’s Tear | Nefarian |
| Weapon | Staff of the Shadow Flame | Nefarian |
| Wand | Bloodcaller | Onyxia |
Phase 3-6 – AQ40 & Naxxramas
Later phases introduce powerful upgrades from AQ40 and Naxxramas. Check Affliction Warlock main guide for complete Phase 3-6 BiS lists.
Essential Consumables
Maximize your raid performance with proper consumables. Budget approximately 50-100g per raid night for full consumables.
Pre-Raid Consumables (Mandatory)
| Consumable | Effect | Duration | Cost |
|---|---|---|---|
| Flask of Supreme Power | +150 Spell Power | 2 hours (persist through death) | 100-150g |
| Greater Arcane Elixir | +35 Spell Power | 1 hour | 5-8g |
| Elixir of Shadow Power | +40 Shadow Spell Power | 30 minutes | 2-4g |
| Brilliant Wizard Oil | +36 Spell Power, 1% crit | 30 minutes | 3-5g |
Note: Flasks are expensive but persist through death. Most guilds only require flasks for progression content or speed runs.
Food and Buff Items
| Consumable | Effect | Duration |
|---|---|---|
| Nightfin Soup | +8 MP5 | 15 minutes |
| Runn Tum Tuber Surprise | +10 Intellect | 15 minutes |
| Greater Shadow Protection Potion | +100 Shadow Resist | 2 hours |
| Major Mana Potion | Restore 1350-2250 mana | Instant (2min CD) |
Combat Consumables
| Item | Use | Notes |
|---|---|---|
| Demonic Rune | Instant 900-1500 mana | Life loss doesn’t generate threat |
| Major Healthstone | 1200-1500 HP heal | Always keep one ready |
| Limited Invulnerability Potion | 6 seconds immunity | Emergency only |
| Greater Firepower | +35 Spell Power | 30 seconds, share CD with potions |
Warlock-Specific Mechanics
Understanding Warlock mechanics optimizes your raid contribution beyond simple DPS.
Life Tap Mastery
Life Tap converts health into mana, allowing infinite mana sustain with healer support.
Optimal Life Tap Usage:
- Tap during movement phases (no DPS loss)
- Tap between Shadow Bolt casts when mana below 40%
- Never Life Tap below 30% HP (vulnerability to raid damage)
- Coordinate with healers to avoid strain during intensive healing phases
Life Tap Priority:
- Movement phases (highest priority)
- Boss downtime or immunity phases
- During normal rotation (if mana critical)
Curse Assignment
Most raids assign specific Warlocks to specific curses. Coordinate before pulls.
Common Curse Assignments:
- Curse of Elements – 1-2 Warlocks maintain permanent uptime
- Curse of Recklessness – Tank Warlock for boss positioning
- Curse of Agony – Remaining Warlocks (if debuff slots allow)
Some bosses require specific curses for mechanics. Always listen to raid leader instructions.
Soulstone Utility
Provide combat resurrection capability for raid recovery.
Soulstone Priority:
- Main Tank (most fights)
- Main Healer (high healing requirement fights)
- Off-Tank (situational)
Always soulstone before pull. Communicate in raid chat when used.
Healthstone Distribution
Create and distribute Healthstones before raid starts.
Distribution Strategy:
- Create Healthstones before raid start
- Trade to melee DPS first (highest risk)
- Distribute remainder to healers and casters
- Remind raid to use Healthstones during emergencies
Boss-Specific Strategies
Certain bosses require adjustments to your standard rotation or positioning.
Molten Core
Lucifron:
- Standard DoT rotation works perfectly
- Position spread for Impending Doom dispels
- Life Tap freely – healers have mana to spare
Magmadar:
- Fear immune – ignore Curse of Recklessness
- Use Curse of Agony or Curse of Elements
- Major healing phases reduce Life Tap safety
Gehennas:
- Standard rotation
- Spread positioning for Rain of Fire
- Limited movement requirements
Garr:
- Focus primary target (Garr himself)
- Do NOT apply DoTs to adds (heals Garr)
- Shadow Bolt spam only until adds die
Baron Geddon:
- Standard rotation
- Watch for Living Bomb – run out immediately
- Mana Shield if you receive Living Bomb
Shazzrah:
- High mobility fight
- Keep DoTs rolling, less Shadow Bolt uptime
- Counter Spell can interrupt your casts – continue rotation
Sulfuron Harbinger:
- Kill adds quickly
- Avoid pulling threat on respawned adds
- Standard rotation on Sulfuron between add phases
Golemagg:
- Standard rotation
- Dogs die to raid AoE – ignore them
- Very long fight – Life Tap aggressively
Majordomo Executus:
- Kill specific adds per raid strategy
- High movement fight
- Maintain Corruption, less Shadow Bolt uptime
Ragnaros:
- Submerge phases – stop DPS completely
- Sons of Flame phase – DoT all adds
- Extremely long fight – mana efficiency critical
Blackwing Lair
Razorgore:
- Phase 1: Kill adds, avoid eggs
- Phase 2: Full DPS rotation on Razorgore
- Conflagration dispels required frequently
Vaelastrasz:
- Infinite mana from Essence of the Red buff
- Spam Shadow Bolt non-stop
- Skip Life Tap entirely
- Use Major Mana Potions on cooldown
Broodlord Lashlayer:
- Standard rotation
- Mortal Strike on tanks – reduce Life Tap frequency
- High melee damage – stay max range
Firemaw/Ebonroc/Flamegor:
- Wing Buffet pushback – stand far from boss
- Limited DoT usage due to debuff cap
- Standard rotation otherwise
Chromaggus:
- Random breath abilities affect strategy
- Bronze breath – all DoTs halved duration
- Blue breath – arcane vulnerability – maintain full DoTs
- Adjust per breath combination
Nefarian:
- Class call – Warlocks STOP CASTING during call
- Infernals spawn and attack random players
- Phase 2 – full DoT rotation with high mobility
For more boss strategies, check the complete Warlock PvE guide hub.
Raid Utility and Group Composition
Warlocks provide essential utility beyond pure DPS contribution.
Summon Utility
- Summon late raiders or replacements during raid
- Coordinate with other Warlocks – requires 2 additional Warlocks and 1 shard each
- Save shards for crucial summons (main tank, main healer)
Healthstone Distribution
- Every raid member should have Healthstone before first pull
- Create new Healthstones during breaks
- Announce in raid chat when distributing
Soulstone Strategy
- Coordinate soulstone targets with other Warlocks
- Refresh soulstones every 30 minutes
- Communicate immediately when soulstone is used
Curse Management
- Never overwrite another Warlock’s curse without coordination
- Higher DPS Warlocks should use damage curses
- Lower DPS Warlocks maintain utility curses
Macros for Raiding
Essential macros streamline your raid performance and improve efficiency.
Soulstone Mouseover Macro
#showtooltip
/cast [@mouseover,help,nodead] Soulstone
Quickly soulstone targets without changing your current target.
Spell Lock Pet Macro
#showtooltip
/cast [pet:Felhunter] Spell Lock
/petattack [@pettarget,noexists]
Interrupt caster enemies with Felhunter.
Life Tap With Warning
#showtooltip Life Tap
/cast Life Tap
/script if UnitHealth("player")/UnitHealthMax("player") <= 0.3 then SendChatMessage("LOW HP - NEED HEAL","SAY") end
Alerts healers when you Life Tap to dangerous HP levels.
Curse of Elements Macro
#showtooltip Curse of Elements
/cast [@target] Curse of Elements
/script SendChatMessage("CoE Active - " ..UnitName("target"),"RAID")
Announces Curse of Elements application to raid.
Demonic Sacrifice Notification
#showtooltip
/cast Demonic Sacrifice
/y Demonic Sacrifice used - combat resurrection available if needed
Informs raid you’ve sacrificed your demon.
For more advanced macros, visit our Warlock Macros guide.
Common Mistakes to Avoid
Even experienced Warlocks make these errors. Identify and correct them for improved performance.
Exceeding Debuff Limit: Applying unnecessary DoTs when debuff slots are full pushes off important debuffs. Coordinate with raid leader for allowed debuffs.
Threat Management: Shadow Bolt generates significant threat. Monitor your threat meter constantly and stop DPS if approaching tank threat level.
Life Tapping at Low HP: Life Tapping below 30% HP risks death from raid-wide damage. Wait for heals before continuing Life Tap usage.
Ignoring Movement Mechanics: Standing in fire or avoidable damage wastes healer mana. Learn boss mechanics and move proactively.
Poor Shard Management: Running out of shards prevents summoning and Healthstone creation. Always farm 25+ shards before raid start.
Overwriting Curses: Never overwrite another Warlock’s assigned curse. Coordinate curse assignments clearly before pulls.
Inefficient Consumable Usage: Using expensive consumables on farm content wastes gold. Save Flasks and Greater Elixirs for progression bosses.
Advanced Tips for Maximum DPS
These advanced techniques separate good Affliction Warlocks from exceptional ones.
Shadow Bolt Weaving: Cast Shadow Bolt while DoTs have 3+ seconds remaining. With practice, you can finish the cast and immediately refresh DoTs without losing tick time.
Pre-Pull Life Tap: Life Tap to ~50% HP before pull starts. This generates free mana without combat healing requirements.
Nightfall Proc Recognition: When Nightfall procs (instant cast Shadow Bolt), immediately cast Shadow Bolt even if DoT refresh is imminent. The free instant cast increases overall DPS.
Mana Efficiency: Always keep mana above 30% for burst phases. Consistent Life Tapping throughout the fight prevents emergency Life Tap sessions that lower DPS.
Threat Dropping: If approaching threat limit, stop DPS for 3-5 seconds while maintaining DoTs. This prevents tank death while minimizing DPS loss.
Consume Shadows Usage: During downtime phases (boss immunity, add phases), use pet Consume Shadows for free healing. This reduces Life Tap frequency.
Dark Pact Timing: Cast Dark Pact immediately after pet uses Consume Shadows for free mana without draining pet resources.
Transitioning from Other Specs
Switching to Affliction from other Warlock specs requires rotation and talent adjustments.
From Demonology
- Lose Soul Link survivability – position more carefully
- Gain significant DPS increase on long fights
- Relearn DoT-based rotation instead of pet focus
- Acquire hit-capped gear immediately (no Suppression in Demonology)
Check the Demonology Warlock guide for spec comparison.
From Destruction
- Trade burst damage for sustained damage
- Longer ramp-up time (DoT application)
- Better mana efficiency overall
- Different consumable requirements
Compare with Destruction Warlock guide for detailed differences.
Frequently Asked Questions About PvE Affliction Warlock
Should I use Affliction or Destruction for raiding?
How many debuff slots do Affliction Warlocks need?
What spell hit percentage do I need for raids?
Should I use Nightfall proc immediately or save it?
Related Guides
Explore more Warlock content to master your class:
- Complete Warlock Guide Hub – Overview of all specs and playstyles
- Affliction Warlock Guide – Complete spec overview
- Affliction PvP Guide – Battlegrounds and world PvP strategies
- Warlock Talent Calculator – Plan your build
- Pre-Raid BiS Guide – Complete gear progression