Leveling as a Holy Priest in WoW Classic Era offers a unique balance between solo questing efficiency and dungeon healing capability. While Shadow is typically considered the fastest leveling spec after level 40, Holy provides excellent flexibility for players who enjoy running dungeons frequently while maintaining solid solo performance through smart talent choices and spell rotation.
This WoW Classic Holy Priest Leveling Guide covers everything you need to level your Holy Priest from 1 to 60, including optimal talent builds, rotation priorities, gear recommendations, and essential tips to minimize downtime and maximize efficiency.
Why Choose Holy for Leveling?
Holy Priest leveling is ideal for players who:
✅ Plan to run dungeons frequently while leveling ✅ Want to practice healing mechanics early ✅ Prefer a spec that transitions smoothly into endgame healing ✅ Enjoy supporting groups while maintaining decent solo capability
Key Advantages:
- Always in demand for dungeon groups
- Strong healing toolkit from early levels
- Excellent mana efficiency with proper talent choices
- Benefits from Spirit scaling through Spiritual Guidance
- Holy damage bypasses most enemy resistances
Considerations:
- Slower solo kill speed compared to Shadow (especially post-40)
- Less survivability than Discipline in PvP situations
- Requires good wand management for efficient leveling
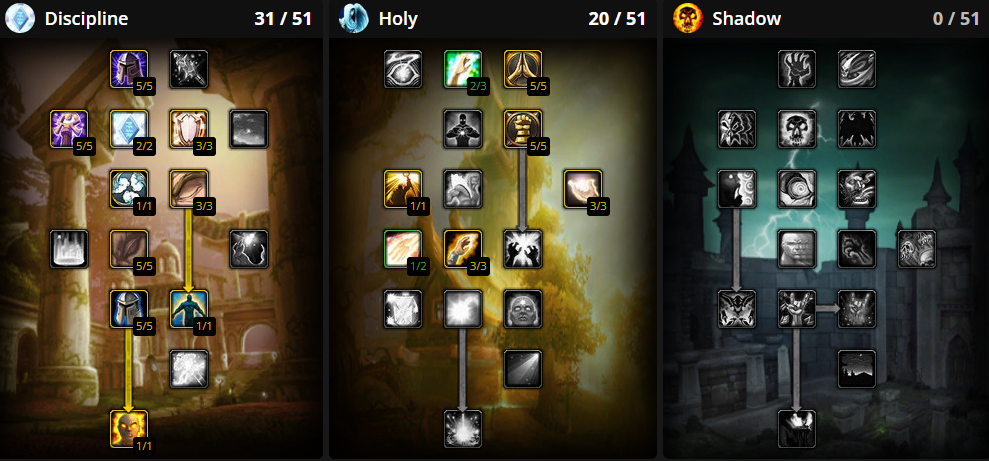
Holy Priest Talent Build Strategy (1-60)
The optimal Holy leveling build focuses on three priorities: wand damage enhancement, mana regeneration, and holy damage scaling. Your first 10 talent points are absolutely critical and remain valuable throughout your entire journey to 60.
Leveling Rotation & Spell Priority
Solo Questing Rotation (Levels 1-19)
Pre-Pull:
- Ensure Power Word: Fortitude buff is active
- Ensure Inner Fire buff is active
Combat Sequence:
- Cast Power Word: Shield on yourself (prevents spell pushback)
- Cast Smite or Mind Blast (use whichever is higher rank)
- Apply Shadow Word: Pain if mob will survive long enough for full DoT duration
- Wand until mob reaches ~50% health
- Continue wanding until mob dies
- Spirit Tap activates – begin regenerating mana immediately
Mana Management: The key to efficient leveling is finishing mobs with wand damage. Allow 2-3 seconds of wanding at the end of each fight before pulling the next mob. This activates mana regeneration from Spirit, dramatically reducing downtime.
Solo Questing Rotation (Levels 20-60)
Once you obtain Holy Fire at level 20, your rotation becomes more powerful:
Combat Sequence:
- Cast Power Word: Shield on yourself
- Cast Holy Fire (your strongest opener with DoT component)
- Cast 2-4 Smite depending on mob health and your mana reserves
- Apply Shadow Word: Pain if beneficial
- Wand until mob dies (usually at ~40-50% health)
- Enjoy Spirit Tap regeneration
Burst Rotation (Tough Mobs/Elites):
- Power Word: Shield
- Inner Focus (for free spell)
- Holy Fire
- Smite spam (3-5 casts)
- Shadow Word: Pain
- Mind Blast
- Wand to finish
Multi-Mob Situations: Holy Priest lacks strong AoE, so avoid pulling multiple mobs when possible. If you do pull extras:
- Power Word: Shield immediately
- Holy Fire on primary target
- Psychic Scream to fear mobs away (gives you ~8 seconds to kill one)
- Focus down one target with Smite + wand
- Re-shield and repeat
Dungeon Healing Rotation
Holy Priest excels at dungeon healing even with a leveling spec:
Single Target Healing:
- Flash Heal for emergency healing
- Greater Heal for efficient tank healing
- Renew for consistent damage intake
- Power Word: Shield before pulls or to prevent pushback
Group Healing:
- Prayer of Healing for party-wide damage (use sparingly due to mana cost)
- Renew on multiple targets
- Downrank heals as you progress (use lower ranks for smaller damage to conserve mana)
Buffing Priority:
- Power Word: Fortitude on all party members
- Inner Fire on yourself
- Shadow Protection if facing shadow damage enemies
Utility Spells:
- Dispel Magic for removing harmful magic effects
- Cure Disease for disease effects
- Shackle Undead for crowd control in undead-heavy dungeons
- Resurrection for recovering from wipes
Stat Priority & Gear Selection
Primary Stats
Spirit >>> Intellect > Spell Power > Stamina
Spirit is your most important stat throughout leveling for two reasons:
- Natural mana regeneration scales with Spirit
- Spirit Tap doubles your Spirit after kills
- Spiritual Guidance converts 25% of Spirit into spell power
With high Spirit, you’ll rarely need to drink, making your leveling experience extremely efficient.
Intellect increases your mana pool and critical strike chance. Important for sustained dungeon healing and burst damage windows.
Spell Power directly increases damage and healing. Rare on leveling gear but highly valuable when available.
Stamina provides survivability but is less critical due to Power Word: Shield and self-healing capabilities.
Gear Recommendations by Level Range
Levels 1-20:
- Prioritize “of the Owl” suffix gear (Intellect + Spirit)
- Keep Power Word: Fortitude buff active for bonus Stamina
- Focus on cloth armor for maximum stat benefits
Levels 20-40:
- Continue prioritizing Spirit and Intellect
- Look for gear with “of the Owl” or “of the Eagle” (Intellect + Stamina)
- Begin collecting dungeon pieces from Deadmines, Shadowfang Keep, and Blackfathom Deeps
Levels 40-60:
- Maintain Spirit focus for Spiritual Guidance synergy
- Collect Pre-Raid BiS healing pieces from level 50+ dungeons
- Balance between healing gear (for dungeons) and Spirit/Intellect gear (for solo play)
Notable Gear Pieces:
| Level | Slot | Item Name | Source |
|---|---|---|---|
| 18 | Trinket | Charged Gear | Blackfathom Deeps quest |
| 29 | Chest | Robes of Arugal | Shadowfang Keep |
| 40 | Legs | Burial Shawl | Razorfen Downs quest |
| 52 | Chest | Robe of the Magi | Crafted (Tailoring) |
| 56 | Trinket | Briarwood Reed | Jandice Barov (Scholomance) |
Wand Progression Guide
Wands are your most critical piece of equipment while leveling. With Wand Specialization providing 25% increased damage, keeping your wand current is more important than any other gear slot.
Essential Wand Upgrades
| Level | Wand Name | DPS | Source |
|---|---|---|---|
| 5 | Lesser Magic Wand | 15.1 | Crafted (Enchanting) – Buy from Auction House |
| 13 | Greater Magic Wand | 20.3 | Crafted (Enchanting) – Buy from Auction House |
| 17 | Cookie’s Stirring Rod | 24.3 | Deadmines – Drops from Cookie |
| 18 | Gravestone Scepter | 26.4 | Blackfathom Deeps quest reward |
| 25 | Skycaller | 31.3 | Gnomeregan – Drops from Electrocutioner 6000 |
| 41 | Blackbone Wand | 35.7 | Vendor sold in capital cities |
| 52 | Skul’s Ghastly Touch | 45.3 | Stratholme – Drops from Skul |
Important Notes:
🔥 Gravestone Scepter is exceptionally powerful and can carry you into your 40s. Prioritize obtaining this wand from the Blackfathom Villainy quest in Blackfathom Deeps.
💰 Lesser and Greater Magic Wands are crafted by Enchanters. Buy them from the Auction House rather than leveling Enchanting yourself.
⚡ After level 40-42, wand damage becomes less critical if you respec to Shadow, but remains valuable for mana conservation.
Class Quests & Racial Abilities
Priests gain unique racial spells at levels 10 and 20. These abilities vary significantly by race and can influence your leveling experience.
Level 10 Racial Abilities
Human/Dwarf: Desperate Prayer
- Instant heal for 1324-1657 health
- 10-minute cooldown
- Excellent emergency button for solo and dungeon content
Night Elf: Elune’s Grace
- Reduces ranged damage taken by 95 for 15 seconds
- Increases chance to dodge by 10%
- Situational but useful against ranged enemies
Troll: Hex of Weakness
- Reduces target’s physical damage by 20 for 2 minutes
- Lowers healing received by 20%
- Useful for difficult melee enemies
Undead: Touch of Weakness
- Causes attackers to take shadow damage and reduces their damage
- Passive defensive ability
- Moderate benefit in solo content
Level 20 Racial Abilities
Dwarf: Fear Ward (Best PvE Racial)
- Completely prevents the next fear effect on target
- 30-second duration, 30-second cooldown
- Invaluable for raid content and many dungeon bosses
Human: Desperate Prayer (Rank 2)
- Upgraded version of level 10 ability
- 2502-3127 healing
Night Elf: Starshards
- DoT ability dealing arcane damage over 6 seconds
- Minor DPS increase for solo leveling
Troll: Devouring Plague
- Disease DoT that heals you for damage dealt
- Excellent for solo survivability
Undead: Devouring Plague (Rank 1)
- Similar to Troll version
- Strong self-sustain ability
Quest Chains
Redemption Quest (Level 12): Learn the Resurrection spell to bring fallen allies back to life.
Blood of Morphaz Quest (Level 50+): Sunken Temple quest chain offering choice between:
- Woestave: Excellent healing wand
- Blessed Prayer Beads: Healing trinket with mana regeneration
Dungeon Recommendations by Level
Running dungeons while leveling provides excellent experience, gear upgrades, and healing practice. As Holy Priest, you’ll find groups instantly.
Recommended Dungeon Order
| Level Range | Dungeon | Notable Rewards |
|---|---|---|
| 15-25 | Deadmines | Cookie’s Stirring Rod (wand), Armor pieces |
| 18-24 | Wailing Caverns | Armor of the Fang set pieces |
| 20-30 | Shadowfang Keep | Robes of Arugal, various caster gear |
| 20-28 | Blackfathom Deeps | Gravestone Scepter (quest), cloth gear |
| 25-35 | Gnomeregan | Skycaller (wand), engineering items |
| 30-40 | Scarlet Monastery | Numerous excellent cloth pieces |
| 35-45 | Razorfen Downs | Burial Shawl (quest reward) |
| 40-50 | Uldaman | Various pre-raid gear |
| 45-55 | Zul’Farrak | Good caster gear, Carrot on a Stick |
| 52-60 | Blackrock Depths | Many Pre-BiS items |
| 55-60 | Scholomance | Best Pre-BiS healing gear |
| 55-60 | Stratholme | Skul’s Ghastly Touch (wand), healing gear |
Dungeon Healing Tips
✅ Communication: Let your tank know if you need mana before pulls
✅ Downranking: Use lower spell ranks to conserve mana on smaller damage
✅ Shield Timing: Pre-shield the tank before large pulls
✅ Dispel Awareness: Learn which debuffs are dangerous and dispel immediately
✅ Drink Between Pulls: Don’t let your mana drop below 50% if possible
Essential Spells & Spell Ranks to Buy
Not all spell ranks are worth purchasing while leveling. Here’s a priority list:
Must-Buy Spells
Every Rank:
- Power Word: Shield (your primary defensive tool)
- Flash Heal (emergency healing)
- Greater Heal (efficient tank healing)
- Renew (mana-efficient HoT)
- Holy Fire (primary damage spell at 20+)
- Smite (secondary damage spell)
Situational Ranks:
- Shadow Word: Pain (skip some ranks if tight on gold)
- Mind Blast (optional after level 30)
Utility Spells:
- Dispel Magic (level 18 – essential)
- Psychic Scream (level 14 – emergency CC)
- Cure Disease (level 22 – remove diseases)
- Levitate (level 34 – movement utility)
- Mind Soothe (level 20 – stealth past humanoids)
- Fade (level 8 – threat reduction)
Money-Saving Tips
💰 Skip intermediate ranks of Shadow Word: Pain if gold is tight – the damage increase per rank is minimal
💰 You don’t need every rank of Mind Blast after level 30 if you primarily use wand
💰 Lower ranks of healing spells are useful for downranking – keep 2-3 ranks of Flash Heal and Greater Heal
Professions for Leveling
Recommended Professions
Tailoring + Enchanting:
- Craft your own cloth armor upgrades
- Create wands through Enchanting (sell extras for profit)
- Disenchant unwanted items for materials
- Best long-term investment for endgame
Herbalism + Alchemy:
- Gather herbs while questing for gold
- Craft healing and mana potions
- Excellent gold-making combination
Skinning + Leatherworking:
- Less optimal for Priest but viable for gold
- Consider Skinning + any profession for easy gold
Mining + Engineering:
- Engineering provides useful gadgets and bombs
- Mining generates steady gold income
- Less synergy with Priest but fun
Enchanting Wand Crafting
If you choose Enchanting, you can craft your own early wands:
- Lesser Magic Wand (Enchanting 10): Requires Lesser Magic Essence, Simple Wood
- Greater Magic Wand (Enchanting 70): Requires Greater Magic Essence, Simple Wood
These wands can also be sold for profit in the Auction House as many Priests need them.
Advanced Leveling Tips & Tricks
Mana Management Mastery
🎯 The 5-Second Rule: Natural mana regeneration begins 5 seconds after your last spell cast. Finish enemies with wand damage to allow 2-3 seconds of regeneration before pulling the next mob.
🎯 Shield, Don’t Heal: Use Power Word: Shield proactively rather than healing reactively. Preventing damage is cheaper than healing it.
🎯 Wand at 40-50% HP: Don’t waste mana casting spells when enemies are low health. Switch to wanding earlier rather than later.
Combat Efficiency
⚡ Holy Fire First: Always open with Holy Fire at level 20+. It’s your hardest-hitting spell with a DoT component.
⚡ Skip Shadow Word: Pain on Fast Kills: If mobs die in 10-15 seconds, Shadow Word: Pain might not deal full damage. Use those globals for Smite instead.
⚡ Psychic Scream Positioning: When fearing multiple mobs, position yourself so they run in different directions. This prevents them from returning together.
Utility Spell Applications
🔧 Levitate for Shortcuts: Carry Light Feathers to use Levitate. Jump from cliffs safely or walk across water to skip long routes.
🔧 Mind Soothe for Stealth: This underrated spell allows you to get close to humanoid mobs without pulling. Combine with Fade to navigate dangerous areas.
🔧 Shackle Undead for Safety: In undead-heavy zones, shackle one mob while killing another. Essential for elite quests in Eastern/Western Plaguelands.
Gold-Making While Leveling
💎 Vendor Grays: Always sell gray items to vendors – they add up quickly
💎 Auction House Greens: Sell valuable “of the Owl” and “of the Eagle” items to other players
💎 Gather Everything: Pick up all cloth drops – Linen, Wool, Silk, and Mageweave sell well
💎 Run Dungeons: Dungeon gear sells for good vendor gold and chance at BoE blues
Common Mistakes to Avoid
❌ Neglecting Wand Upgrades: Your wand is more important than chest or legs pieces. Always upgrade when possible.
❌ Over-Healing in Dungeons: Don’t top off the tank to 100% constantly. Keep them above 60% and use the time to regenerate mana.
❌ Buying Every Spell Rank: You’ll waste hundreds of gold. Skip unnecessary ranks and buy only essential updates.
❌ Ignoring Spirit Gear: Spirit is your best stat for leveling. Don’t replace Spirit gear with Stamina gear unless absolutely necessary.
❌ Pulling Without Buffs: Always have Power Word: Fortitude and Inner Fire active. They’re free stats and protection.
❌ Forgetting to Respec: If you plan to switch to Shadow at 40, save gold for respec cost (1 gold first time).
Frequently Asked Questions
Should I level as Holy or Shadow Priest?
Is Wand Specialization really necessary?
When should I use Power Word: Shield?
Can I heal dungeons with a leveling spec?
What’s the best race for Holy Priest leveling?
Should I prioritize Spirit or Intellect gear?
When should I start running dungeons?
How important is spell hit rating while leveling?
Should I keep multiple ranks of healing spells?
What addons help with Holy Priest leveling?
When to Respec to Shadow
If you find Holy solo leveling too slow after level 40, consider respeccing to Shadow. Signs you should respec:
- Your dungeon runs have decreased significantly
- You’re spending most time on solo quests
- Kill times feel noticeably slower than other classes
- You have 50+ gold saved for the respec cost
The Shadow leveling spec with Shadowform dramatically increases kill speed and survivability through Vampiric Embrace. You can still heal dungeons as Shadow until level 55+, though less efficiently than Holy.
If you plan to heal at level 60, you’ll respec to a raid healing spec anyway, so don’t feel locked into Holy for the entire leveling journey.
Macros for Efficiency
Power Word: Shield + Holy Fire Macro
#showtooltip Holy Fire
/cast Power Word: Shield
/cast Holy Fire
Attempts to shield yourself then cast Holy Fire. Useful for quick combat engagement.
Desperate Prayer Macro (Human/Dwarf)
#showtooltip Desperate Prayer
/cast Desperate Prayer
Creates a dedicated button for your racial emergency heal.
Fade Macro
#showtooltip Fade
/cast Fade
Quick threat reduction when pulling aggro in dungeons.
Mouseover Healing Macro
#showtooltip Flash Heal
/cast [@mouseover,help,nodead] Flash Heal
Heal your mouseover target without deselecting current target. Essential for efficient dungeon healing.
Transition to Level 60
Once you reach level 60, your priorities shift toward raid preparation:
Immediate Goals:
- Obtain your endgame healing spec (typically 21/30/0 or similar)
- Farm Pre-Raid Best in Slot gear from Scholomance, Stratholme, and UBRS
- Complete Priest class quests for Benediction/Anathema (requires raid attunement)
- Stockpile consumables: Mana potions, Greater Arcane Elixirs, Flask of Distilled Wisdom
Recommended Links: For detailed level 60 information, visit our other guides:
- WoW Classic Holy Priest PvE Guide
- WoW Classic Priest Pre-Raid BiS Guide
- WoW Classic Priest Healing Guide
- WoW Classic Priest Macros
Final Thoughts
Leveling as Holy Priest in WoW Classic Era offers a rewarding experience that prepares you excellently for endgame healing. While not the fastest leveling spec, the combination of wand damage, Spirit Tap, and Spiritual Guidance creates smooth, efficient progression with minimal downtime.
Your ability to instantly find dungeon groups provides consistent experience gains and gear upgrades throughout your journey. By level 60, you’ll have extensive healing practice and mechanical understanding that Shadow-leveling Priests need to relearn.
Remember these core principles: keep your wand current, prioritize Spirit gear, use Power Word: Shield proactively, and let Spirit Tap work its magic between pulls. Master these fundamentals, and you’ll enjoy one of the smoothest leveling experiences in Classic WoW.
Good luck on your journey to 60, and may the Light guide your path!