Affliction Warlock provides the smoothest and most efficient leveling experience among all Warlock specializations in WoW Classic. With superior mana efficiency, excellent multi-target capabilities, and minimal downtime, Affliction allows you to chain-pull enemies while sustaining yourself through Drain Life.
This WoW Classic Affliction Warlock Leveling Guide covers everything you need to reach level 60 quickly and comfortably, including talent builds, rotation tips, and strategies for maximizing your efficiency as you level up.
Why Level as Affliction?
Affliction stands as the premier leveling spec for Warlocks due to its exceptional resource management and sustainability. You’ll spend less time drinking and more time killing.
Leveling Advantages
Best mana efficiency of all Warlock specs Minimal downtime between pulls Excellent multi-target damage with DoTs Self-healing through Drain Life and Siphon Life Can handle multiple enemies simultaneously Strong sustain in long grinding sessions Forgiving gameplay for new players Efficient for solo elite quests
Leveling Disadvantages
Slower single-target kill speed than Destruction Less burst damage for quick kills Relies on DoT damage over time Weaker in short dungeon pulls Lower damage in organized group content Requires more ability management Less satisfying for players who prefer burst
Affliction Warlock Leveling Talent Build
Your talent progression should maximize efficiency and sustainability while leveling from 1 to 60.
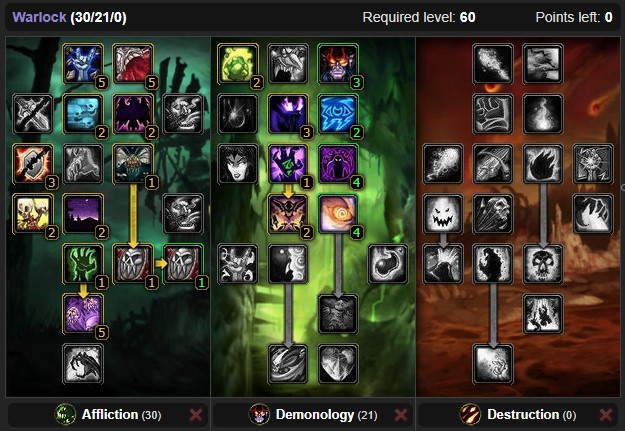
Levels 10-20: Foundation talents that improve your core abilities. Improved Corruption and Suppression are mandatory.
Levels 20-30: Efficiency talents that reduce downtime. Improved Life Tap and Fel Concentration keep you fighting longer.
Levels 30-40: Power spike with Siphon Life. This transforms your leveling experience completely.
Levels 40-60: Maximize damage and sustain. Shadow Mastery and Improved Drain Life make you nearly unstoppable.
Leveling Rotation by Level Range
Your rotation evolves significantly as you gain new abilities and talents throughout your journey.
Levels 1-9 (No Talents)
Basic Single Target:
| Step | Ability | Purpose |
|---|---|---|
| 1 | Immolate | Apply initial DoT |
| 2 | Corruption | Second DoT damage |
| 3 | Shadow Bolt | Filler damage |
| 4 | Wand | Conserve mana |
| 5 | Life Tap | Between fights only |
Strategy: Keep pulls simple and focus on learning spell timing. Don’t pull multiple enemies yet.
Levels 10-19 (Early Talents)
Optimized Rotation:
Cast Corruption (now instant with talent) Apply Curse of Agony Cast Immolate Spam Shadow Bolt if high mana Wand when mana drops below 40% Life Tap between fights
Two Enemy Pull:
- Apply Corruption to both targets
- Cast Curse of Agony on primary target
- Focus damage on one enemy
- Use Voidwalker to tank second enemy
- Drain Life if health drops
Levels 20-29 (Improved Efficiency)
Standard Rotation:
| Priority | Ability | Condition |
|---|---|---|
| 1 | Corruption | Always apply first |
| 2 | Curse of Agony | After Corruption |
| 3 | Immolate | If mana allows |
| 4 | Drain Life | Below 70% health |
| 5 | Shadow Bolt | High mana only |
| 6 | Wand | Primary filler |
Multi-Target (2-3 enemies):
- Apply Corruption to all targets
- Cast Curse of Agony on main target
- Use Drain Life to sustain through damage
- Wand to finish low health enemies
- Let Voidwalker hold aggro
Levels 30-39 (Siphon Life Power Spike)
Core Rotation with Siphon Life:
| Step | Ability | Notes |
|---|---|---|
| 1 | Corruption | Instant cast |
| 2 | Curse of Agony | Standard curse |
| 3 | Siphon Life | Major self-healing |
| 4 | Immolate | Optional if mana good |
| 5 | Drain Life | Sustain health |
| 6 | Wand | Finish enemies |
This is where Affliction becomes incredibly powerful. Siphon Life combined with Drain Life provides massive self-healing. You can now handle 2-3 enemies comfortably.
Three Enemy Pull:
- Apply Corruption to all three
- Cast Siphon Life on all three
- Add Curse of Agony to primary target
- Use Drain Life on different targets as needed
- Let DoTs kill everything while you stay full health
Levels 40-60 (Complete Build)
Full Affliction Rotation:
| Priority | Ability | Purpose |
|---|---|---|
| 1 | Corruption | Instant DoT |
| 2 | Siphon Life | Healing DoT |
| 3 | Curse of Agony | Damage curse |
| 4 | Immolate | Additional DoT |
| 5 | Drain Life | Active healing |
| 6 | Life Tap | Mana when healthy |
| 7 | Wand | Low mana filler |
Multi-Target Excellence (3-5 enemies):
With Improved Drain Life and Shadow Mastery, you become virtually unkillable:
- Apply Corruption to all targets (5 enemies maximum)
- Cast Siphon Life on all targets
- Add Curse of Agony to primary target
- Rotate Drain Life between different enemies
- Life Tap when health is full from healing
- Let DoTs finish everything
Against Elites:
- Apply all DoTs immediately
- Spam Drain Life for sustain
- Use Voidwalker to tank
- Refresh DoTs before expiration
- Life Tap when health exceeds 80%
- Can solo most elite quests
Pet Choice While Leveling Affliction Warlock
Choosing the appropriate demon significantly impacts your leveling efficiency and comfort.
Pet Recommendations by Level
| Level Range | Primary Pet | Backup Pet | Usage Scenario |
|---|---|---|---|
| 1-9 | Imp | None | Only option available |
| 10-29 | Voidwalker | Imp | Learning phase, survivability |
| 30-60 | Imp | Voidwalker | Maximum efficiency |
Detailed Pet Guide
Imp (Levels 1-60):
Best overall pet for leveling after level 30 Blood Pact provides stamina buff Stays at range safely Low mana cost to maintain Best choice for dungeon groups Use when confident and geared properly
Voidwalker (Levels 10-60):
Essential from levels 10-30 for survivability Tanks multiple enemies effectively Sacrifice provides emergency shield Use in dangerous zones and for elite quests Required when learning new areas Keep available for difficult content
Succubus (Levels 20+):
Seduction provides crowd control for 2+ enemies Higher damage than Voidwalker Useful in humanoid-heavy zones Good for handling multiple pulls Better than Voidwalker once comfortable
Felhunter (Levels 30+):
Excellent against caster-heavy zones Devour Magic removes dangerous buffs Spell Lock interrupts casting Use in zones with many casters Essential for caster elite mobs
Stat Priority While Leveling
Understanding which stats matter ensures you choose optimal quest rewards and gear upgrades.
Leveling Stat Priority
| Priority Rank | Stat | Why It Matters |
|---|---|---|
| 1 | Stamina | Survivability for multi-target pulls |
| 2 | Intellect | Larger mana pool for sustainability |
| 3 | Spirit | Faster mana regeneration between fights |
| 4 | Spell Power | Increases DoT and Drain damage |
| 5 | Spell Hit | Less important while leveling |
Stamina Importance: With Affliction’s drain tanking playstyle, high stamina allows you to pull more enemies and sustain through Life Tap usage.
Intellect Value: Larger mana pools mean more casts before needing to drink, directly improving leveling speed.
Spirit Benefit: While not affecting combat, spirit significantly reduces downtime between fighting sessions.
Spell Power: Nice bonus but not critical since DoTs scale well regardless and you’re wanding frequently.
Hit Rating: Against same-level enemies, hit matters less. Suppression talent provides sufficient accuracy for leveling.
Gear and Equipment
Focus on stamina and intellect from quest rewards while keeping your wand updated constantly.
Key Gear Pieces by Level
| Level | Slot | Item | Source |
|---|---|---|---|
| 13-17 | Chest | Robes of Arugal | Shadowfang Keep |
| 18-22 | Wand | Charred Razormane Wand | Barrens quest |
| 20-25 | Staff | Staff of Westfall | Deadmines quest |
| 25-30 | Shoulders | Mantle of Thieves | Scarlet Monastery |
| 30-35 | Chest | Robes of Insight | Various dungeons |
| 35-40 | Off-hand | Orb of the Forgotten Seer | Uldaman |
| 40-45 | Wand | Icefury Wand | Maraudon quest |
| 45-50 | Chest | Dreamweave Vest | Crafted/AH |
| 50-55 | Legs | Skyshroud Leggings | Dire Maul |
| 55-60 | Multiple | Pre-raid BiS pieces | Level 60 dungeons |
Wand Progression Guide
Wands are absolutely critical for Affliction leveling efficiency. Always maintain the highest DPS wand available.
Best Wands by Level:
| Level | Wand Name | DPS | Source |
|---|---|---|---|
| 5 | Lesser Magic Wand | 11.9 | Crafted (Enchanting) |
| 13 | Greater Magic Wand | 17.2 | Crafted (Enchanting) |
| 18 | Charred Razormane Wand | 23.4 | Barrens quest chain |
| 25 | Skycaller | 28.7 | Scarlet Monastery |
| 37 | Gravestone Scepter | 35.8 | Razorfen Downs |
| 43 | Icefury Wand | 42.1 | Maraudon quest |
| 51 | Inventor’s Focal Sword | 46.3 | BRD quest |
| 57 | Bonecreeper Stylus | 50.4 | Stratholme |
Wanding Strategy: Start wanding enemies at 40-50% health after DoTs are applied. This saves enormous amounts of mana over your leveling journey.
Best Leveling Zones
Following an optimized zone path maintains appropriate quest density and enemy levels for smooth progression.
Alliance Leveling Path
| Level Range | Primary Zone | Alternative Zone | Notes |
|---|---|---|---|
| 1-10 | Starting Zone | Race-specific | Complete all quests |
| 10-20 | Westfall | Darkshore/Loch Modan | Excellent quest density |
| 20-25 | Redridge Mountains | Duskwood | Stay until 25 |
| 25-30 | Duskwood | Wetlands | Strong quest chains |
| 30-35 | Stranglethorn Vale | Desolace | Best XP in game |
| 35-40 | Stranglethorn Vale | Arathi Highlands | Finish all STV quests |
| 40-45 | Tanaris | Feralas | Desert questing |
| 45-50 | Tanaris/Hinterlands | Searing Gorge | Mix zones |
| 50-55 | Un’Goro Crater | Felwood | Excellent quest chains |
| 55-60 | Western Plaguelands | Eastern Plaguelands | Final push to 60 |
Horde Leveling Path
| Level Range | Primary Zone | Alternative Zone | Notes |
|---|---|---|---|
| 1-10 | Starting Zone | Race-specific | Learn your class |
| 10-20 | The Barrens | Silverpine Forest | Massive zone |
| 20-25 | The Barrens | Hillsbrad Foothills | Complete Barrens |
| 25-30 | Stonetalon/Ashenvale | Thousand Needles | Multiple options |
| 30-35 | Stranglethorn Vale | Desolace | Neutral territory |
| 35-40 | Stranglethorn Vale | Arathi Highlands | Best XP available |
| 40-45 | Tanaris | Badlands | Desert zones |
| 45-50 | Tanaris/Hinterlands | Feralas | Multiple zone mix |
| 50-55 | Un’Goro Crater | Felwood | Dinosaur hunting |
| 55-60 | Western Plaguelands | Eastern Plaguelands | Endgame zones |
Class Quests Priority
Warlock-specific quests provide essential abilities and should be completed at appropriate levels.
Must-Complete Class Quests
| Level | Quest Chain | Reward | Priority | Completion Time |
|---|---|---|---|---|
| 10 | Voidwalker Quest | Summon Voidwalker | Critical | 30-45 minutes |
| 20 | Succubus Quest | Summon Succubus | High | 45-60 minutes |
| 30 | Felhunter Quest | Summon Felhunter | High | 60-90 minutes |
| 40 | Dreadsteed Quest | 60% Mount | Very High | 2-3 hours |
| 60 | Epic Dreadsteed | 100% Mount | Very High | 5-8 hours + gold |
Voidwalker Quest (Level 10):
Critical for survivability during early leveling Complete immediately when available at level 10 Required for handling dangerous zones Takes 30-45 minutes to complete Dramatically improves leveling experience
Succubus Quest (Level 20):
Provides valuable crowd control ability Complete around level 20-22 naturally Useful for handling multiple enemies Takes about 45-60 minutes Seduction improves multi-target pulls
Felhunter Quest (Level 30):
Essential for caster-heavy zones Complete before level 35 ideally Devour Magic and Spell Lock are powerful Takes 60-90 minutes to complete Makes caster fights significantly easier
Dreadsteed Quest (Level 40):
Saves significant gold on mount purchase Start at level 40 immediately Requires dungeon runs and materials Takes 2-3 hours with groups Free 60% speed mount
Epic Dreadsteed (Level 60):
Saves 900+ gold on epic mount Complex questline requiring materials Needs Scholomance and other dungeon runs Takes 5-8 hours plus 150-300 gold in materials Worth the investment for 100% speed mount
For detailed quest walkthroughs, visit the Warlock Quests Guide.
Dungeon Leveling Strategy
Dungeons provide excellent experience and gear when integrated properly with your questing path.
Recommended Dungeons by Level
| Dungeon | Level Range | Key Loot | Quest XP | Value Rating |
|---|---|---|---|---|
| Deadmines | 17-21 | Emberstone Staff | Good | Average |
| Shadowfang Keep | 18-25 | Robes of Arugal | Excellent | Very High |
| Blackfathom Deeps | 20-27 | Dextrous Armor | Good | Average |
| Scarlet Monastery | 28-42 | Multiple items | Excellent | Very High |
| Razorfen Kraul | 30-37 | Corpsemaker | Good | Low |
| Razorfen Downs | 37-42 | Gravestone Scepter | Good | Medium |
| Uldaman | 40-45 | Multiple caster items | Good | Medium |
| Zul’Farrak | 43-48 | Various upgrades | Good | Medium |
| Maraudon | 45-52 | Icefury Wand | Excellent | High |
| Sunken Temple | 50-55 | Various pieces | Average | Low |
| Blackrock Depths | 52-58 | Many pre-BiS items | Excellent | Very High |
Dungeon Performance as Affliction
Your Role:
- Apply DoTs to all targets in pulls
- Focus Drain Life on low-health enemies
- Use assigned curses consistently
- Provide crowd control with Fear when needed
- Create and distribute Healthstones before runs
- Soulstone the healer for emergency resurrection
- Summon group members as requested
Optimal Dungeon Rotation:
- Apply Corruption to all enemies in pull
- Cast Curse of Elements or assigned curse on primary target
- Apply Siphon Life to main target
- Cast Immolate on focus target
- Use Drain Life to finish low-health enemies
- Refresh DoTs as needed during long pulls
- Wand when mana drops below 30%
Dungeon vs Questing:
Run each dungeon once for quests and key gear pieces Dungeon grinding is slower than efficient questing Shadowfang Keep, Scarlet Monastery, and BRD provide best returns Avoid repeated runs unless farming specific items Mix one dungeon per level range with open world questing
Leveling Tips and Optimization
Drain Tanking Technique
The signature Affliction leveling strategy that separates good players from great ones.
How to Drain Tank:
- Pull 3-5 enemies simultaneously
- Apply Corruption to all targets
- Cast Siphon Life on all targets
- Add Curse of Agony to strongest enemy
- Rotate Drain Life between different targets
- Life Tap when health exceeds 80%
- Let DoTs kill everything while you stay full health
Why This Works:
Corruption + Siphon Life on multiple targets provides massive healing Drain Life sustains you through incoming damage Life Tap converts excess health back to mana You end fights at full health and full mana No downtime required between pulls
Mana Management Mastery
Life Tap Optimization:
Use Life Tap when health exceeds 70% Never Life Tap during heavy incoming damage Combine with Drain Life for health recovery Life Tap between pulls when at full health Drain tank multiple enemies to recover health after tapping
Minimize Drinking:
Affliction should rarely need to drink if played correctly Use drain tanking to sustain both resources Wand frequently to conserve mana Only drink when mana drops below 20% somehow Efficient play means drinking every 20-30 kills instead of every 5
Pull Optimization Strategies
Single Target (1 enemy):
- Apply all DoTs
- Drain Life for healing
- Wand when mana below 50%
- Very efficient but slower
Two Enemies:
- Corruption on both
- Siphon Life on both
- Curse of Agony on primary
- Drain Life both alternately
- Optimal efficiency
Three to Five Enemies:
- Corruption on all
- Siphon Life on all
- Curse of Agony on strongest
- Drain Life rotation
- Maximum efficiency peak
Six+ Enemies:
- Getting dangerous
- Use Voidwalker to tank
- Fear one or two
- Still apply DoTs to all
- Drain Life aggressively
Skill Training Priorities
Don’t waste gold training every spell rank. Focus on abilities you actively use.
Always Train Immediately:
Corruption (all ranks) – Your most-used spell Curse of Agony (all ranks) – Primary curse Siphon Life (all ranks) – Essential healing Drain Life (all ranks) – Core ability Life Tap (all ranks) – Mana generation Drain Soul (rank 1 only) – Shard farming
Train Selectively:
Shadow Bolt (every other rank) – Used less often Immolate (every other rank) – Optional DoT Fear (every 2-3 ranks) – Situational Health Funnel (every 2 ranks) – Pet healing Demon summoning (current rank) – Rarely cast
Skip or Delay:
Searing Pain – Rarely used while leveling Howl of Terror – Expensive and situational Hellfire – Too dangerous for leveling Rain of Fear – Mana inefficient Ritual of Doom – Not useful solo
Training Strategy:
Selective training saves 75-120 gold by level 60 This gold goes toward your level 40 mount Only train what you actually cast regularly Skip expensive ranks of rarely-used spells
Consumables and Buffs
Using appropriate consumables accelerates your leveling speed while reducing frustration.
Essential Consumables
| Item | Purpose | Usage Frequency |
|---|---|---|
| Food | Health regen | Rarely needed |
| Water | Mana regen | Rarely needed |
| Healthstones | Emergency heal | Keep on cooldown |
| Minor Mana Potion | Quick mana | Elite fights |
| Minor Health Potion | Emergency heal | Dangerous situations |
Note: Affliction needs consumables far less than other specs due to self-sustaining nature.
Beneficial Buffs to Request
When in groups or passing through cities, request these buffs:
Power Word: Fortitude (Priest) – Stamina increase Arcane Intellect (Mage) – Intellect boost Mark of the Wild (Druid) – All stats increase Blessing of Kings (Paladin) – Percentage stat increase Any stamina or intellect buffs available
Gold Making While Leveling
Warlocks have excellent gold-making potential during the leveling journey.
Gold Generation Methods
| Method | Gold per Hour | Effort Level | Recommended |
|---|---|---|---|
| Vendor Gray Items | Passive | None | Always do |
| Sell Cloth on AH | Variable | Low | Yes |
| Gathering Professions | 10-20g | Medium | Yes |
| Dungeon Farming | 5-15g | High | Situational |
| Crafting for Profit | Variable | High | If profitable |
| Solo Elite Farming | 15-25g | Medium | After level 40 |
Vendor Everything Gray: Always loot and vendor gray items. They accumulate to 50-100g by level 60.
Save All Cloth: Keep all cloth drops and sell in stacks at level 60 when prices are higher.
Gather While Questing: Take Herbalism or Mining to gather materials passively while questing.
Farm SM Cathedral: At level 35-40, farm Scarlet Monastery Cathedral for cloth and valuable drops.
Solo Elite Mobs: Your drain tanking ability lets you solo elites that drop valuable items.
Craft Bags: If you take Tailoring, craft bags to sell. Bags always have demand.
Common Leveling Mistakes
Avoid these frequent errors that slow down your leveling progress.
Critical Mistakes to Avoid
Not Using Drain Life: Many players neglect Drain Life, missing its incredible sustain value. Use it constantly.
Pulling Too Few: Affliction excels at multi-target. Pulling single enemies wastes your potential.
Wrong Pet Choice: Using Imp in dangerous zones causes deaths. Switch to Voidwalker when needed.
Training All Spells: Wastes gold on ranks you never use. Be selective with skill training.
Ignoring Wand Upgrades: Outdated wands slow leveling significantly. Always keep wand current.
Skipping Class Quests: Class quests provide essential abilities. Complete them on schedule.
Poor Drain Tanking: Not applying Corruption and Siphon Life to multiple targets before draining.
Excessive Drinking: Drinking frequently means you’re playing inefficiently. Use drain tanking properly.
Wrong Stat Priority: Chasing spell power over stamina and intellect reduces efficiency.
Solo Grinding Too Much: Questing provides more XP per hour than grinding. Follow quest paths.
Profession Recommendations
Choosing complementary professions enhances your leveling experience and provides long-term benefits.
Best Profession Combinations
| Primary | Secondary | Synergy Rating | Leveling Benefit | Endgame Value |
|---|---|---|---|---|
| Tailoring | Enchanting | Excellent | High | High |
| Herbalism | Alchemy | Good | Medium | High |
| Mining | Engineering | Good | Low | Medium |
| Skinning | Leatherworking | Poor | Low | Low |
| Herbalism | Mining | Excellent | High | High |
Tailoring + Enchanting (Recommended):
Make your own cloth gear while leveling Disenchant unwanted items for materials Provides consistent gear upgrades Strong gold-making at level 60 Bags sell well throughout journey Self-sufficient for gear needs
Herbalism + Alchemy:
Gather herbs passively while questing Create your own consumables Strong gold-making potential Useful raid consumables at 60 Low maintenance while leveling
Double Gathering (Best for Gold):
Take Herbalism + Mining or Skinning Maximum gold generation while leveling Gather materials passively Sell everything on auction house Can switch to crafting at 60 if desired Best option for mount gold
Engineering (Utility):
Provides utility items like bombs Teleporters save time at 60 Requires Mining as secondary Less useful during actual leveling More beneficial at max level
Transitioning to End Game
As you approach level 60, begin preparing for end-game content and character optimization.
Level 55-60 Preparation Checklist
Gear Preparation:
- Start running level 55+ dungeons for pre-raid BiS items
- Farm Stratholme, Scholomance, UBRS, and BRD
- Target specific pieces from Pre-BiS list
- Replace leveling gear with dungeon gear
Resource Stockpiling:
- Farm 20-25 Soul Shards for raid readiness
- Save 100+ gold for respec and consumables
- Stockpile crafting materials if relevant
- Gather reputation items for key factions
Quest Completion:
- Complete Onyxia attunement chain
- Finish any class quests remaining
- Do epic Dreadsteed quest chain
- Complete major quest chains for gold
Guild Preparation:
- Join an active raiding guild before 60
- Introduce yourself and schedule
- Learn raid times and requirements
- Prepare for smooth transition to raiding
Spec Consideration at Level 60
After reaching level 60, evaluate whether to maintain Affliction or respec for optimization.
Stay Affliction if:
You enjoy the sustained damage playstyle Your guild needs DoT damage You primarily PvP in battlegrounds You farm content solo frequently Your raid spot doesn’t demand specific spec
Consider SM/Ruin Hybrid:
Best overall raid DPS for Warlocks Combines Shadow Mastery with Destruction Balanced performance in all content Most guilds prefer this build Strong in both PvE and PvP
Respec to Destruction if:
You prefer burst damage playstyle Your guild needs execute damage You PvP in dueling scenarios You enjoy faster-paced gameplay
For complete end-game spec information, visit the main Affliction Warlock Guide.
For general leveling information across all specs, check the Warlock Leveling Guide hub.
Conclusion
Affliction Warlock provides the smoothest and most efficient leveling experience in WoW Classic. Through superior mana efficiency, excellent multi-target capabilities, and incredible self-sustain, you’ll reach level 60 with minimal frustration and maximum speed.
Master the drain tanking technique by pulling multiple enemies and sustaining through Corruption and Siphon Life healing. Keep your wand updated, manage Life Tap efficiently, and rarely need to drink. Choose appropriate pets for each situation and complete class quests on schedule.
By following this guide, you’ll experience one of the best leveling journeys in Classic while preparing yourself for successful end-game content. For complete Warlock information covering all specializations, explore the main Warlock Guide hub.