 World of Warcraft Guides, Lore, Addons & News – Noob to Boss From Azeroth's Newbie to Champion – World of Warcraft Guides
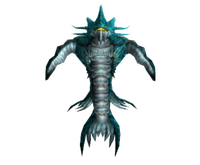
The Lurker Below is the second boss most raids face in Serpentshrine Cavern during TBC Classic Anniversary (The Burning Crusade), and it’s widely considered the easiest encounter in the raid — guilds even nickname it “the loot below.” Unlike every other boss in the instance, Lurker doesn’t just stand around waiting for you. Your raid has to fish him out of his pool before the fight can even begin.
This guide covers everything you need: how to summon the boss, every ability in the fight, role-by-role positioning, and the gear it drops.
📌 Quick takeaways:
- Requires a raider with 300+ Fishing skill to summon
- Six trash platforms must be cleared first to “boil” the water
- Two repeating phases: surface combat, then a 60-second add wave
- No resistance gear required — unlike Hydross and Leotheras
- Drops priest and tank best-in-slot items, including The Seal of Danzalar
Who Is The Lurker Below? Quick Lore
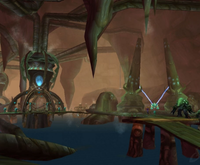
The Lurker Below is an ancient sea creature that lives beneath the central pool in Serpentshrine Cavern’s entrance hall, surrounded by six smaller platforms. It’s typically the second boss guilds kill, often right after Hydross the Unstable, since it requires no resistance gear and is one of the more forgiving fights in the raid.
For the bigger picture on raid pathing, attunement, and gearing, check our Serpentshrine Cavern Overview and SSC Attunement Guide.
How to Summon The Lurker Below
This is the part that trips up fresh raids the most:
- Clear all six surrounding trash platforms first. This kills the Coilfang Frenzy piranhas swimming in the pool and “boils” the water.
- A raid member with 300 Fishing skill or higher needs to fish directly in the central pool.
- Casting takes anywhere from one attempt up to several minutes — there’s no guaranteed proc.
- Once hooked, The Lurker Below surfaces and the encounter begins automatically.
⚠️ Skipping the platform clear makes the pull nearly impossible — the Frenzy adds will shred your fisher and anyone standing nearby.
Abilities & Mechanics
The fight alternates between two phases roughly every two minutes.
| Phase | Duration | What Happens |
|---|---|---|
| Phase 1 — Surface | ~120 sec | Lurker attacks normally; melee and ranged manage Spout and Whirl |
| Phase 2 — Submerge | 60 sec | Boss is untargetable; 9 adds spawn across the platforms |
Key abilities during Phase 1:
- Spout — A rotating water beam that sweeps 360° around the boss, knocking back and damaging anyone it touches. Jump into the water to avoid it; just don’t spam jump in and out, since each entry deals its own tick of damage.
- Whirl — Hits everyone in melee range with physical damage and a knockback. Melee should hug the boss tightly to avoid being launched into the water.
- Water Bolt — A heavy single-target hit that only fires if nobody is in melee range. As long as your tank stays on the boss, this never comes up.
- Geyser — Knocks back and damages everyone within roughly 10 yards of a random target. Spreading out minimizes how many players get caught by each cast.
Phase 2 — the submerge add wave: When Lurker dives, nine adds spawn: six Coilfang Ambushers (two per outer platform, ranged) and three Coilfang Guardians (melee, on the center platform). All of them can be crowd controlled.
Role-by-Role Strategy
Tanks
- Hold the boss at the very edge of the main platform, facing away from the raid.
- Stay ready to use a gap-closer (Intercept, Charge) in case Whirl knocks you into the water.
- During Phase 2, pick up the three Coilfang Guardians immediately — they hit hard if left unchecked.
Healers
- Watch for Geyser splash damage and Spout knockback damage on anyone slow to react.
- Keep an eye on whichever DPS gets tagged by Water Bolt if the tank ever loses the boss.
Melee DPS
- Stay in tight melee range to avoid triggering Water Bolt.
- Move with the boss during Spout instead of jumping in the water — only dive in if the beam is about to hit you.
- During Phase 2, help clear the Coilfang Guardians, then rotate out to assist with leftover Ambushers.
Ranged DPS & CC
- Spread across the three outer platforms before the pull.
- When Lurker submerges, immediately crowd control your assigned Coilfang Ambusher and hold it until your platform group is ready to burn it down.
- Jump into the water for Spout — it’s safer than the knockback.
For full comp recommendations, see our Best Classes & Comp for SSC guide.
Loot & Rewards
The Lurker Below doesn’t drop a Tier 5 token, but it does drop some of the best non-set items in Serpentshrine Cavern, including:
- Earring of Soulful Meditation — A priest-only healing trinket that’s close to best-in-slot for most of Phase 2.
- The Seal of Danzalar — A versatile ring valued by both tanks and PvP casters.
For the complete drop list across every difficulty and class, check the dedicated SSC Loot Table & Tier 5 Guide.
Pro Tips
- ✅ Pre-assign which CC class covers which outer platform before the pull — don’t sort it out mid-fight.
- ✅ Bring at least one extra healer compared to other SSC bosses; the constant Geyser and Spout chip damage adds up.
- ❌ Don’t let melee fight the boss from inside the water — the extra environmental damage isn’t worth dodging Whirl.
- ❌ Don’t forget to level Fishing past 300 before raid night. It’s an easy thing to overlook during Phase 2 prep.