Restoration Shamans are the backbone of Horde raid healing in WoW Classic. With Chain Heal, versatile totems, and strong raid support, they keep groups alive through the toughest encounters.
This WoW Classic Restoration Shaman PvE Healing Guide covers talent builds, rotations, BiS gear, consumables, and boss-specific strategies to help you maximize your healing potential in PvE.
Related Guides:
- WoW Classic Restoration Shaman Guide – Overview of Restoration specialization
- WoW Classic Shaman Guide – Main hub for all Shaman content
- WoW Classic Restoration Shaman PvP Guide – Battleground and arena healing
Why Play Restoration Shaman in PvE?
Restoration Shamans are the most desired healers on the Horde side for several compelling reasons:
Raid Necessity:
- Every raid wants 6-8 Restoration Shamans to ensure totem coverage in all groups
- Chain Heal provides the strongest area-of-effect healing in the game
- Totems like Windfury, Strength of Earth, and Tranquil Air dramatically increase raid DPS
- Utility totems (Tremor, Poison Cleansing, Fire Resistance) solve specific encounter mechanics
Guaranteed Raid Spots:
- High demand means you’ll always find a guild looking for Restoration Shamans
- Less competition for healing gear compared to Priests or Druids
- Viable and powerful from Molten Core through Naxxramas
- Scales exceptionally well with gear in later content phases
Versatile Healing Style:
- Can focus on raid healing (Chain Heal spam) or tank healing (Healing Wave)
- Hybrid nature allows occasional DPS contributions with low-healing encounters
- Reincarnation provides a free battle resurrection once per hour
Best Race for Restoration Shaman PvE
Shamans are exclusive to the Horde, with three race options: Troll, Orc, and Tauren.
Troll (Best Choice for PvE)
Why Troll is Best: Trolls are the optimal PvE race due to their Berserking racial ability, which directly improves healing throughput during critical moments.
Racial Abilities:
- Berserking: 3-minute cooldown that increases casting speed by 10-30% based on missing health for 10 seconds. When timed correctly during heavy raid damage phases, this allows you to cast Chain Heal significantly faster, potentially preventing wipes.
- Regeneration: 10% increased health regeneration, with 10% continuing in combat (minor quality of life benefit)
- Beast Slaying: 5% damage bonus against Beasts (useful while leveling)
- Bow Specialization / Throwing Specialization: No benefit for healing
Strategic Use of Berserking: Berserking becomes more powerful as your health drops, so using it immediately after taking raid damage (such as from Lucifron’s Impending Doom or Vaelastrasz’s Burning Adrenaline) maximizes its effectiveness. At 30% health, you gain the full 30% casting speed increase, turning your 2.5-second Chain Heal into a 1.75-second cast.
Orc (Decent Alternative)
Racial Abilities:
- Hardiness: 25% stun resistance (better for PvP than PvE)
- Axe Specialization: +5 weapon skill with Axes (can help if using axes for melee DPS on farm content)
- Blood Fury: Increases melee attack power but reduces healing received (not useful for Restoration)
- Command: Pet damage increase (irrelevant for Shamans)
Orcs lack a meaningful PvE healing racial, making them inferior to Trolls for raiding purposes. However, if you plan to PvP frequently, Hardiness makes Orcs the superior choice overall.
Tauren (Balanced Option)
Racial Abilities:
- War Stomp: 2-minute AoE stun (more useful in PvP and dungeons than raids)
- Endurance: 5% increased total health (200-300 extra HP at level 60)
- Nature Resistance: +10 Nature Resistance (minor benefit)
- Cultivation: +15 Herbalism skill (quality of life for gold farming)
Taurens provide extra survivability through Endurance but lack throughput-increasing racials. The larger hitbox can be problematic in tight raid positioning scenarios.
Race Recommendation: Choose Troll for maximum PvE healing performance. Choose Orc if you prioritize PvP alongside raiding. Choose Tauren if you prefer their aesthetic or want a middle-ground option.
Talent Tree Calculator Builds for Restoration Shaman PvE
Restoration Shamans have limited flexibility in talent allocation due to how powerful the Restoration tree is. Nearly all viable PvE builds invest 31+ points into Restoration, with remaining points distributed between Enhancement and Elemental depending on your raid role.
Why This Build? This build maximizes both healing throughput and support utility for melee-heavy groups. Windfury Totem is the single most powerful buff for Warriors and Rogues, and Improved Weapon Totems makes it even stronger. The 12 points in Enhancement ensure your melee DPS perform at their peak while you keep them alive with Chain Heal.
Best For: Shamans assigned to groups with Warriors, Rogues, or Enhancement Shamans
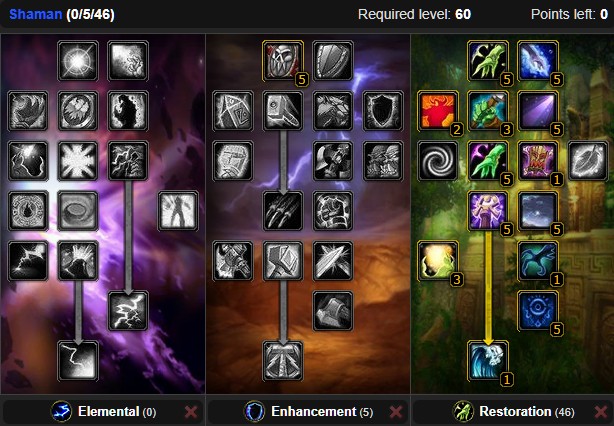
Deep Restoration Caster Group (5/5/41 or 0/5/46)
This build focuses on pure healing throughput for Shamans assigned to caster-heavy groups.
Restoration Tree (41-46 points):
- All core healing talents from the previous build
- 5/5 Restorative Totems: Increases Healing Stream Totem healing and Mana Spring Totem effect by 25% (valuable for casters)
- 5/5 Healing Grace: Reduces threat generated by healing spells by 5% per point (15% total with 3 points, 25% with 5 – important for avoiding tank threat issues)
- 3/3 Improved Healing Wave and other optional talents depending on points available
Enhancement Tree (5 points):
- 5/5 Ancestral Knowledge: Increases mana pool by 5% (mandatory)
Why This Build? With fewer points invested in Enhancement, you gain access to deeper Restoration talents like Healing Grace (threat reduction) and Restorative Totems (stronger passive healing and mana regeneration). This build is ideal when you’re in a caster group where Windfury Totem isn’t useful, allowing you to focus entirely on healing optimization.
Best For: Shamans assigned to ranged DPS or healer groups
Totem Utility Hybrid (0/22/29)
This is a specialized build used primarily in farm content where healing demand is low and maximizing raid DPS becomes the priority.
Enhancement Tree (22 points):
- 5/5 Ancestral Knowledge: Mana pool increase
- 5/5 Flurry: Increases attack speed by 30% after landing a critical strike (allows you to proc Nightfall or Annihilator more frequently)
- 3/3 Enhancing Totems: Stronger Strength of Earth and Grace of Air Totems
- 2/2 Improved Weapon Totems: Stronger Windfury Totem
- 5/5 Anticipation: Increases defense skill by 10 (reduces chance to be crit)
- 2/2 Improved Ghost Wolf: Mobility
Restoration Tree (29 points):
- Core healing talents including Improved Healing Wave, Tidal Focus, Purification, Nature’s Swiftness
- Does NOT include Mana Tide Totem (you sacrifice mana regeneration for DPS utility)
Why This Build? Once your guild is comfortably farming content, healing requirements drop significantly. This build allows you to “totem twist” (alternating between Windfury Totem and Grace of Air Totem to provide both buffs simultaneously) while also contributing melee DPS with weapons like Nightfall or Annihilator. Flurry increases your proc chances for these weapons, boosting raid DPS.
Totem Twisting Mechanic:
- Drop Windfury Totem → all melee receive 10-second Windfury weapon buff
- Immediately drop Grace of Air Totem → melee now have both Windfury buff and Grace of Air buff
- Before 10 seconds expire, drop Windfury Totem again → refresh Windfury weapon buff
- Repeat the cycle
Best For: Farm content, guilds with excess healing, and Shamans comfortable with hybrid playstyles
For detailed talent calculator, visit our Shaman talent calculator.
Warning: This build is not recommended for progression raiding due to lack of Mana Tide Totem and reduced healing talents.
Restoration Shaman Stat Priority
Stat priorities differ slightly depending on whether you’re focusing on tank healing or raid healing, but generally follow the same hierarchy.
Primary Stats (Always Prioritize)
1. +Healing Power
- Your single most important stat
- Directly increases healing done by all healing spells
- Chain Heal benefits from +healing on each jump
- Prioritize +healing on every piece of gear whenever possible
- Goal: 800+ healing power in Phase 1, 1200+ in later phases
2. Mana per 5 Seconds (MP5)
- Critical for mana sustainability in long encounters
- Provides mana regeneration regardless of whether you’re casting (unlike Spirit)
- Each point of MP5 = 1 mana every 5 seconds, even while casting
- Goal: 100+ MP5 in Phase 1, 150+ in later phases
3. Intellect
- Increases maximum mana pool by 15 mana per point
- Provides minor spell critical strike chance (1% per 60 Intellect)
- Larger mana pool allows you to cast more heals before going OOM
- Goal: 300+ Intellect at level 60
Secondary Stats
4. Spell Critical Strike
- Increases chance for critical heals
- Procs Ancestral Healing (+25% armor buff on critical heal targets)
- Less valuable than +Healing or MP5, but still beneficial
- Goal: 10-15% spell crit
5. Stamina
- Provides survivability through increased health
- Less important in PvE than PvP, but helps survive raid damage
- Don’t sacrifice healing stats for Stamina in raids
- Goal: 4000+ health unbuffed
Stats to Avoid
Spirit:
- Provides mana regeneration only during the “five-second rule” (5 seconds after casting)
- Since you’re constantly casting heals in raids, Spirit is nearly useless
- Avoid prioritizing Spirit over MP5, Intellect, or +Healing
- Minor benefit: Does help with mana regeneration while drinking or out of combat
Spell Hit / Spell Penetration:
- Completely irrelevant for healing spells (healing spells cannot miss)
- Only matters if you’re DPSing with Lightning Bolt or Shocks (rare in raids)
Weapon Skill:
- Only relevant if you’re using the Totem Utility build and DPSing with Nightfall/Annihilator
- Max weapon skill reduces miss chance and increases crit chance for melee attacks
Restoration Shaman PvE Rotation and Gameplay
Restoration Shaman healing is deceptively simple on the surface but requires mastery of mana management, positioning, and situational awareness.
Core Healing Spells
Chain Heal (Primary Spell):
- Your signature ability and most-used spell
- Heals initial target, then jumps to 2 additional nearby targets
- Each jump heals for 50% less than the previous jump
- 2.5-second cast time baseline (2.0 seconds with Improved Healing Wave)
- Extremely mana-intensive at max rank
Downranking Chain Heal: Chain Heal is so expensive that you cannot sustain max-rank spam throughout an entire encounter. Downranking is mandatory for mana efficiency:
- Rank 1 Chain Heal: Use 50-60% of the time when raid damage is moderate. Extremely mana-efficient and still applies Ancestral Healing on crits.
- Rank 2 Chain Heal: Use when raid damage is moderate-to-heavy.
- Rank 3 Chain Heal: Use only during intense AoE damage phases or when mana is abundant.
Pro Tip: Even Rank 1 Chain Heal provides more total healing per mana spent than spamming max-rank Healing Wave. You’ll cast more heals and keep more people alive by downranking intelligently.
Healing Wave (Tank Healing):
- Powerful single-target heal with 3-second cast time (2.5 seconds with Improved Healing Wave)
- High mana cost but massive healing output
- Use for tank healing or burst healing on critical targets
- Combine with Nature’s Swiftness for instant full heal on emergency situations
- Only use if talented into Healing Way or assigned as dedicated tank healer
Lesser Healing Wave (Emergency Heal):
- Fast 1.5-second cast time
- Lower healing output but quicker emergency response
- Higher mana efficiency than Healing Wave for small amounts of healing
- Use to save raid members who suddenly drop low or are about to die
- Can be downranked for extremely mana-efficient spot healing
Healing Stream Totem (Passive Healing):
- Drops a totem that heals party members every 2 seconds
- Low mana cost, 5-minute duration
- Use at the start of encounters for passive supplemental healing
- Refreshed by Restorative Totems talent if talented
Raid Healing Rotation
Pre-Pull Checklist:
- Drop all four totems (Windfury/Grace of Air, Strength of Earth, Searing Totem, Mana Spring Totem)
- Ensure Healing Stream Totem is active
- If tank healing with Healing Way talent, pre-stack 3x Healing Way on tank with Rank 1 Healing Wave
- Check mana consumables (mana potions, Demonic Runes, Mageblood Potion active)
During Encounter:
Step 1: Chain Heal Spam (80% of your casts)
- Target the lowest-health raid member with Chain Heal
- Prioritize targets surrounded by other injured players (maximizes jump value)
- Alternate between Rank 1, Rank 2, and Rank 3 based on damage intensity and mana reserves
- Avoid overhealing (don’t cast if targets are above 80% health unless heavy incoming damage expected)
Step 2: Emergency Lesser Healing Wave
- If a raid member suddenly drops below 30% health, immediately cast Lesser Healing Wave on them
- Use Nature’s Swiftness + Healing Wave for tanks or critical raid members about to die
Step 3: Tank Spot Healing (if needed)
- If assigned as backup tank healer, weave Healing Wave casts on tank between Chain Heals
- Monitor tank health closely and prioritize tank survival over raid members
Step 4: Manage Cooldowns
- Use Mana Tide Totem on cooldown (4-minute CD) during high-damage phases
- Use Nature’s Swiftness only for emergency instant heals (3-minute CD)
- Coordinate Mana Tide Totem with other Shamans to stagger mana regeneration
Step 5: Mana Management
- At 70% mana: Drink a Mageblood Potion if not already active (lasts 30 minutes, +12 MP5)
- At 50% mana: Use Major Mana Potion (restores ~1800 mana, 2-minute cooldown)
- At 30% mana: Use Demonic Rune or Dark Rune (restores 900-1500 mana at cost of health, no shared cooldown with mana potions)
- At 10% mana: Drop Mana Tide Totem immediately if available
Step 6: Maintain Totems
- Refresh totems as they expire or when repositioning
- Ensure Windfury/Grace of Air is always active for your group
- Swap to situational totems as needed (Tremor Totem for fears, Fire Resistance Totem for fire damage)
Tank Healing Rotation (If Assigned)
Pre-Pull:
- Pre-stack 3x Healing Way on tank using Rank 1 Healing Wave before encounter begins
During Encounter:
Step 1: Maintain Healing Way Stacks
- Keep 3 stacks of Healing Way active on tank at all times
- If stacks drop, reapply immediately with Healing Wave
Step 2: Prioritize Tank Survival
- Use appropriate Healing Wave rank based on incoming damage:
- Rank 4-6: Moderate tank damage
- Rank 8-10: Heavy tank damage
- Max Rank: Tank dropping rapidly or preparing for big hit
Step 3: Emergency Responses
- If tank drops below 30%, cast Nature’s Swiftness + Healing Wave for instant full heal
- Weave in Lesser Healing Wave if tank health spikes down unexpectedly
Step 4: “Fishing” for Ancestral Healing
- During low-damage moments, cast Rank 1 Healing Wave repeatedly to “fish” for critical strikes
- Critical heals apply Ancestral Healing (+25% armor) to tank, reducing physical damage taken
Step 5: Supplement with Chain Heal
- If tank is stable and raid is taking damage, throw Chain Heals targeting melee near tank
- Chain Heal jumps will keep melee alive while healing tank
Totem Management in Raids
Group-Specific Totem Assignments:
Melee Groups (Warriors, Rogues, Enhancement Shamans):
- Air: Windfury Totem (mandatory – single most powerful DPS buff for melee)
- Earth: Strength of Earth Totem (+77 Strength for entire group)
- Fire: Searing Totem (adds minor DPS)
- Water: Mana Spring Totem (mana regeneration) or Healing Stream Totem (passive healing)
Ranged/Caster Groups:
- Air: Tranquil Air Totem (reduces threat by 20% – essential for threat-sensitive casters)
- Earth: Stoneskin Totem (reduces physical damage taken) or Strength of Earth Totem if hunters present
- Fire: Searing Totem or Totem of Wrath (if available in later phases)
- Water: Mana Spring Totem (mandatory for casters)
Tank Groups:
- Air: Windfury Totem (if melee) or Tranquil Air Totem (if caster/healer heavy)
- Earth: Stoneskin Totem (reduces physical damage on tank)
- Fire: Searing Totem
- Water: Mana Spring Totem
Situational Totems (Boss-Specific):
- Tremor Totem: Use against fear mechanics (Magmadar’s Panic, Onyxia’s Bellowing Roar, Nefarian’s Fear)
- Fire Resistance Totem: Use on high fire damage encounters (Vaelastrasz, Firemaw, Ragnaros)
- Frost Resistance Totem: Use on frost damage encounters (Sapphiron)
- Poison Cleansing Totem: Use on heavy poison encounters (Viscidus, Huhuran)
- Disease Cleansing Totem: Use on disease-heavy encounters (Heigan, Loatheb)
- Grounding Totem: Use in dungeons or situational raid encounters to absorb hostile spells
Totem Twisting (Advanced Technique): If using Totem Utility build and in a melee group:
- Drop Windfury Totem → melee receive 10-second Windfury weapon buff
- Immediately replace with Grace of Air Totem → melee now have both buffs
- Before 10 seconds expire, drop Windfury Totem again
- Repeat cycle while healing between totem drops
Warning: Only totem twist if healing demand is low. Never risk raid members dying to optimize totem buffs.
Best Professions for Restoration Shaman PvE
Professions provide significant benefits for endgame raiding, from crafting consumables to accessing unique gear and tools.
Tier 1: Essential Professions
Alchemy (Best for Raiding)
- Why: Restoration Shamans consume massive amounts of mana potions. Crafting your own saves hundreds of gold per week.
- Key Benefits:
- Craft Major Mana Potions, Mageblood Potions, and Elixirs
- Transmute: Arcanite cooldown generates 50+ gold per day with minimal effort
- Flask crafting (if you obtain rare flask recipes from guild)
- Some alchemists gain Elixir Master specialization for bonus procs on elixir creation
Recommended Pairing: Herbalism (for self-sufficient material gathering)
check out our wow classic alchmey leveling guide
Herbalism (Best Gathering Profession)
- Why: Pairs perfectly with Alchemy and provides consistent gold income
- Key Benefits:
- Gather herbs for Alchemy crafting
- Black Lotus farming: Black Lotus is extremely valuable (50-100+ gold each) and required for flask creation
- Consistent gold income from selling herbs on Auction House
- Tauren racial bonus: Taurens get +15 Herbalism skill from Cultivation racial
Recommended Pairing: Alchemy
Tier 2: Strong Alternatives
Engineering (Best for Min-Maxing)
- Why: Provides unique tools and gadgets unavailable to other professions
- Key Benefits (Gnomish Engineering):
- Gnomish Battle Chicken: BoP trinket that summons a pet with chance to increase melee attack speed of party by 5%
- Arcanite Dragonling: BoP trinket that summons a pet which debuffs enemies to take increased fire damage
- Dense Dynamite / Goblin Sapper Charge: Adds burst AoE damage on trash pulls or specific boss encounters
- Reflector trinkets: (Hyper-Radiant Flame Reflector, Gyrofreeze Ice Reflector) situationally useful in PvE
Drawback: Extremely expensive to level and maintain. Restoration Shamans have weak solo farming capabilities, making material costs burdensome.
Recommended Pairing: Herbalism (to fund Engineering costs) or Mining
Tailoring (Passive Gold Generation)
- Why: Provides passive gold income with minimal time investment
- Key Benefits:
- Mooncloth cooldown: Craft Mooncloth once every 4 days, selling for 15-30 gold with near-zero effort
- Craft bags for personal use or selling
- No gathering profession required
Recommended Pairing: Enchanting (for disenchanting drops) or Alchemy
Professions to Avoid
Leatherworking / Blacksmithing / Mining:
- Provide no meaningful benefit for Restoration Shamans
- Restoration gear comes from dungeons, raids, and crafted cloth/mail pieces
- Not recommended unless you’re leveling a DPS off-spec that benefits from these professions
Boss-Specific Strategies and Tips
Molten Core Encounters
Lucifron:
- Challenge: Impending Doom curse causes heavy AoE raid damage
- Strategy: Spam Chain Heal (Rank 1-2) to keep raid topped off between curse applications
- Totems: Fire Resistance Totem for tank group
Magmadar:
- Challenge: Panic fear mechanic affects entire raid
- Strategy: Drop Tremor Totem before Panic cast to remove fear immediately
- Critical: Coordinate with other Shamans to ensure every group has Tremor Totem coverage
Gehennas:
- Challenge: Rain of Fire and curse mechanics
- Strategy: Focus Chain Heal on melee groups taking Rain of Fire damage
- Totems: Fire Resistance Totem for melee groups
Garr:
- Challenge: Adds explode on death, causing raid-wide damage
- Strategy: Prepare Chain Heal spam when adds die. Use Rank 3 Chain Heal for maximum throughput.
Baron Geddon:
- Challenge: Living Bomb on random raid members
- Strategy: Watch for Living Bomb debuff, prepare to heal bombed target after explosion
Shazzrah:
- Challenge: Arcane Explosion spam, frequent blinks
- Strategy: Melee groups take heavy damage. Spam Chain Heal targeting melee.
- Totems: Grounding Totem can absorb Arcane Explosion (situational)
Sulfuron Harbinger:
- Challenge: Flamestrike AoE, heal-over-time effects
- Strategy: Standard Chain Heal rotation, low healing requirements
Golemagg the Incinerator:
- Challenge: Earthquake AoE, tank takes heavy fire damage
- Strategy: Keep tank topped with Healing Wave, raid heal with Chain Heal during Earthquake
- Totems: Fire Resistance Totem for tank group
Majordomo Executus:
- Challenge: Heavy damage reflection on tanks
- Strategy: Backup tank healing required. Use Healing Wave to keep tanks stable.
Ragnaros:
- Challenge: Wrath of Ragnaros (melee knockback + heavy damage), Elemental Fire DoT, Sons of Flame phase
- Strategy: Spam Chain Heal during Sons phase (heavy raid AoE). Keep melee topped before Wrath of Ragnaros.
- Totems: Fire Resistance Totem mandatory for tank group
Blackwing Lair Encounters
Razorgore the Untamed:
- Challenge: Constant add spawns, heavy raid-wide damage
- Strategy: Spam Chain Heal throughout entire encounter. Conserve mana for Phase 2 burn.
- Totems: All standard DPS totems
Vaelastrasz the Corrupt:
- Challenge: Burning Adrenaline debuff, constant tank damage, tight DPS race
- Strategy: Use Healing Focus talent to avoid interruption. If you get Burning Adrenaline, spam Chain Heal until death.
- Consumables: Use all mana consumables aggressively; fight is only 3 minutes long.
- Totems: Windfury Totem for maximum melee DPS
Broodlord Lashlayer:
- Challenge: Mortal Strike on tank (healing reduction)
- Strategy: Tank healing intensive. Use high-rank Healing Wave and coordinate with other healers.
Firemaw:
- Challenge: Flame Buffet stacking debuff, Wing Buffet knockback
- Strategy: Spam Chain Heal to counter Flame Buffet damage. Position carefully to avoid knockback.
- Totems: Fire Resistance Totem for tank group
Chromaggus:
- Challenge: Multiple breath attacks, random debuffs, high tank damage
- Strategy: Be ready to dispel curses/poisons. Tank healing + raid healing hybrid approach.
- Totems: Situational resistance totems based on breath colors
Nefarian:
- Challenge: Class calls (Shaman call drains mana), Corrupted Healing (healing damages instead), add waves
- Strategy: During Shaman call, STOP CASTING IMMEDIATELY to avoid mana drain. Spam Chain Heal during add waves.
- Critical: Drop all totems before class call phase, as you cannot cast during it.
AQ40 Encounters
Prophet Skeram:
- Challenge: Mind Control, teleports, splitting into three clones
- Strategy: Focused tank healing on marked tanks. Spam Chain Heal when mind control breaks.
Fankriss the Unyielding:
- Challenge: Tank swap mechanic, worm add spawns
- Strategy: Keep both tanks topped. Chain Heal melee during worm spawns.
Princess Huhuran:
- Challenge: Berserk enrage at 30%, heavy poison damage
- Strategy: Drop Poison Cleansing Totem immediately at pull. Spam Chain Heal during enrage burn.
Twin Emperors:
- Challenge: Tank swap every 45 seconds, teleports, heavy tank damage
- Strategy: Coordinate with healers for tank swaps. One Shaman per emperor recommended.
- Totems: Arcane Resistance Totem for caster tanks
C’Thun:
- Challenge: Multi-phase fight, stomach phase, eye beam instant kills, tentacle adds
- Strategy: Spam Chain Heal during stomach phase (heavy AoE). Focused tank healing on Giant Eye Tentacles.
- Critical: Save Nature’s Swiftness for emergency stomach phase saves.
Naxxramas Encounters
Anub’Rekhan:
- Challenge: Locust Swarm massive raid damage
- Strategy: Spam max-rank Chain Heal during Locust Swarm. Use all cooldowns (Mana Tide, Nature’s Swiftness, consumables).
Heigan the Unclean:
- Challenge: Dance mechanic, heavy DoT damage
- Strategy: Keep Chain Heal rolling on raid during dance. Use Ghost Wolf for mobility if needed.
Loatheb:
- Challenge: Healing cooldown (60-second lockout on healing), massive shadow damage
- Strategy: Stack 3x Healing Way on tank before fight. Use consumables aggressively during healing windows.
Sapphiron:
- Challenge: Icebolt freeze, Frost Aura raid-wide damage, Blizzard
- Strategy: Spam Chain Heal to counter Frost Aura. Save Nature’s Swiftness for Icebolt emergencies.
- Totems: Frost Resistance Totem mandatory
Kel’Thuzad:
- Challenge: Multi-phase fight, add waves, Frost Blast, Chains
- Strategy: Spam Chain Heal during Phase 1 add waves. Tank healing + raid healing hybrid in Phase 3.
- Critical: Save Mana Tide Totem for Phase 3 mana management.
Advanced Tips and Tricks
Mana Management Mastery
The Golden Rule: Never go OOM (out of mana) before the boss dies. It’s better to heal 20% less throughout the fight than to go OOM at 50% boss health.
Optimal Mana Consumption Rate:
- For 5-minute encounters: Aim to use 20% mana per minute
- For 10-minute encounters: Aim to use 10% mana per minute
- Always keep 20% mana reserve for unexpected burst damage phases
Consumable Timing:
- Major Mana Potion: Use at 50% mana (2-minute CD allows 2-3 uses per fight)
- Demonic/Dark Rune: Use immediately after mana potion CD expires
- Mana Tide Totem: Use during heavy damage phases where raid needs maximum healing
Positioning and Awareness
Chain Heal Jump Optimization:
- Stand within 12 yards of injured raid members to maximize jump targets
- Target the lowest-health player surrounded by other injured players
- In spread-out encounters, prioritize healing melee groups (easier Chain Heal bounces)
Totem Placement:
- Drop totems centrally in your assigned group’s position
- Totems have 20-yard range; ensure all 5 group members are in range
- Reposition totems when raid moves (but don’t pull trash!)
Threat Management:
- Use low-rank heals early in fights to avoid pulling aggro
- Enchant cloak with Subtlety (-2% threat)
- Let tanks build threat for 5-10 seconds before spamming max-rank Chain Heal
Healing Assignment Communication
Typical Shaman Assignments:
- Melee Group Shamans: Focus 80% Chain Heal, 20% tank spot healing
- Ranged Group Shamans: Focus 100% raid healing with Chain Heal
- Tank Healer Shamans: Focus 70% Healing Wave on tank, 30% raid Chain Heal
Communicate with your healing team to avoid heal sniping (wasted overhealing).
Addons for Restoration Shaman
Essential addons dramatically improve healing performance and quality of life.
Healing Addons:
- Healbot / VuhDo / Grid + Clique: Allows click-casting heals on raid frames
- Decursive: One-button decursing for curse/poison removal
- Omen Threat Meter: Monitors your healing threat to avoid pulling aggro
Utility Addons:
- TotemTimers: Tracks totem durations and cooldowns
- BigWigs / Deadly Boss Mods: Encounter warnings and timers
- WeakAuras: Custom alerts for important cooldowns (Nature’s Swiftness, Mana Tide Totem)
Conclusion
Restoration Shamans are the cornerstone of Horde raid healing in WoW Classic PvE. With their unparalleled AoE healing through Chain Heal, essential totem support, and versatile healing toolkit, they remain in high demand from Molten Core through Naxxramas.
Mastering Restoration Shaman requires perfecting mana management, optimizing downranking strategies, and understanding encounter-specific mechanics. By following this guide’s talent builds, gearing paths, consumable strategies, and boss-specific tips, you’ll become an indispensable member of your raid team.
Ready to dive deeper? Check out our related guides:
- WoW Classic Restoration Shaman Healing PvP Guide – Master battleground and arena healing
- WoW Classic Shaman Totems Guide – Complete totem usage reference
- WoW Classic Shaman Macros Guide – Essential macros for healing efficiency
- Complete WoW Classic Restoration Shaman Healing Guide – Return to overview
May your Chain Heals always crit, your mana never run dry, and your Windfury Totems proc endlessly! 🌊⚡